> ## Documentation Index
> Fetch the complete documentation index at: https://docs.gcore.com/llms.txt
> Use this file to discover all available pages before exploring further.
# Install kubectl and connect to a Kubernetes cluster
kubectl is the standard command-line client for Kubernetes. It communicates with the Kubernetes API server to create, update, and manage cluster resources. For a complete list of commands, see the [kubectl official documentation](https://kubernetes.io/docs/reference/generated/kubectl/kubectl-commands).
The procedures below cover installing kubectl, downloading the cluster kubeconfig from the Customer Portal, and verifying the connection. For a graphical alternative, [Lens](https://k8slens.dev) provides a desktop interface for managing clusters without the command line.
## Install kubectl and connect from Windows
1\. Download kubectl for Windows. The example below downloads v1.36.0. For the latest version, find the updated command in the [Kubernetes official documentation](https://kubernetes.io/docs/tasks/tools/install-kubectl-windows/#install-kubectl-binary-with-curl-on-windows):
```sh theme={null}
curl.exe -LO https://dl.k8s.io/release/v1.36.0/bin/windows/amd64/kubectl.exe
```
2\. Add the directory containing **kubectl.exe** to the **PATH** environment variable so the system can find it. First, copy the download path from the command line:
 Then navigate to **Windows settings** > **System** > **About** > **Advanced system settings** (or right-click **This PC** and select **Properties** > **Advanced system settings**):
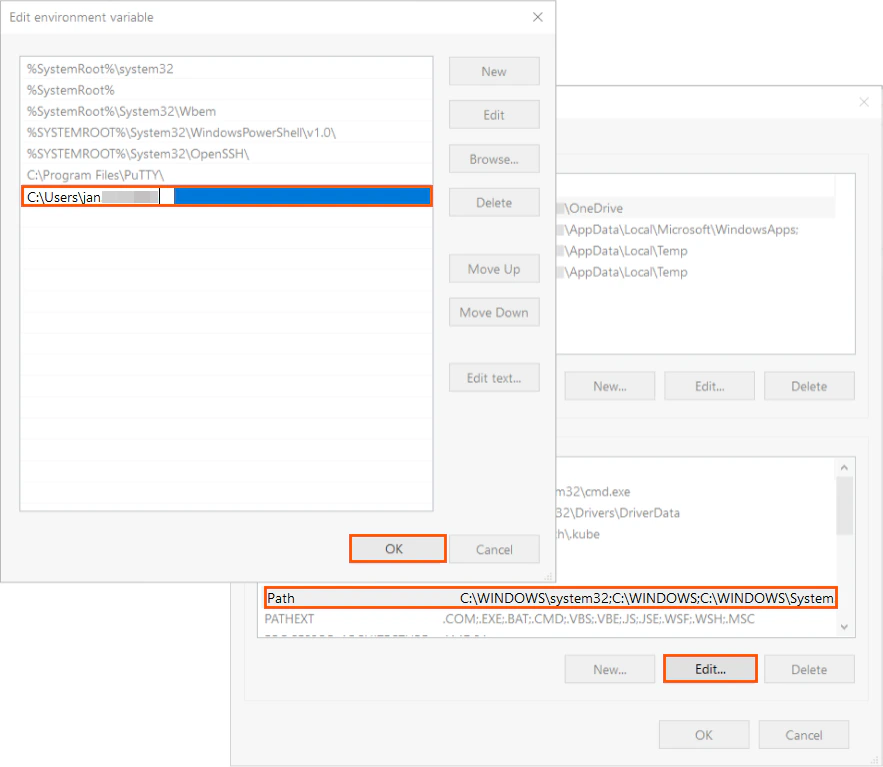
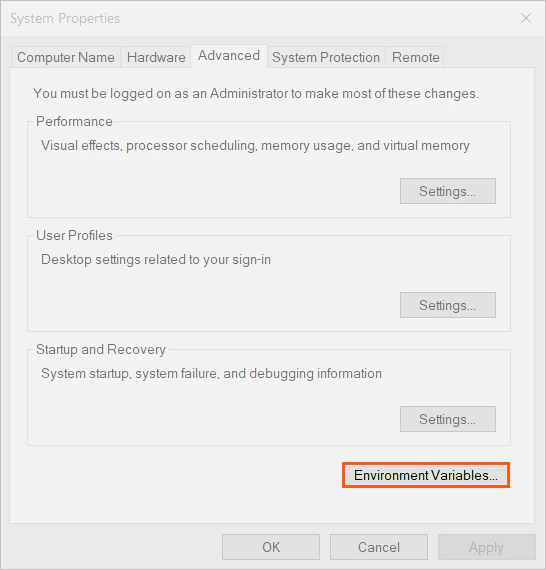 In the dialog, click **Environment Variables**, double-click the **Path** system variable, paste the kubectl.exe path into the bottom empty field, and save the changes:
 With kubectl available in the system PATH, the next steps configure cluster access.
3\. Create the `.kube` directory in `C:\Users\[username]` to store the cluster configuration file:
With kubectl available in the system PATH, the next steps configure cluster access.
3\. Create the `.kube` directory in `C:\Users\[username]` to store the cluster configuration file:
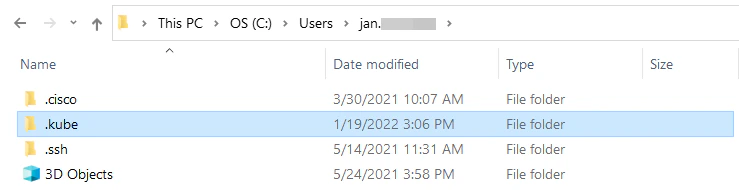 4\. In the [Gcore Customer Portal](https://portal.gcore.com), navigate to **Cloud** > **Managed Kubernetes**, click the cluster name, then click **Kubernetes config** to download the configuration file:
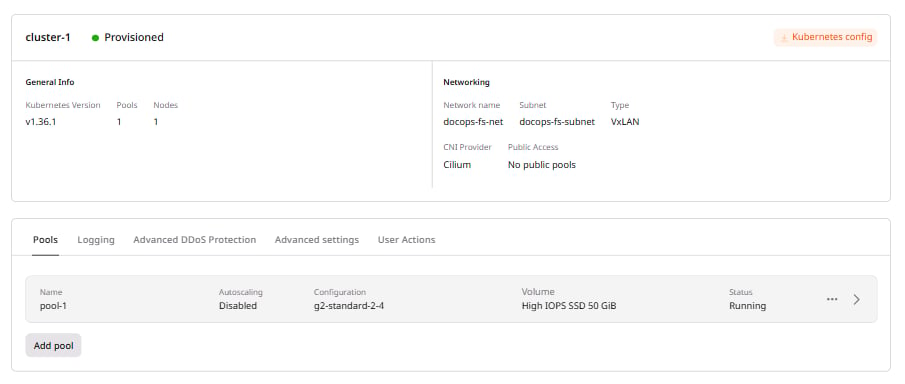 5\. Rename the downloaded file to `config` (no extension) and place it in the `.kube` folder. kubectl can now access it:
 6\. Verify kubectl can reach the cluster:
```sh theme={null}
kubectl get pods
```
Either result — `No resources found in default namespace` or a list of running pods — confirms kubectl is correctly configured.
## Install kubectl and connect from Ubuntu or Linux
1\. Download the latest stable kubectl binary:
```sh theme={null}
curl -LO "https://dl.k8s.io/release/$(curl -L -s https://dl.k8s.io/release/stable.txt)/bin/linux/amd64/kubectl"
```
2\. Make the kubectl binary executable:
```sh theme={null}
chmod +x ./kubectl
```
3\. Move the binary to a directory in the **PATH** variable:
```sh theme={null}
sudo mv ./kubectl /usr/local/bin/kubectl
```
With kubectl installed, the next steps configure cluster access.
4\. Create the `.kube` directory in the home directory:
```sh theme={null}
mkdir ~/.kube
```
5\. In the Customer Portal, navigate to **Cloud** > **Managed Kubernetes**, click the cluster name, then click **Kubernetes config** to download the configuration file:
6\. Rename the downloaded file to `config` (no extension) and place it in the `.kube` folder:
6\. Verify kubectl can reach the cluster:
```sh theme={null}
kubectl get pods
```
Either result — `No resources found in default namespace` or a list of running pods — confirms kubectl is correctly configured.
## Install kubectl and connect from Ubuntu or Linux
1\. Download the latest stable kubectl binary:
```sh theme={null}
curl -LO "https://dl.k8s.io/release/$(curl -L -s https://dl.k8s.io/release/stable.txt)/bin/linux/amd64/kubectl"
```
2\. Make the kubectl binary executable:
```sh theme={null}
chmod +x ./kubectl
```
3\. Move the binary to a directory in the **PATH** variable:
```sh theme={null}
sudo mv ./kubectl /usr/local/bin/kubectl
```
With kubectl installed, the next steps configure cluster access.
4\. Create the `.kube` directory in the home directory:
```sh theme={null}
mkdir ~/.kube
```
5\. In the Customer Portal, navigate to **Cloud** > **Managed Kubernetes**, click the cluster name, then click **Kubernetes config** to download the configuration file:
6\. Rename the downloaded file to `config` (no extension) and place it in the `.kube` folder:
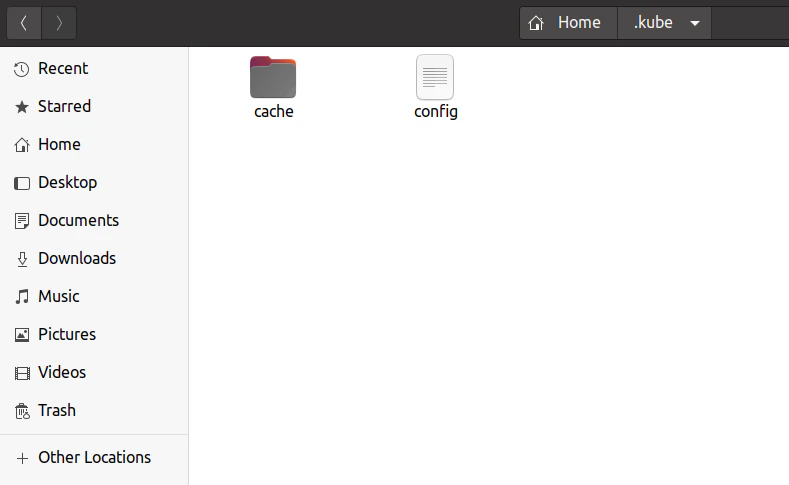 7\. Confirm cluster access:
```sh theme={null}
kubectl get pods
```
Successful output confirms that kubectl can communicate with the cluster.
## Install kubectl and connect from macOS
1\. Download the latest stable kubectl binary. For Intel Macs, use `amd64`; for Apple Silicon (M1/M2/M3), use `arm64`:
```sh theme={null}
curl -LO "https://dl.k8s.io/release/$(curl -L -s https://dl.k8s.io/release/stable.txt)/bin/darwin/amd64/kubectl"
```
2\. Make the binary executable:
```sh theme={null}
chmod +x ./kubectl
```
3\. Move the binary to a directory in the **PATH** variable. Check which directories are in PATH:
```sh theme={null}
echo $PATH
```
Select a directory from the output and move kubectl there. For example:
```sh theme={null}
sudo mv ./kubectl /usr/local/bin/kubectl
```
With kubectl installed, the next steps configure cluster access.
4\. Create the `.kube` directory in the home directory:
```sh theme={null}
mkdir ~/.kube
```
5\. In the Customer Portal, navigate to **Cloud** > **Managed Kubernetes**, click the cluster name, then click **Kubernetes config** to download the configuration file:
6\. Rename the downloaded file to `config` (no extension) and place it in the `.kube` folder.
7\. Test the connection:
```sh theme={null}
kubectl get pods
```
If the command returns pod information or reports that no resources exist, the connection is working correctly.
## Renewal of kubectl certificates
Gcore renews kubectl access certificates every two years. Notifications are sent before the renewal date:
* **In the Customer Portal**: a notification appears with the expiry date and a reminder to download the new kubeconfig from the cluster page.
* **Via email**: two weeks before the renewal date, an email is sent with the renewal date. After the certificate is updated, a confirmation email is sent with a reminder to download the new certificate.
7\. Confirm cluster access:
```sh theme={null}
kubectl get pods
```
Successful output confirms that kubectl can communicate with the cluster.
## Install kubectl and connect from macOS
1\. Download the latest stable kubectl binary. For Intel Macs, use `amd64`; for Apple Silicon (M1/M2/M3), use `arm64`:
```sh theme={null}
curl -LO "https://dl.k8s.io/release/$(curl -L -s https://dl.k8s.io/release/stable.txt)/bin/darwin/amd64/kubectl"
```
2\. Make the binary executable:
```sh theme={null}
chmod +x ./kubectl
```
3\. Move the binary to a directory in the **PATH** variable. Check which directories are in PATH:
```sh theme={null}
echo $PATH
```
Select a directory from the output and move kubectl there. For example:
```sh theme={null}
sudo mv ./kubectl /usr/local/bin/kubectl
```
With kubectl installed, the next steps configure cluster access.
4\. Create the `.kube` directory in the home directory:
```sh theme={null}
mkdir ~/.kube
```
5\. In the Customer Portal, navigate to **Cloud** > **Managed Kubernetes**, click the cluster name, then click **Kubernetes config** to download the configuration file:
6\. Rename the downloaded file to `config` (no extension) and place it in the `.kube` folder.
7\. Test the connection:
```sh theme={null}
kubectl get pods
```
If the command returns pod information or reports that no resources exist, the connection is working correctly.
## Renewal of kubectl certificates
Gcore renews kubectl access certificates every two years. Notifications are sent before the renewal date:
* **In the Customer Portal**: a notification appears with the expiry date and a reminder to download the new kubeconfig from the cluster page.
* **Via email**: two weeks before the renewal date, an email is sent with the renewal date. After the certificate is updated, a confirmation email is sent with a reminder to download the new certificate.