> ## Documentation Index
> Fetch the complete documentation index at: https://docs.gcore.com/llms.txt
> Use this file to discover all available pages before exploring further.
# Configure and manage SSH keys
SSH key pairs authenticate connections to Linux Virtual Instances — a public key is stored in the [Gcore Customer Portal](https://portal.gcore.com) and a private key remains on the local machine.
## Generate SSH keys
SSH keys can be generated in the Customer Portal or via CLI tools and SSH clients:
* [Customer Portal](/cloud/virtual-instances/connect/connect-to-your-instance-via-ssh#generate-ssh-keys-in-the-customer-portal)
* [CLI tools](/cloud/virtual-instances/connect/connect-to-your-instance-via-ssh#generate-ssh-keys-via-cli-tools-or-ssh-clients)
Never share a private SSH key or password with third parties. Doing so may result in unauthorized access to a Virtual Instance and the compromise of any sensitive information stored there.
### Generate SSH keys in the customer portal
SSH keys can be created when [creating a Virtual Instance](/cloud/virtual-instances/create-an-instance) or generated separately in the [SSH Keys](/cloud/virtual-instances/connect/connect-to-your-instance-via-ssh#generate-an-ssh-key-in-the-ssh-keys-section) section.
After generation, the public key is added to the system and appears in the SSH Keys section alongside any other keys. The private key is downloaded to local storage.
Public key names can contain only Latin characters, underscores, spaces, and dots. The length must be between 3 and 63 characters.
When [creating a Virtual Instance](/cloud/virtual-instances/create-an-instance), the **SSH key** section offers a dropdown to select an existing key and links to add or generate a new key.
* **Select ssh key** — add a key already stored in the Gcore Customer Portal by selecting it from the dropdown list.
* **add a new SSH Key** — add an existing key generated via CLI tools or an SSH client.
* **generate a SSH Key** — create a new key pair in the portal.
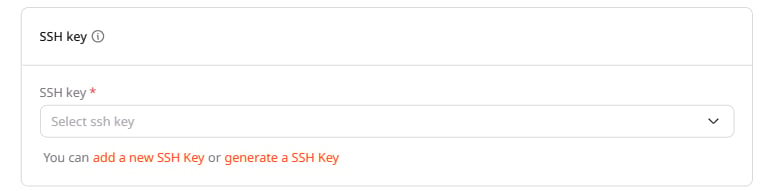 To use the **generate a SSH Key** option:
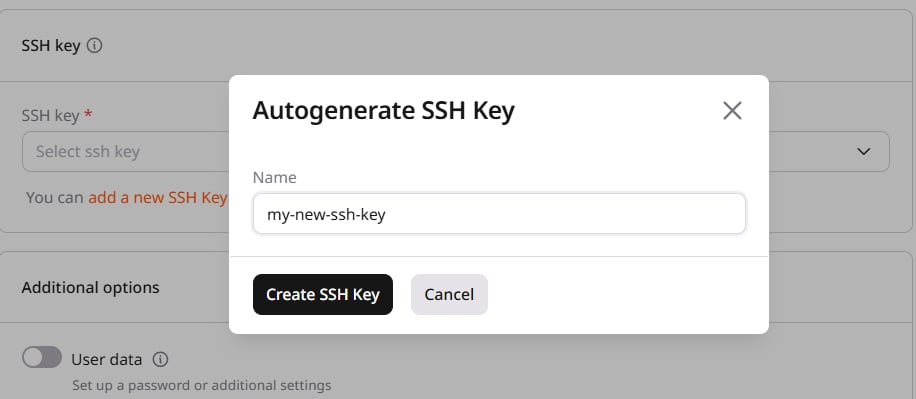
1. Click the **generate a SSH Key** link.
2. In the dialog that opens, enter the key name to identify the key in the system.
3. Click **Create SSH Key** — the browser downloads the private key file to local storage.
To use the **generate a SSH Key** option:
1. Click the **generate a SSH Key** link.
2. In the dialog that opens, enter the key name to identify the key in the system.
3. Click **Create SSH Key** — the browser downloads the private key file to local storage.
 A pair of SSH keys can be generated separately and then selected during Virtual Instance creation.
To generate the keys:
1. In the Gcore Customer Portal, go to **Cloud** > **SSH Keys**.
2. Click **Autogenerate SSH Key**.
A pair of SSH keys can be generated separately and then selected during Virtual Instance creation.
To generate the keys:
1. In the Gcore Customer Portal, go to **Cloud** > **SSH Keys**.
2. Click **Autogenerate SSH Key**.
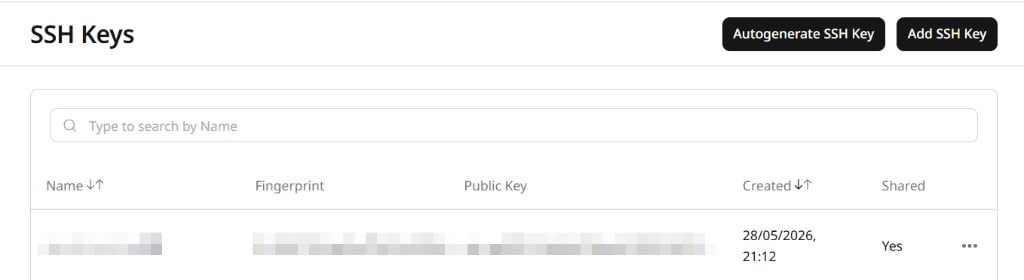 3. Enter the key name and click **Create SSH Key**.
4. The public key is added to the system and the private key is saved to local storage.
## Generate SSH keys via CLI tools or SSH clients
To generate SSH keys on Linux, macOS, or Windows 10/11 devices:
1. Open Terminal (Linux, macOS) or Command Prompt (`cmd.exe` on Windows).
2. Run the following command to generate a key pair:
```sh theme={null}
ssh-keygen -t rsa -b 2048
```
3. When prompted for the file path, specify a custom location (for example, `.ssh/`) or press **Enter** to save the keys to the default directory. The default directory is `~/.ssh/` for Linux/macOS and `C:\Users\{username}\.ssh\` for Windows.
4. When prompted for a passphrase, enter a password for additional security or leave the field empty and press **Enter** to create the key without a password.
5. Confirm the passphrase by entering it again, or leave the field empty and press **Enter**. The key is saved in the default directory or in the custom location specified during creation.
6. The public key is saved in the `.pub` file. Add this public key to the Customer Portal as described in [Add a public key](/cloud/virtual-instances/connect/connect-to-your-instance-via-ssh#add-a-public-ssh-key-to-the-customer-portal).
Linux distributions on Windows 11 can generate SSH keys for Virtual Instance connections. WSL must be installed on the device.
To install WSL, see the official Microsoft guide: [How to install Linux on Windows with WSL](https://learn.microsoft.com/en-us/windows/wsl/install).
To generate SSH keys via WSL:
1. Open Windows Command Prompt or PowerShell.
2. Launch the default Linux distribution by running `wsl.exe`. For other ways to run a Linux distribution, see [Ways to run multiple Linux distributions with WSL](https://learn.microsoft.com/en-us/windows/wsl/install#ways-to-run-multiple-linux-distributions-with-wsl).
3. Run the following command to generate a key pair:
```text theme={null}
ssh-keygen -t rsa -b 2048
```
4. When prompted for the file path, specify a custom location (for example, `.ssh/`) or press **Enter** to save the keys to the default directory. The default directory is `~/.ssh/`.
5. When prompted for a passphrase, enter a password or leave the field empty and press **Enter** to create the key without a password.
6. Confirm the passphrase by entering it again, or leave the field empty and press **Enter**. The key is saved in the default directory or in the custom location specified during creation.
7. The public key is saved in the `.pub` file. Add this public key to the Customer Portal as described in [Add a public key](/cloud/virtual-instances/connect/connect-to-your-instance-via-ssh#add-a-public-ssh-key-to-the-customer-portal).
To generate SSH keys on Windows 10/11 devices:
1. Download and install the [PuTTY package](https://putty.org/).
2. Launch the PuTTYgen app.
3. Find the **Type of key to generate** parameter and select RSA.
4. In the **Number of bits in a generated key** field, set the value to `2048`.
3. Enter the key name and click **Create SSH Key**.
4. The public key is added to the system and the private key is saved to local storage.
## Generate SSH keys via CLI tools or SSH clients
To generate SSH keys on Linux, macOS, or Windows 10/11 devices:
1. Open Terminal (Linux, macOS) or Command Prompt (`cmd.exe` on Windows).
2. Run the following command to generate a key pair:
```sh theme={null}
ssh-keygen -t rsa -b 2048
```
3. When prompted for the file path, specify a custom location (for example, `.ssh/`) or press **Enter** to save the keys to the default directory. The default directory is `~/.ssh/` for Linux/macOS and `C:\Users\{username}\.ssh\` for Windows.
4. When prompted for a passphrase, enter a password for additional security or leave the field empty and press **Enter** to create the key without a password.
5. Confirm the passphrase by entering it again, or leave the field empty and press **Enter**. The key is saved in the default directory or in the custom location specified during creation.
6. The public key is saved in the `.pub` file. Add this public key to the Customer Portal as described in [Add a public key](/cloud/virtual-instances/connect/connect-to-your-instance-via-ssh#add-a-public-ssh-key-to-the-customer-portal).
Linux distributions on Windows 11 can generate SSH keys for Virtual Instance connections. WSL must be installed on the device.
To install WSL, see the official Microsoft guide: [How to install Linux on Windows with WSL](https://learn.microsoft.com/en-us/windows/wsl/install).
To generate SSH keys via WSL:
1. Open Windows Command Prompt or PowerShell.
2. Launch the default Linux distribution by running `wsl.exe`. For other ways to run a Linux distribution, see [Ways to run multiple Linux distributions with WSL](https://learn.microsoft.com/en-us/windows/wsl/install#ways-to-run-multiple-linux-distributions-with-wsl).
3. Run the following command to generate a key pair:
```text theme={null}
ssh-keygen -t rsa -b 2048
```
4. When prompted for the file path, specify a custom location (for example, `.ssh/`) or press **Enter** to save the keys to the default directory. The default directory is `~/.ssh/`.
5. When prompted for a passphrase, enter a password or leave the field empty and press **Enter** to create the key without a password.
6. Confirm the passphrase by entering it again, or leave the field empty and press **Enter**. The key is saved in the default directory or in the custom location specified during creation.
7. The public key is saved in the `.pub` file. Add this public key to the Customer Portal as described in [Add a public key](/cloud/virtual-instances/connect/connect-to-your-instance-via-ssh#add-a-public-ssh-key-to-the-customer-portal).
To generate SSH keys on Windows 10/11 devices:
1. Download and install the [PuTTY package](https://putty.org/).
2. Launch the PuTTYgen app.
3. Find the **Type of key to generate** parameter and select RSA.
4. In the **Number of bits in a generated key** field, set the value to `2048`.
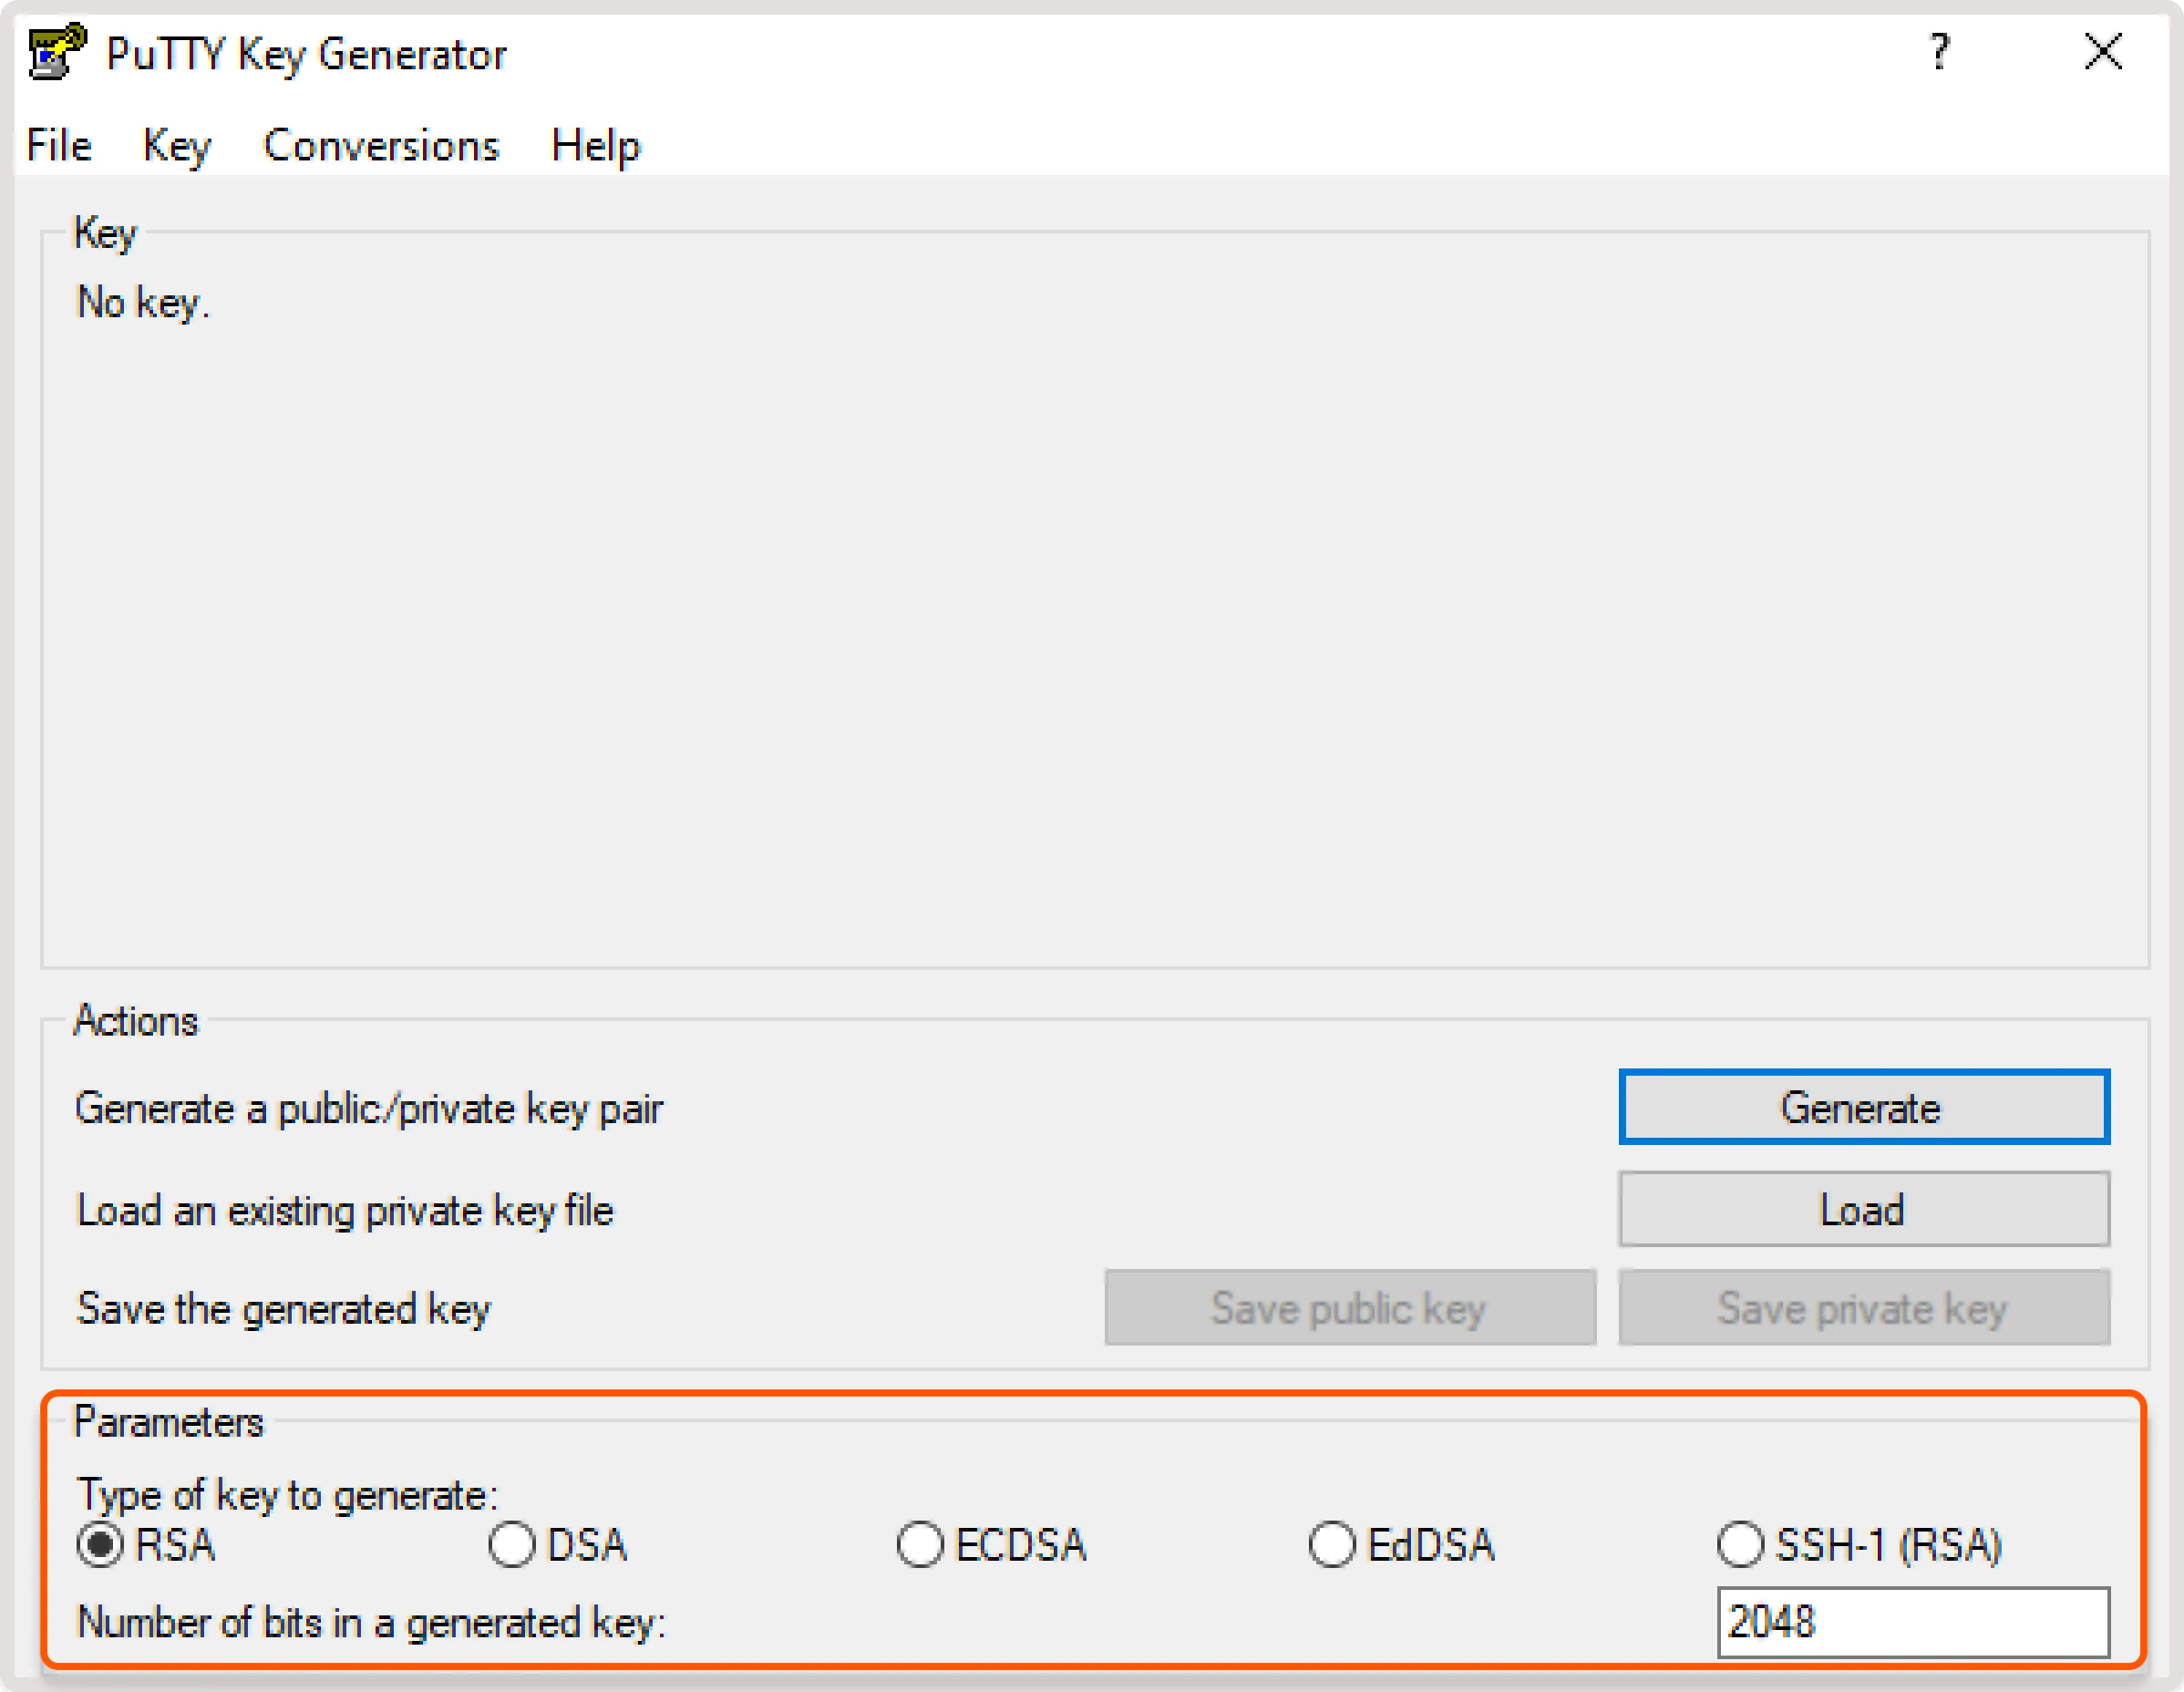 5. Click **Generate**. While the key is being generated, move the cursor in the **Key** field until the key appears.
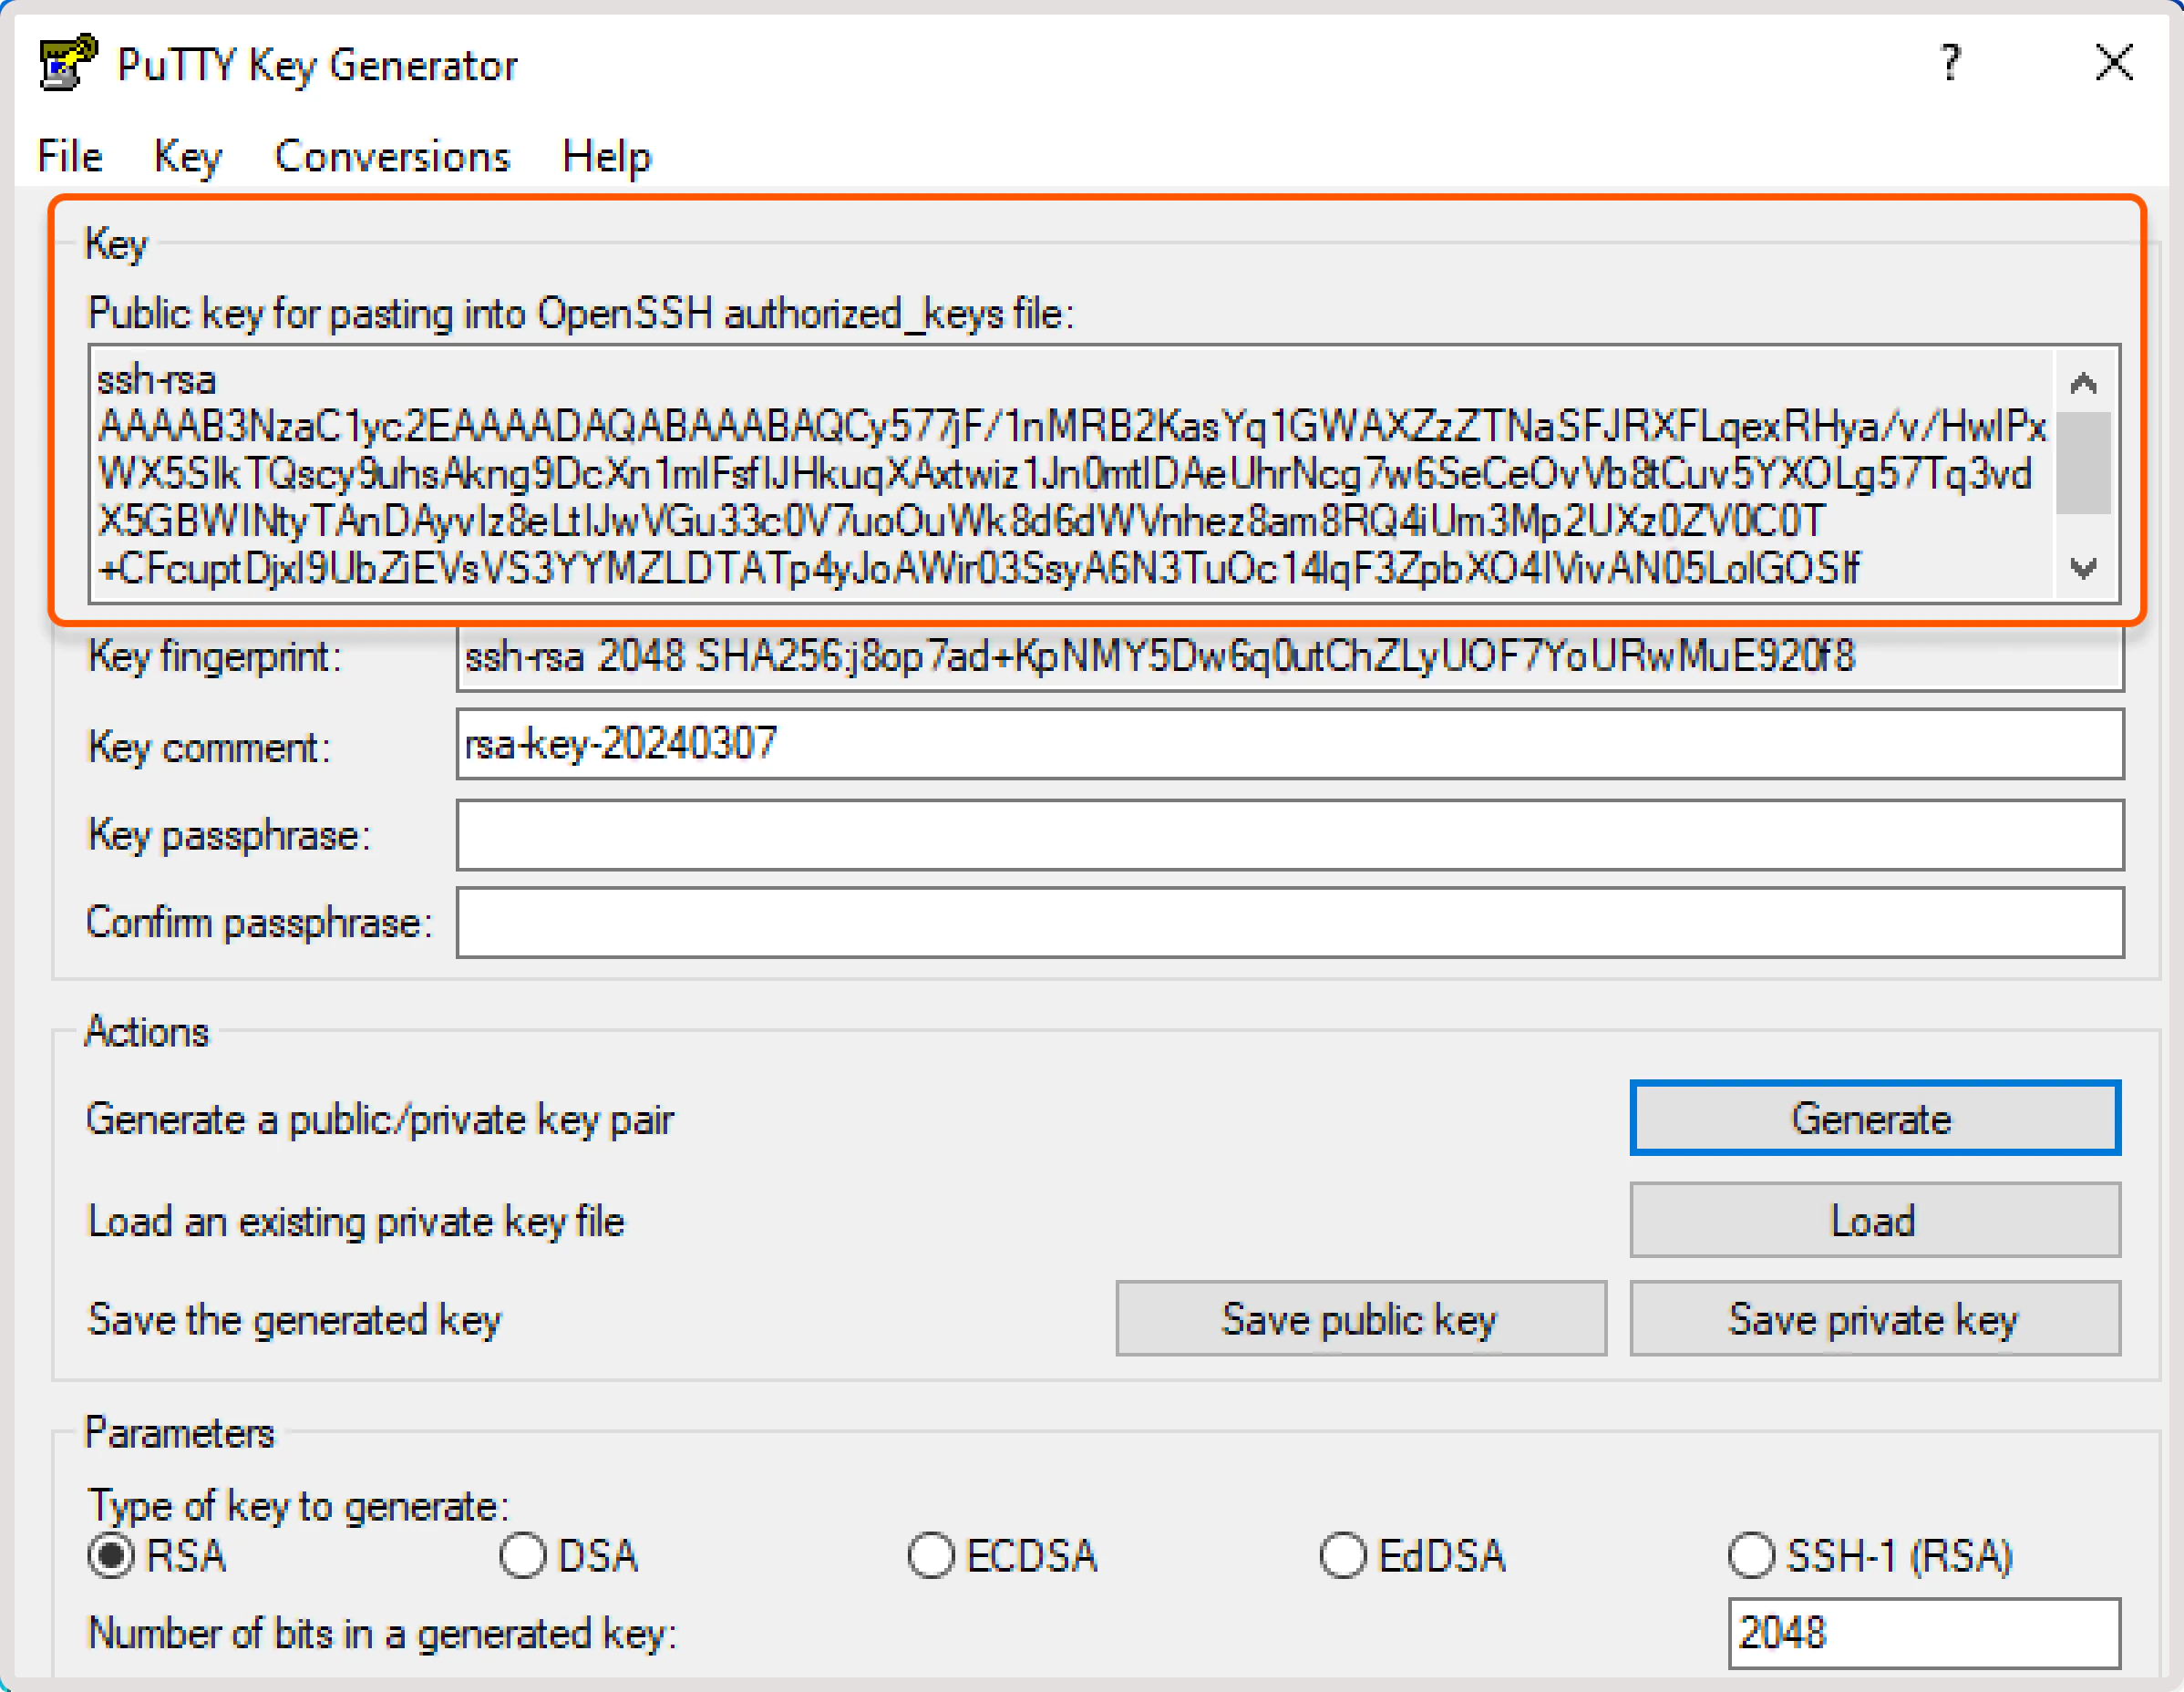 6. (Optional) To protect the private key with a passphrase, enter a passphrase in the **Key passphrase** field and retype it in the **Confirm passphrase** field.
7. Click **Save private key** to download the key to local storage.
Keys generated via PuTTYgen or in the Gcore Customer Portal must be converted to `.ppk` format before connecting via PuTTY. See [Key conversion](/cloud/ssh-keys/convert-an-ssh-key-from-pem-to-ppk).
## Add a public SSH key to the customer portal
If the SSH key was not generated via the Gcore Customer Portal, add the public key there:
1. In the Gcore Customer Portal, go to **Cloud** > **SSH Keys**.
2. Click **Add SSH Key**.
3. In the **SSH key content** field, paste the public key.
4. Enter a key name and click **Add SSH Key**.
6. (Optional) To protect the private key with a passphrase, enter a passphrase in the **Key passphrase** field and retype it in the **Confirm passphrase** field.
7. Click **Save private key** to download the key to local storage.
Keys generated via PuTTYgen or in the Gcore Customer Portal must be converted to `.ppk` format before connecting via PuTTY. See [Key conversion](/cloud/ssh-keys/convert-an-ssh-key-from-pem-to-ppk).
## Add a public SSH key to the customer portal
If the SSH key was not generated via the Gcore Customer Portal, add the public key there:
1. In the Gcore Customer Portal, go to **Cloud** > **SSH Keys**.
2. Click **Add SSH Key**.
3. In the **SSH key content** field, paste the public key.
4. Enter a key name and click **Add SSH Key**.
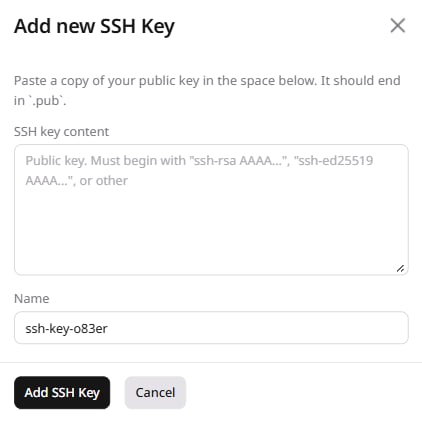 5. The key appears in the SSH keys list and can be selected as an authentication method when creating a new instance.
After a public key is added, it is automatically shared with all users in the same project. To change the key's visibility, see [Stop sharing](/cloud/virtual-instances/connect/connect-to-your-instance-via-ssh#stop-sharing-ssh-keys).
## Manage SSH keys in the customer portal
Public SSH keys can be deleted from the Gcore Customer Portal, shared with other users in the same project, or restricted to a single user.
### Delete SSH keys
Only the user who created an SSH key or added the public key to the Gcore Customer Portal can delete that key. To delete the key:
1. In the Gcore Customer Portal, go to **Cloud** > **SSH Keys**.
2. Find the SSH key to delete and click the three-dot icon.
3. Click **Delete**.
4. In the confirmation dialog, click **Delete SSH key**.
## Stop sharing SSH keys
After an SSH key is added or generated in the Customer Portal, the public key is automatically shared with all users in the same project.
To stop sharing the key and restrict visibility to the current user:
1. In the Gcore Customer Portal, go to **Cloud** > **SSH Keys**.
5. The key appears in the SSH keys list and can be selected as an authentication method when creating a new instance.
After a public key is added, it is automatically shared with all users in the same project. To change the key's visibility, see [Stop sharing](/cloud/virtual-instances/connect/connect-to-your-instance-via-ssh#stop-sharing-ssh-keys).
## Manage SSH keys in the customer portal
Public SSH keys can be deleted from the Gcore Customer Portal, shared with other users in the same project, or restricted to a single user.
### Delete SSH keys
Only the user who created an SSH key or added the public key to the Gcore Customer Portal can delete that key. To delete the key:
1. In the Gcore Customer Portal, go to **Cloud** > **SSH Keys**.
2. Find the SSH key to delete and click the three-dot icon.
3. Click **Delete**.
4. In the confirmation dialog, click **Delete SSH key**.
## Stop sharing SSH keys
After an SSH key is added or generated in the Customer Portal, the public key is automatically shared with all users in the same project.
To stop sharing the key and restrict visibility to the current user:
1. In the Gcore Customer Portal, go to **Cloud** > **SSH Keys**.
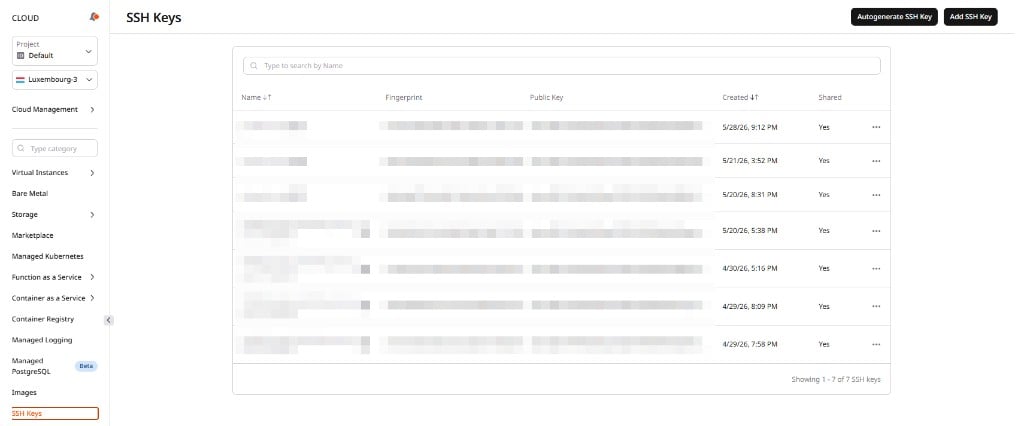 2. Find the SSH key to stop sharing and click the three-dot icon.
3. Click **Stop sharing**.
4. In the confirmation dialog, click **Stop sharing**.
Sharing can be restored by following the same steps and clicking **Share** from the three-dot icon.
2. Find the SSH key to stop sharing and click the three-dot icon.
3. Click **Stop sharing**.
4. In the confirmation dialog, click **Stop sharing**.
Sharing can be restored by following the same steps and clicking **Share** from the three-dot icon.