Create Linux or Windows Virtual Instances in Gcore Cloud.
When using [VAST file shares](/cloud/file-shares/configure-file-shares), it is best to create them **before** provisioning the corresponding compute resources.
## Step 1. Select a region
1. In the [Gcore Customer Portal](https://portal.gcore.com/accounts/reports/dashboard), go to **Virtual Instances** and click **Create Instance**.
 2. Choose the region where the Virtual Instance will be deployed.

Notice that regions are labeled either Core or Edge. This represents the region's equipment specifications.
| | Core | Edge\* |
| ---------------------------------------- | --------------------------- | ------------------------------- |
| Equipment generation | The latest | Different |
| Designed for high scalability on the fly | Yes | Not |
| Available resources | 1000 cores and 30 TB of RAM | Up to 300 cores and 1 TB of RAM |
| Ports for user traffic and storage | Separate | Shared |
| Price | Higher | Lower |
* Edge regions can be transformed into Core regions — contact [support](mailto:support@gcore.com) to request the conversion.
## Step 2. Configure the image
Select the type of hardware architecture for the instance:
* **x86-64** : This architecture is known for its broad compatibility with Linux operating systems and Windows distributions. It is commonly used in general purpose computing applications.
* **ARM** : ARM architecture is designed for energy efficiency and low power consumption, which also supports strong performance, making it ideal for high-performance computing tasks. However, ARM Virtual Machines are compatible with fewer OS distributions.

The selected hardware architecture determines the available OS options and instance flavors. Select the image source from one of the tabs:
* **Distributions** — standard OS distributions such as Ubuntu, Debian, CentOS, Windows, and others.
* **Marketplace** — pre-configured templates with software already installed.
* **Volume** — boot from an existing volume.
* **Snapshot** — boot from a previously created snapshot.
* **Custom Images** — use an image uploaded to the project.
## Step 3. Choose the VM type
The available CPU generation is determined by the selected region and displayed in the **CPU generation** field. Select one of the available flavors:
* **Standard** — balanced compute, memory, and networking for a wide range of workloads.
* **CPU-Optimized** — higher vCPU-to-RAM ratio, suited for CPU-intensive tasks — batch processing, video encoding, and large-scale data processing.
* **Memory-Optimized** — higher RAM-to-vCPU ratio, suited for memory-intensive workloads — databases, SRM/ERP, and data warehouses.
**Info**
GPU, High-frequency, and Shared flavors are available in select regions only. The flavor tabs appear automatically when those flavors are available in the selected region.
## Step 4. Set up volumes
Enter a volume name, choose its type, and set its size in GiB.
 * **High IOPS SSD**. High-performance SSD block storage designed for latency-sensitive transactional workloads (60 IOPS per 1 GB; 2.5 MB/s per 1 GiB). The IOPS performance limit is 9,000. The bandwidth limit is 500 MB/s.
* **Standard**. Network SSD disk that provides stable and high random I/O performance, as well as high data reliability (6 IOPS per 1 GB; 0.4 MB/s per 1 GiB). The IOPS performance limit is 4,500. The bandwidth limit is 300 MB/s.
* **SSD Low-Latency**. SSD block storage designed for applications that require low-latency storage and real-time data processing. It can achieve IOPS performance of up to 5,000, with an average latency of 300 µs.
* **High IOPS SSD**. High-performance SSD block storage designed for latency-sensitive transactional workloads (60 IOPS per 1 GB; 2.5 MB/s per 1 GiB). The IOPS performance limit is 9,000. The bandwidth limit is 500 MB/s.
* **Standard**. Network SSD disk that provides stable and high random I/O performance, as well as high data reliability (6 IOPS per 1 GB; 0.4 MB/s per 1 GiB). The IOPS performance limit is 4,500. The bandwidth limit is 300 MB/s.
* **SSD Low-Latency**. SSD block storage designed for applications that require low-latency storage and real-time data processing. It can achieve IOPS performance of up to 5,000, with an average latency of 300 µs.
(Optional) Add an **Attachment Tag**.
## Step 5. Configure networking
### Configure the interface
Configure the network interface:
1. Select the **Network type**: **Public** or **Private**.
2. In the **IP Family** section, select the IP version: **IPv4**, **IPv6**, or **Dual (IPv4 + IPv6)**.
3. In the **Security Groups** section, select the security groups to attach. The default security group is attached automatically if no selection is made.
4. (Optional) Enable **Use reserved IP** to assign a [reserved IP address](/cloud/networking/ip-address/create-and-configure-a-reserved-ip-address) to the instance, or enable **Use floating IP** to assign a [floating IP address](/cloud/networking/ip-address/create-and-configure-a-floating-ip-address).
 **Info**
The default security group allows inbound traffic over ICMP, SSH (TCP/22), and RDP (TCP/3389 and UDP/3389). Outbound traffic is unrestricted except SMTP (TCP/25 and UDP/25), which is blocked by default. [Custom security groups](/cloud/networking/add-and-configure-a-firewall) can override these defaults.
**Info**
The default security group allows inbound traffic over ICMP, SSH (TCP/22), and RDP (TCP/3389 and UDP/3389). Outbound traffic is unrestricted except SMTP (TCP/25 and UDP/25), which is blocked by default. [Custom security groups](/cloud/networking/add-and-configure-a-firewall) can override these defaults.
For a **private** interface, configure a network and a subnetwork as described below.
If both a public and private interface are needed, disable the default gateway on the private network's subnetwork and assign a floating IP to the private interface.
### Configure the network
Select an existing network from the dropdown list or create a new one by clicking **Add a new network**.
 1. Click **Add a new network**.
2. Enter the network name.
3. (Optional) Enable **Bare Metal Network** to make the network available to Bare Metal servers.
4. (Optional) Enable **Create router** to create a router that all subnets in this network will connect to by default.
5. (Optional) Enable **Add tags** to attach metadata to the network.
6. Click **Create & Proceed**.
1. Click **Add a new network**.
2. Enter the network name.
3. (Optional) Enable **Bare Metal Network** to make the network available to Bare Metal servers.
4. (Optional) Enable **Create router** to create a router that all subnets in this network will connect to by default.
5. (Optional) Enable **Add tags** to attach metadata to the network.
6. Click **Create & Proceed**.
 ### Configure the subnetwork
**Info**
When a Virtual Instance has several subnetworks, [verify that only one subnetwork is routable](/cloud/networking/create-and-manage-a-subnetwork#set-up-the-default-gateway) to avoid a default gateway conflict that would prevent connecting to the instance.
### Configure the subnetwork
**Info**
When a Virtual Instance has several subnetworks, [verify that only one subnetwork is routable](/cloud/networking/create-and-manage-a-subnetwork#set-up-the-default-gateway) to avoid a default gateway conflict that would prevent connecting to the instance.
Select an existing subnetwork from the dropdown list or create a new one by clicking **Add a new subnetwork**.
 1. Click **Add a new subnetwork**.
2. Enter the subnetwork name.
3. Set CIDR in one of the private ranges: 10.0.0.0–10.255.255.255, 172.16.0.0–172.31.255.255, or 192.168.0.0–192.168.255.255. Set the mask between /16 and /29.
4. (Optional) Enable **Enable DHCP** to assign IP addresses to machines in the subnet automatically.
5. (Optional) Enable **Connect to network router** to connect this subnet to the network's router by default.
6. Select **Gateway IP** assignment: **Automatically** or **Specific**.
7. (Optional) Enter **Custom DNS** server addresses.
8. (Optional) Enter static routes using the **Destination** and **Nexthop** fields.
9. (Optional) Enable **Add tags** to attach metadata to the subnetwork.
10. Click **Create subnet**.
1. Click **Add a new subnetwork**.
2. Enter the subnetwork name.
3. Set CIDR in one of the private ranges: 10.0.0.0–10.255.255.255, 172.16.0.0–172.31.255.255, or 192.168.0.0–192.168.255.255. Set the mask between /16 and /29.
4. (Optional) Enable **Enable DHCP** to assign IP addresses to machines in the subnet automatically.
5. (Optional) Enable **Connect to network router** to connect this subnet to the network's router by default.
6. Select **Gateway IP** assignment: **Automatically** or **Specific**.
7. (Optional) Enter **Custom DNS** server addresses.
8. (Optional) Enter static routes using the **Destination** and **Nexthop** fields.
9. (Optional) Enable **Add tags** to attach metadata to the subnetwork.
10. Click **Create subnet**.
 ### Interface order
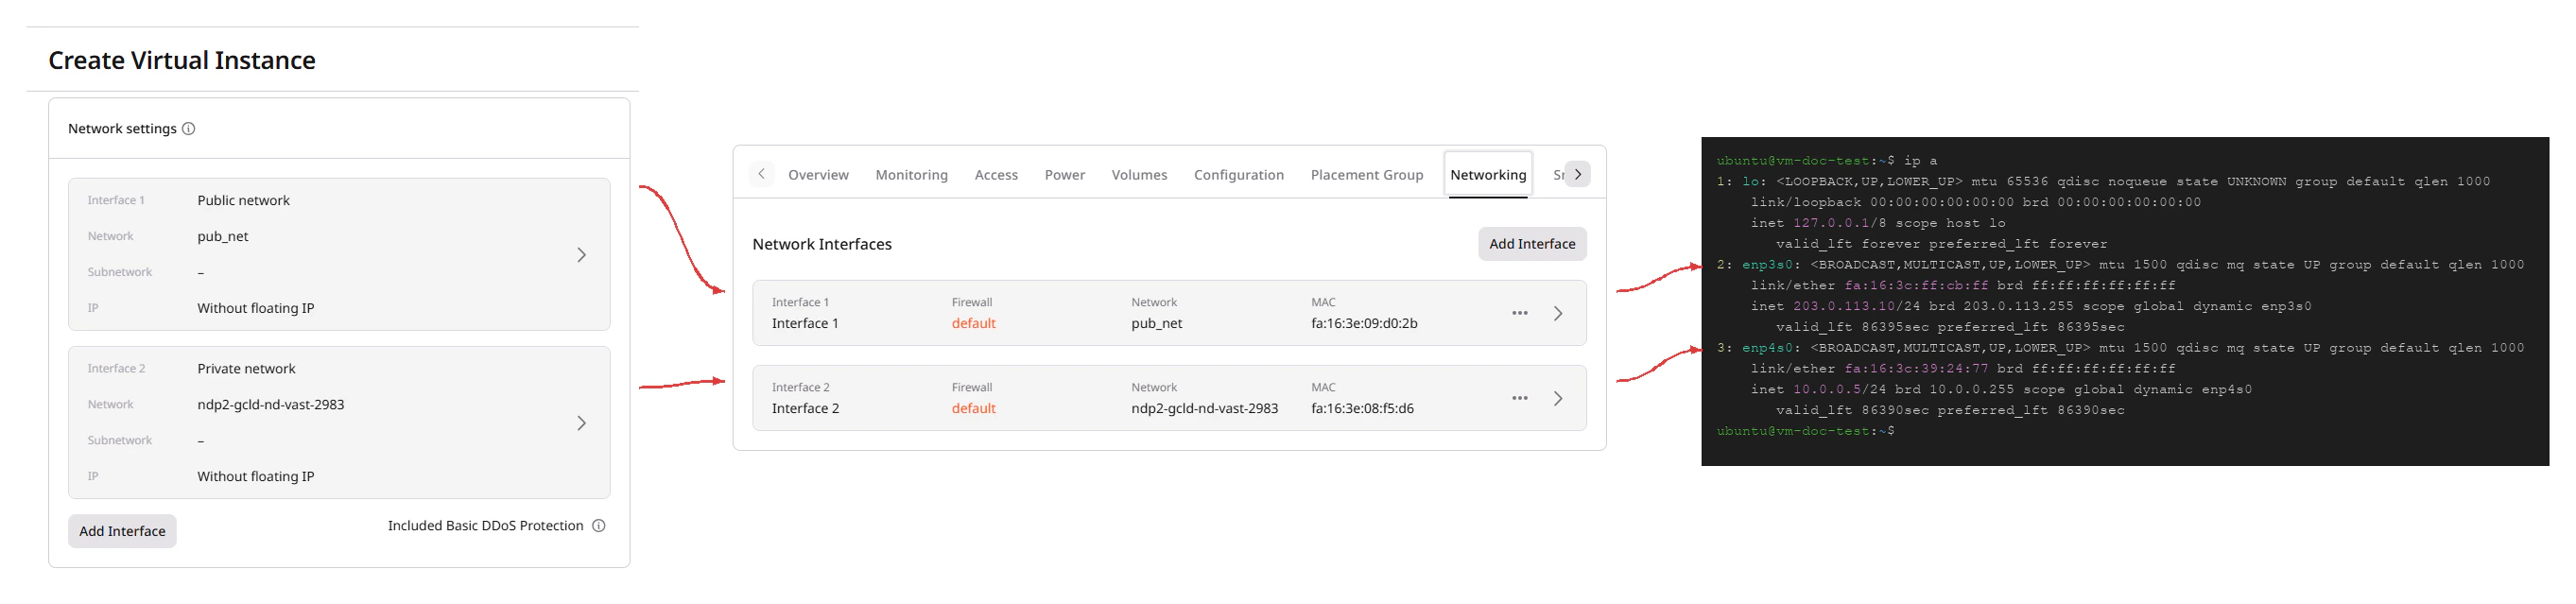
When adding multiple interfaces, the order in the creation form determines how the OS names them after the instance starts. The diagram below shows how the selection order carries through to the **Networking** tab and then to the OS interface names:
 ```bash theme={null}
$ ip addr show enp3s0
2: enp3s0: mtu 1500 ...
inet 85.234.84.186/24 metric 1000 brd 85.234.84.255 scope global dynamic enp3s0
$ ip addr show enp4s0
3: enp4s0: mtu 1500 ...
inet 10.0.0.132/24 metric 2000 brd 10.0.0.255 scope global dynamic enp4s0
```
```bash theme={null}
$ ip addr show enp3s0
2: enp3s0: mtu 1500 ...
inet 85.234.84.186/24 metric 1000 brd 85.234.84.255 scope global dynamic enp3s0
$ ip addr show enp4s0
3: enp4s0: mtu 1500 ...
inet 10.0.0.132/24 metric 2000 brd 10.0.0.255 scope global dynamic enp4s0
```
Interface 1 (`enp3s0`) is the public interface; Interface 2 (`enp4s0`) is the private interface. The order set at creation determines routing priority: the first interface has higher priority for outbound traffic than subsequent ones. The interface order cannot be changed after the instance is created.
## Step 6. Set up authentication
Configure an SSH key for a remote SSH connection. Add an existing SSH key or generate a new one using the [SSH key guide](/cloud/virtual-instances/connect/connect-via-ssh).
 In addition to SSH keys, a password can also be set for the Virtual Instance, as described in step 7. A password is required to connect to a Linux instance [from the Customer Portal](/cloud/virtual-instances/connect/connect-to-your-instance-via-control-panel#connect-to-a-linux-instance).
Configure **Access** by setting a password for the Admin user.
In addition to SSH keys, a password can also be set for the Virtual Instance, as described in step 7. A password is required to connect to a Linux instance [from the Customer Portal](/cloud/virtual-instances/connect/connect-to-your-instance-via-control-panel#connect-to-a-linux-instance).
Configure **Access** by setting a password for the Admin user.
 **Info**
The password must contain between 8 and 16 characters, including at least one lowercase letter (`a-z`), one uppercase letter (`A-Z`), one number (`0-9`), and one special character (`!#$%&'()*+,-./:;<=>?@[]^_{|}~`).
The password can be used to connect to a Windows instance from the [Customer Portal](/cloud/virtual-instances/connect/connect-to-your-instance-via-control-panel) or from a local machine using RDP (Remote Desktop Protocol).
## Step 7 (Optional). Configure additional options
### Instance initialization
**Info**
The password must contain between 8 and 16 characters, including at least one lowercase letter (`a-z`), one uppercase letter (`A-Z`), one number (`0-9`), and one special character (`!#$%&'()*+,-./:;<=>?@[]^_{|}~`).
The password can be used to connect to a Windows instance from the [Customer Portal](/cloud/virtual-instances/connect/connect-to-your-instance-via-control-panel) or from a local machine using RDP (Remote Desktop Protocol).
## Step 7 (Optional). Configure additional options
### Instance initialization
Enable the **User data** toggle to customize the instance during the initial boot using a `cloud-init` agent.

A password for connecting to a Linux instance [from the Customer Portal](/cloud/virtual-instances/connect/connect-to-your-instance-via-control-panel) or [via SSH](/cloud/virtual-instances/connect/connect-via-ssh) can be set via **User data**. Insert the following code into the field, replacing `my-password` with the chosen password:
```yaml theme={null}
#cloud-config
password: my-password
chpasswd: { expire: False }
ssh_pwauth: True
```
**Info**
On Cloud instances with Windows OS, the `password` parameter cannot be used in both the "Access" and "User data" fields. Since the "Access" field is required, configuring user data on Windows instances is not possible. See the allowed parameters in the [API reference](/api-reference/cloud#tag/Instances/operation/InstanceCreateSetV2.post).
A password hash — a machine-readable set of symbols — can be configured to protect the actual password from being exposed. To generate a hash, use the following Python script:
```
#!/usr/bin/env python3
\# based on [https://stackoverflow.com/a/17992126/117471](https://stackoverflow.com/a/17992126/117471)\# pip3 install passlib
import sys
from getpass import getpass
from passlib.hash import sha512_crypt
passwd = input() if not sys.stdin.isatty() else getpass()
print(sha512_crypt.hash(passwd, rounds = 5000 ))
```
**Warning**
When an instance is only in a private subnet, DHCP must be enabled in the subnet settings to allow password-based login.
### Tags
Enable **Add tags** to add a key-value pair as metadata for the Virtual Instance.
### Placement
Enable **Add to placement group** to determine how to place multiple instances.

Instances can be placed in one of three types of groups:
* **Affinity** groups assemble virtual machines on the same hardware. Machines launched in one affinity group will exchange data faster because they are located on the same server.
* **Anti-Affinity** groups work the opposite way: all Virtual Machines in this group will be separated across different physical hardware. This increases fault tolerance of a cluster: Even if something goes wrong with one server, machines on the other servers will remain available.
* **Soft Anti-Affinity** groups encourage, but don't strictly enforce, the separation of Virtual Machines. Unlike a strict anti-affinity policy, where machines may never be placed together, soft anti-affinity allows placement on the same hardware when it is necessary due to factors like resource constraints or high demand. It is suitable for users who want to use the anti-affinity policy by default while also avoiding machine creation failures if an unused host is not found.
Add the instance to an existing placement group or create a new one by clicking **Add placement group**.
## Step 8. Specify the number of instances
Indicate how many instances with the same configuration are needed. No more than 10 instances can be created at a time.

Set the **Name Template** for the instances. Select one of the available options from the dropdown:
* `{ip_octets}` — the placeholder is replaced with the last two octets of the assigned IP address (for example, `my-vm-{ip_octets}` becomes `my-vm-10-0-5`).
* `{instance_role}` — the placeholder is replaced with the value of the `instance_role` metadata tag set in the **Add tags** section.
## Step 9. Create the instance
Click **Create Instance**.
The instance transitions to the **Building** status while resources are being allocated.
After that, the instance moves to the **Power on** status and is ready to use.
Creating a Linux VM via the REST API consists of three API calls: list available images, list flavors, then submit the create request. The instance is reachable via SSH within about 30 seconds of the task finishing.
An [API token](/account-settings/api-tokens) is required, along with a [project ID](/api-reference/cloud/projects/list-projects) and [region ID](/api-reference/cloud/regions/list-regions).
Open a bash terminal and set these as environment variables before running the examples:
```bash theme={null}
export GCORE_API_KEY="{YOUR_API_KEY}"
export GCORE_CLOUD_PROJECT_ID="{YOUR_PROJECT_ID}"
export GCORE_CLOUD_REGION_ID="{YOUR_REGION_ID}"
```
## Add an SSH key
If the project does not yet have an SSH key, register one before creating the instance. The create call references the key by name, not by ID.
| Parameter | Required | Description |
| ------------ | -------- | --------------------------------------------------------------------- |
| `name` | Yes | Identifier used as `ssh_key_name` in the create call. |
| `public_key` | No | An RSA or Ed25519 public key string. Omit to generate a new key pair. |
```python theme={null}
ssh_key = client.cloud.ssh_keys.create(
name="my-key",
public_key="ssh-ed25519 AAAA... user@host",
)
```
```go theme={null}
sshKeyCreated, err := client.Cloud.SSHKeys.New(context.TODO(), cloud.SSHKeyNewParams{
Name: "my-ssh-key",
})
if err != nil {
panic(err.Error())
}
fmt.Printf("%+v\n", sshKeyCreated.ID)
```
```bash theme={null}
curl -X POST "https://api.gcore.com/cloud/v1/ssh_keys/$GCORE_CLOUD_PROJECT_ID" \
-H "Authorization: APIKey $GCORE_API_KEY" \
-H "Content-Type: application/json" \
-d '{
"name": "my-key",
"public_key": "ssh-ed25519 AAAA... user@host"
}'
```
Response:
```json theme={null}
{
"id": "36a7a97a-0672-4911-8f2b-92cd4e5b0d91",
"name": "my-key",
"state": "ACTIVE"
}
```
When `public_key` is omitted, the response includes a `private_key` field - save it immediately, as it is not shown again.
## Quickstart
Complete scripts for the full flow. See the step-by-step section below for details on each call.
```python theme={null}
import os
from gcore import Gcore
client = Gcore()
# Step 1. Find Ubuntu 22.04 image
images = client.cloud.instances.images.list()
image = next(img for img in images.results if "ubuntu-22.04" in img.name and "x64" in img.name)
print(f"Image: {image.name} ({image.id}), min_disk={image.min_disk} GiB")
# Step 2. Pick a flavor (IDs are region-specific; this selects 2 vCPU / 4 GB)
flavors = client.cloud.instances.flavors.list()
flavor = next(f for f in flavors.results if f.vcpus == 2 and f.ram == 4096)
print(f"Flavor: {flavor.flavor_id} ({flavor.vcpus} vCPU / {flavor.ram // 1024} GB RAM)")
# Step 3. Create instance and wait (create_and_poll polls automatically)
instance = client.cloud.instances.create_and_poll(
name="my-vm",
flavor=flavor.flavor_id,
ssh_key_name="my-key",
interfaces=[{"type": "external"}],
volumes=[{
"source": "image",
"image_id": image.id,
"size": max(20, image.min_disk),
"boot_index": 0,
}],
)
print(f"Instance ID: {instance.id}, Status: {instance.status}")
# Step 4. Wait for ACTIVE status — handled automatically by create_and_poll()
# Step 5. Get public IP
for ifaces in instance.addresses.values():
for iface in ifaces:
print(f"Public IP: {iface.addr}")
# Step 6. Connect via SSH
for ifaces in instance.addresses.values():
for iface in ifaces:
print(f"ssh ubuntu@{iface.addr}")
```
```go theme={null}
package main
import (
"context"
"fmt"
"os"
"strings"
gcore "github.com/G-Core/gcore-go"
"github.com/G-Core/gcore-go/cloud"
)
func main() {
client := gcore.NewClient()
// Step 1. Find Ubuntu 22.04 image
imageList, err := client.Cloud.Instances.Images.List(context.TODO(), cloud.InstanceImageListParams{})
if err != nil {
panic(err.Error())
}
var imageID string
for _, img := range imageList.Results {
if strings.Contains(img.Name, "ubuntu-22.04") && strings.Contains(img.Name, "x64") {
imageID = img.ID
fmt.Printf("Image: %s (%s)\n", img.Name, img.ID)
break
}
}
// Step 2. Pick a flavor (IDs are region-specific; this selects 2 vCPU / 4 GB)
flavorList, err := client.Cloud.Instances.Flavors.List(context.TODO(), cloud.InstanceFlavorListParams{})
if err != nil {
panic(err.Error())
}
var flavorID string
for _, f := range flavorList.Results {
if f.Vcpus == 2 && f.Ram == 4096 {
flavorID = f.FlavorID
fmt.Printf("Flavor: %s (%d vCPU / %d MB RAM)\n", f.FlavorID, f.Vcpus, f.Ram)
break
}
}
// Step 3. Create instance and wait (NewAndPoll polls automatically)
instance, err := client.Cloud.Instances.NewAndPoll(context.TODO(), cloud.InstanceNewParams{
Flavor: flavorID,
NameTemplate: gcore.String("my-vm-{ip_octets}"),
SSHKeyName: gcore.String("my-key"),
Interfaces: []cloud.InstanceNewParamsInterfaceUnion{{
OfExternal: &cloud.InstanceNewParamsInterfaceExternal{},
}},
Volumes: []cloud.InstanceNewParamsVolumeUnion{{
OfImage: &cloud.InstanceNewParamsVolumeImage{
ImageID: imageID,
Size: gcore.Int(20),
BootIndex: gcore.Int(0),
},
}},
})
if err != nil {
panic(err.Error())
}
fmt.Printf("Instance ID: %s, Status: %s\n", instance.ID, instance.Status)
// Step 4. Wait for ACTIVE status — handled automatically by NewAndPoll()
// Step 5. Get public IP
// Step 6. Connect via SSH
for _, addrs := range instance.Addresses {
for _, addr := range addrs {
fmt.Printf("ssh ubuntu@%s\n", addr.Addr)
}
}
}
```
## Step-by-step
Each step below explains what the call does, which parameters matter, and what the response looks like. Use this section to understand the flow or to debug a specific step.
### Step 1. Choose an OS image
The image determines the operating system and sets the minimum boot volume size for Step 3.
```python theme={null}
import os
from gcore import Gcore
client = Gcore()
images = client.cloud.instances.images.list()
for img in images.results:
print(img.id, img.name)
```
```go theme={null}
package main
import (
"context"
"fmt"
gcore "github.com/G-Core/gcore-go"
"github.com/G-Core/gcore-go/cloud"
)
func main() {
client := gcore.NewClient()
imageList, err := client.Cloud.Instances.Images.List(context.TODO(), cloud.InstanceImageListParams{})
if err != nil {
panic(err.Error())
}
fmt.Printf("%+v\n", imageList.Count)
}
```
```bash theme={null}
curl "https://api.gcore.com/cloud/v1/images/$GCORE_CLOUD_PROJECT_ID/$GCORE_CLOUD_REGION_ID" \
-H "Authorization: APIKey $GCORE_API_KEY"
```
Response:
```json theme={null}
{
"results": [
{
"id": "e460e48c-6836-447e-bc9c-16fc4225d318", // save as IMAGE_ID
"name": "ubuntu-22.04-x64",
"os_distro": "ubuntu",
"os_version": "22.04",
"architecture": "x86_64",
"min_disk": 5
}
]
}
```
Save the `id` of the chosen image. The `min_disk` value is the minimum boot volume size in GiB.
```bash theme={null}
export IMAGE_ID="{IMAGE_ID}"
```
### Step 2. Choose a flavor
A [flavor](/api-reference/cloud/flavors/list-flavors) sets the vCPU count and RAM for the instance. IDs are region-specific — run this call to see what's available in the selected region.
```python theme={null}
flavors = client.cloud.instances.flavors.list()
for f in flavors.results:
print(f.flavor_id, f"{f.vcpus} vCPU / {f.ram // 1024} GB RAM")
```
```go theme={null}
instanceFlavorList, err := client.Cloud.Instances.Flavors.List(context.TODO(), cloud.InstanceFlavorListParams{})
if err != nil {
panic(err.Error())
}
fmt.Printf("%+v\n", instanceFlavorList.Count)
```
```bash theme={null}
curl "https://api.gcore.com/cloud/v1/flavors/$GCORE_CLOUD_PROJECT_ID/$GCORE_CLOUD_REGION_ID" \
-H "Authorization: APIKey $GCORE_API_KEY"
```
Response:
```json theme={null}
{
"results": [
{"flavor_id": "g2-standard-2-4", "vcpus": 2, "ram": 4096},
{"flavor_id": "g2-standard-4-8", "vcpus": 4, "ram": 8192}
]
}
```
```bash theme={null}
export FLAVOR_ID="{FLAVOR_ID}" # replace with a flavor_id from the response above
```
### Step 3. Create the instance
The instance is created with a public interface - `"type": "external"` assigns a public IPv4 address automatically, without a separate floating IP.
| Parameter | Required | Description |
| ---------------------- | -------- | --------------------------------------------------------------------- |
| `name` | Yes | Display name for the instance. |
| `flavor` | Yes | Flavor ID string from Step 2. |
| `ssh_key_name` | Yes | Name of an existing SSH key in the project. |
| `interfaces[].type` | Yes | `"external"` for a public IP. Use `"subnet"` for a private interface. |
| `volumes[].source` | Yes | `"image"` to boot from an image. |
| `volumes[].size` | Yes | Boot volume size in GiB. Must be at least `min_disk` from Step 1. |
| `volumes[].boot_index` | Yes | Set to `0` for the boot volume. |
```python theme={null}
instance = client.cloud.instances.create_and_poll(
name="my-vm",
flavor=os.environ["FLAVOR_ID"],
ssh_key_name="my-key",
interfaces=[{"type": "external"}],
volumes=[{
"source": "image",
"image_id": os.environ["IMAGE_ID"],
"size": 20,
"boot_index": 0,
}],
)
instance_id = instance.id
```
```go theme={null}
instance, err := client.Cloud.Instances.NewAndPoll(context.TODO(), cloud.InstanceNewParams{
Flavor: os.Getenv("FLAVOR_ID"),
NameTemplate: gcore.String("my-vm-{ip_octets}"),
SSHKeyName: gcore.String("my-key"),
Interfaces: []cloud.InstanceNewParamsInterfaceUnion{{
OfExternal: &cloud.InstanceNewParamsInterfaceExternal{},
}},
Volumes: []cloud.InstanceNewParamsVolumeUnion{{
OfImage: &cloud.InstanceNewParamsVolumeImage{
ImageID: os.Getenv("IMAGE_ID"),
Size: gcore.Int(20),
BootIndex: gcore.Int(0),
},
}},
})
if err != nil {
panic(err.Error())
}
// instance is ACTIVE when NewAndPoll returns
instanceID := instance.ID
```
```bash theme={null}
curl -X POST "https://api.gcore.com/cloud/v2/instances/$GCORE_CLOUD_PROJECT_ID/$GCORE_CLOUD_REGION_ID" \
-H "Authorization: APIKey $GCORE_API_KEY" \
-H "Content-Type: application/json" \
-d '{
"name": "my-vm",
"flavor": "'"$FLAVOR_ID"'",
"ssh_key_name": "my-key",
"interfaces": [{"type": "external"}],
"volumes": [
{
"source": "image",
"image_id": "'"$IMAGE_ID"'",
"size": 20,
"boot_index": 0
}
]
}'
```
Response:
```json theme={null}
{
"tasks": ["d4a4b10e-5d22-4c23-8e09-f7a3e1c1a999"] // save as TASK_ID
}
```
### Step 4. Wait for the instance to be ready
Instance creation is asynchronous. The Python SDK `create_and_poll()` and the Go SDK `NewAndPoll()` in Step 3 handle polling automatically and return only when the instance is ACTIVE. For curl, poll `GET /cloud/v1/tasks/{task_id}` every 5 seconds until `state` is `FINISHED`.
`create_and_poll()` in Step 3 polls automatically. `instance` is ACTIVE when Step 3 returns.
`NewAndPoll()` in Step 3 polls automatically. `instance` is ACTIVE when Step 3 returns.
```bash theme={null}
curl "https://api.gcore.com/cloud/v1/tasks/$TASK_ID" \
-H "Authorization: APIKey $GCORE_API_KEY"
```
While provisioning:
```json theme={null}
{"state": "RUNNING", "task_type": "create_vm"}
```
When complete:
```json theme={null}
{
"state": "FINISHED",
"created_resources": {
"instances": ["169942e0-9b53-42df-95ef-1a8b6525c2bd"], // save as INSTANCE_ID
"volumes": ["726ecfcc-7fd0-4e30-a86e-7892524aa483"]
}
}
```
```bash theme={null}
export INSTANCE_ID="{INSTANCE_ID}"
```
### Step 5. Get the public IP address
The `addresses` field on the instance object contains the public IP assigned at creation.
```python theme={null}
# instance.addresses is populated on the object returned by create_and_poll()
for ifaces in instance.addresses.values():
for iface in ifaces:
print(f"IP: {iface.addr}")
```
```go theme={null}
instance, err := client.Cloud.Instances.Get(
context.TODO(),
"instance_id",
cloud.InstanceGetParams{},
)
if err != nil {
panic(err.Error())
}
fmt.Printf("%+v\n", instance.ID)
```
```bash theme={null}
curl "https://api.gcore.com/cloud/v1/instances/$GCORE_CLOUD_PROJECT_ID/$GCORE_CLOUD_REGION_ID/$INSTANCE_ID" \
-H "Authorization: APIKey $GCORE_API_KEY"
```
Response:
```json theme={null}
{
"status": "ACTIVE",
"addresses": {
"pub_net": [
{"addr": "203.0.113.42", "type": "fixed"}
]
}
}
```
The keys in `addresses` are network names that vary by region (typically `"pub_net"` for public interfaces), so iterate over all keys when parsing programmatically.
### Step 6. Connect via SSH
Connect using the public IP from Step 5. Replace `ubuntu` with the default user for the chosen OS image.
```bash theme={null}
ssh -i ~/.ssh/my-key ubuntu@203.0.113.42
```
| OS | Default user |
| ----------- | ------------ |
| Ubuntu | `ubuntu` |
| Debian | `debian` |
| CentOS | `centos` |
| Rocky Linux | `rocky` |
| Fedora | `fedora` |
The default security group is applied automatically, allowing inbound SSH (port 22) and ICMP.
## Filter images by OS
To list only Gcore-managed public images, add the `visibility=public` parameter.
```python theme={null}
images = client.cloud.instances.images.list(visibility="public")
for img in images.results:
print(img.id, img.name, img.os_distro, img.os_version)
```
```go theme={null}
imageList, err := client.Cloud.Instances.Images.List(context.TODO(), cloud.InstanceImageListParams{
Visibility: cloud.InstanceImageListParamsVisibilityPublic,
})
if err != nil {
panic(err.Error())
}
for _, img := range imageList.Results {
fmt.Printf("%s %s\n", img.ID, img.Name)
}
```
```bash theme={null}
curl "https://api.gcore.com/cloud/v1/images/$GCORE_CLOUD_PROJECT_ID/$GCORE_CLOUD_REGION_ID?visibility=public" \
-H "Authorization: APIKey $GCORE_API_KEY"
```
## Clean up
To delete the instance and its boot volume in a single call, pass the volume ID in the `volumes` query parameter.
```python theme={null}
boot_volume_id = instance.volumes[0].id
client.cloud.instances.delete_and_poll(
instance_id=instance.id,
volumes=boot_volume_id,
)
```
```go theme={null}
taskIDList, err := client.Cloud.Instances.Delete(
context.TODO(),
"instance_id",
cloud.InstanceDeleteParams{},
)
if err != nil {
panic(err.Error())
}
fmt.Printf("%+v\n", taskIDList.Tasks)
```
```bash theme={null}
curl -X DELETE \
"https://api.gcore.com/cloud/v1/instances/$GCORE_CLOUD_PROJECT_ID/$GCORE_CLOUD_REGION_ID/$INSTANCE_ID?volumes=$BOOT_VOLUME_ID" \
-H "Authorization: APIKey $GCORE_API_KEY"
```
Response:
```json theme={null}
{"tasks": ["ef3b0d34-..."]}
```
Poll `GET /cloud/v1/tasks/{task_id}` every 5 seconds until `state` is `FINISHED`.
If a floating IP was assigned to the instance, add `delete_floatings=true` to the query string.