> ## Documentation Index
> Fetch the complete documentation index at: https://docs.gcore.com/llms.txt
> Use this file to discover all available pages before exploring further.
# Manage DNS records (advanced interface mode with dynamic response)
This article explains how to create DNS record sets (RRSets) in [Gcore Managed DNS](https://gcore.com/dns) advanced interface mode.
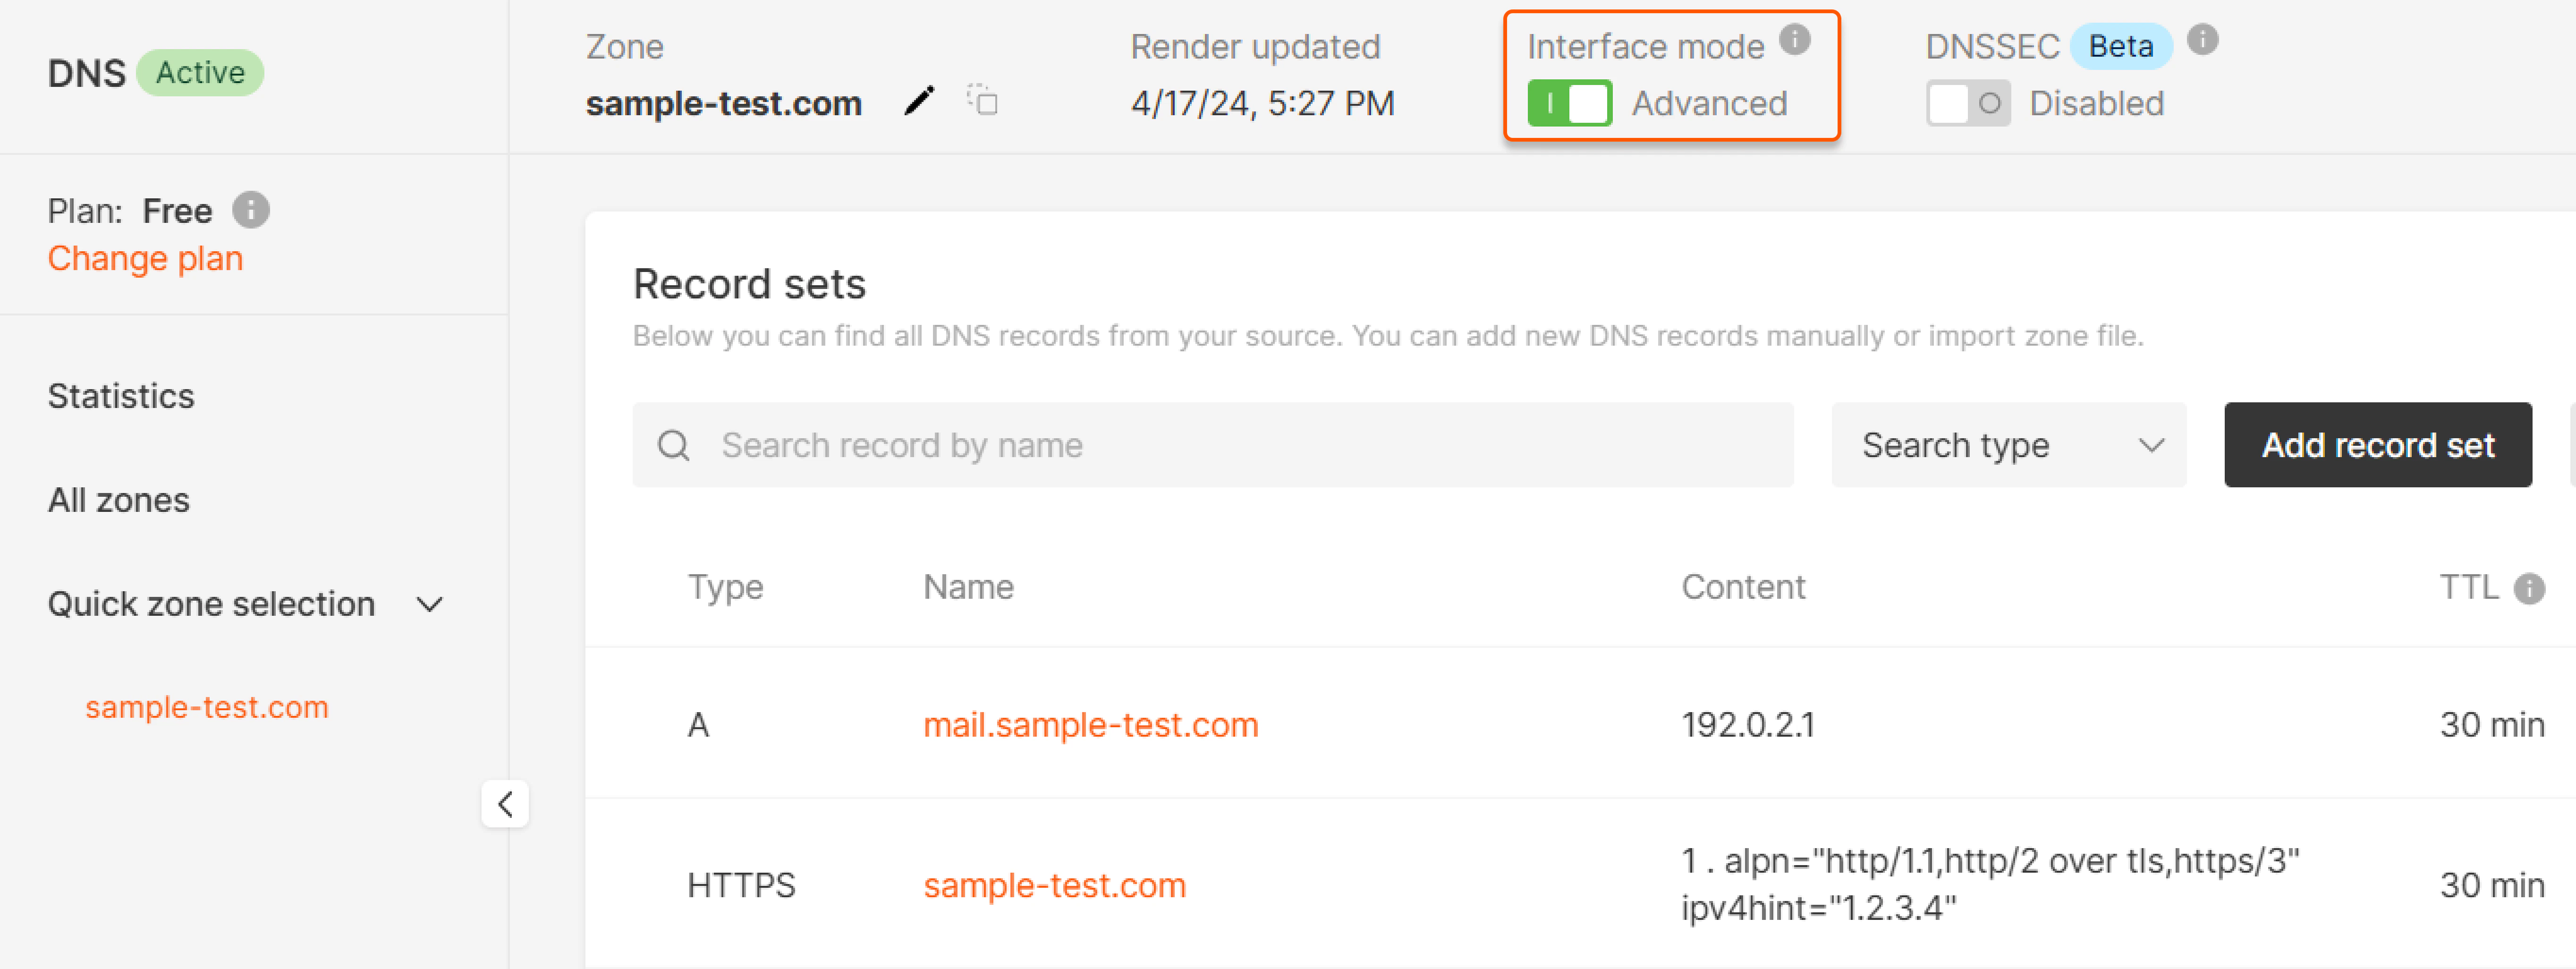
To check if advanced mode is enabled, navigate to [DNS](https://portal.gcore.com/dns/zones) and open the records page of the desired DNS zone by clicking on the domain name:
 Ensure the toggle is enabled/green in order to manage DNS records according to this guide:
 ## Create a DNS record
1\. Navigate to the [All zones](https://portal.gcore.com/dns/zones) tab and select the domain zone for which you want to add records. Or, click three-dot icon on the right and then click **Go to records**.
2\. The page with your existing DNS records will open. Click **Add record set**.
## Create a DNS record
1\. Navigate to the [All zones](https://portal.gcore.com/dns/zones) tab and select the domain zone for which you want to add records. Or, click three-dot icon on the right and then click **Go to records**.
2\. The page with your existing DNS records will open. Click **Add record set**.
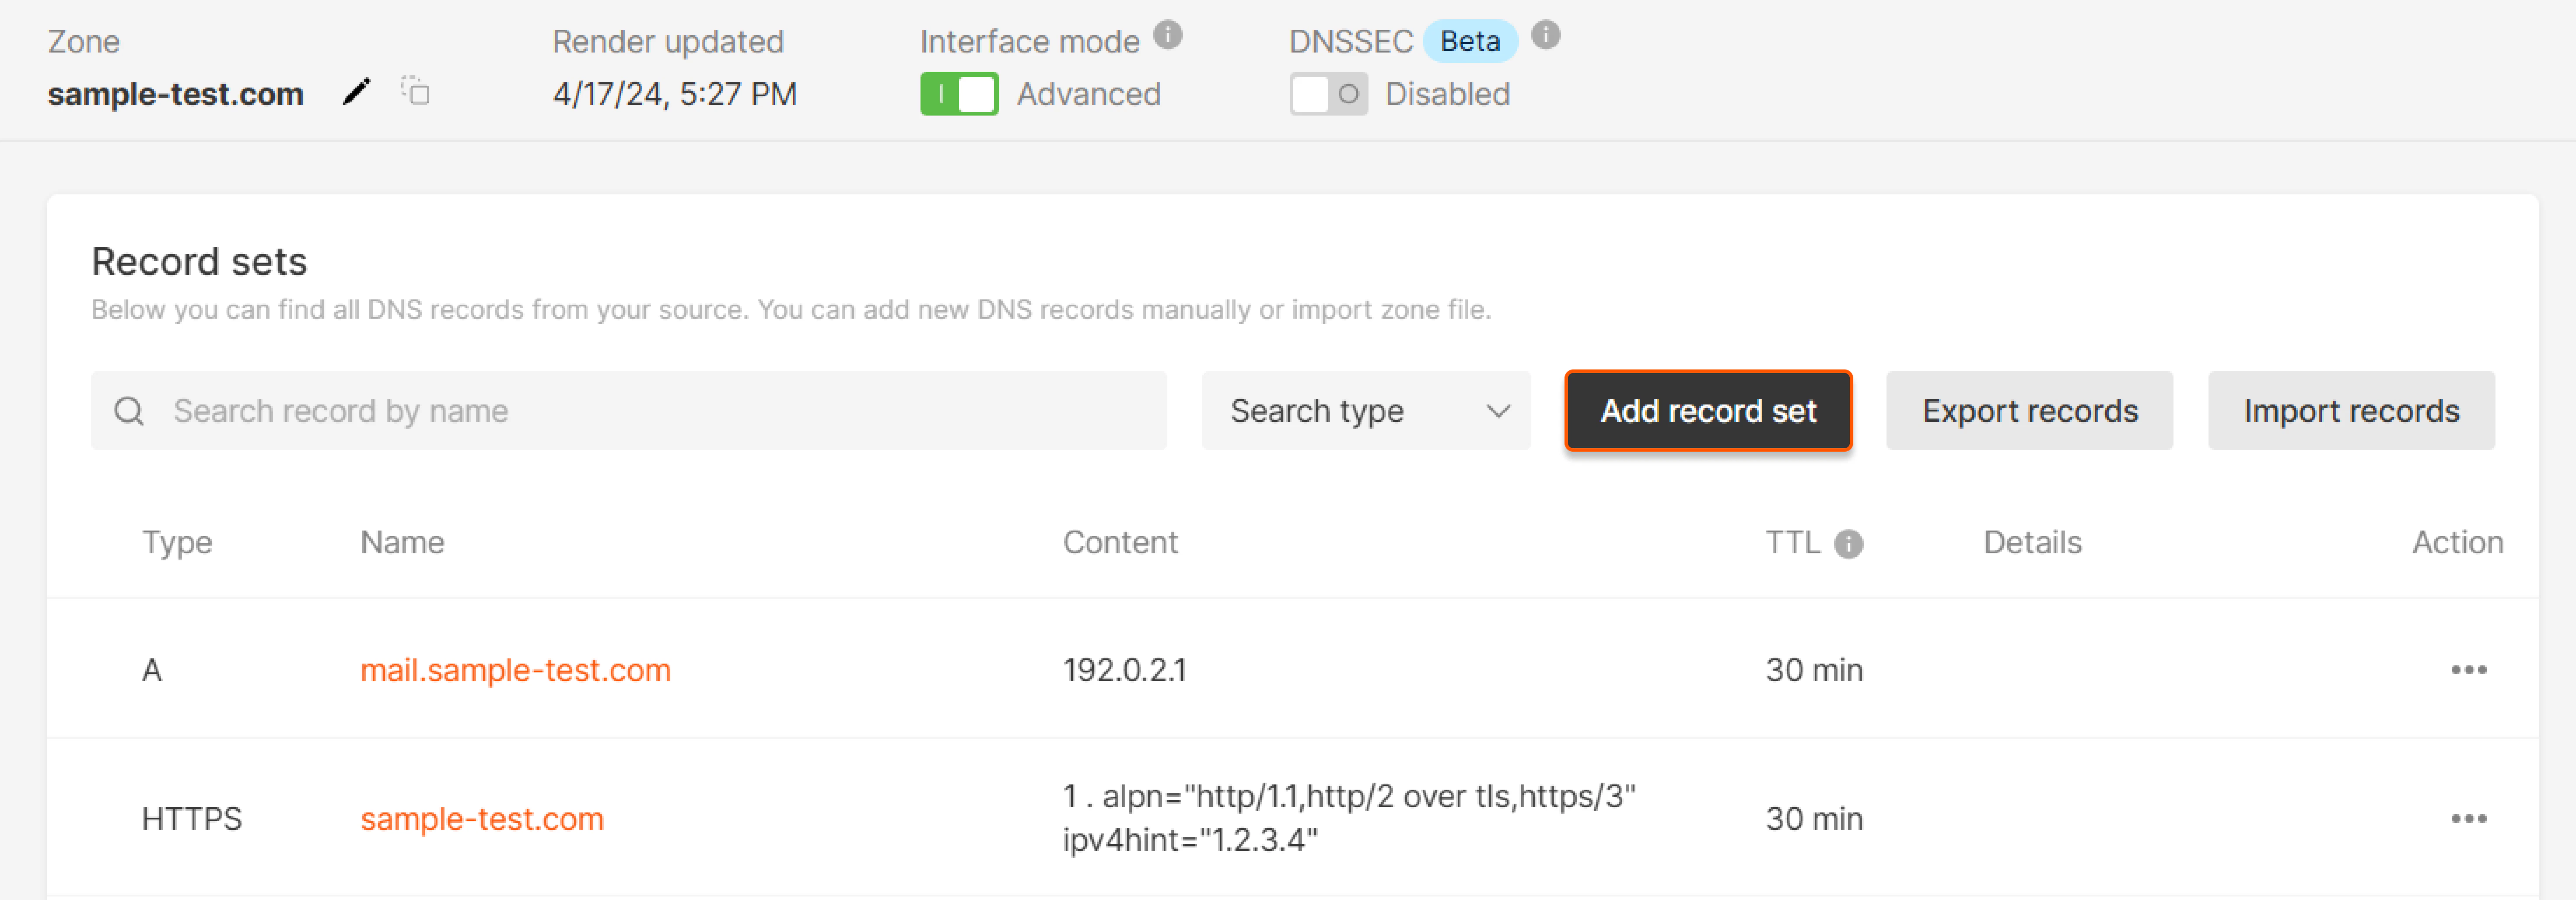 A new page will open. Perform the remaining steps there.
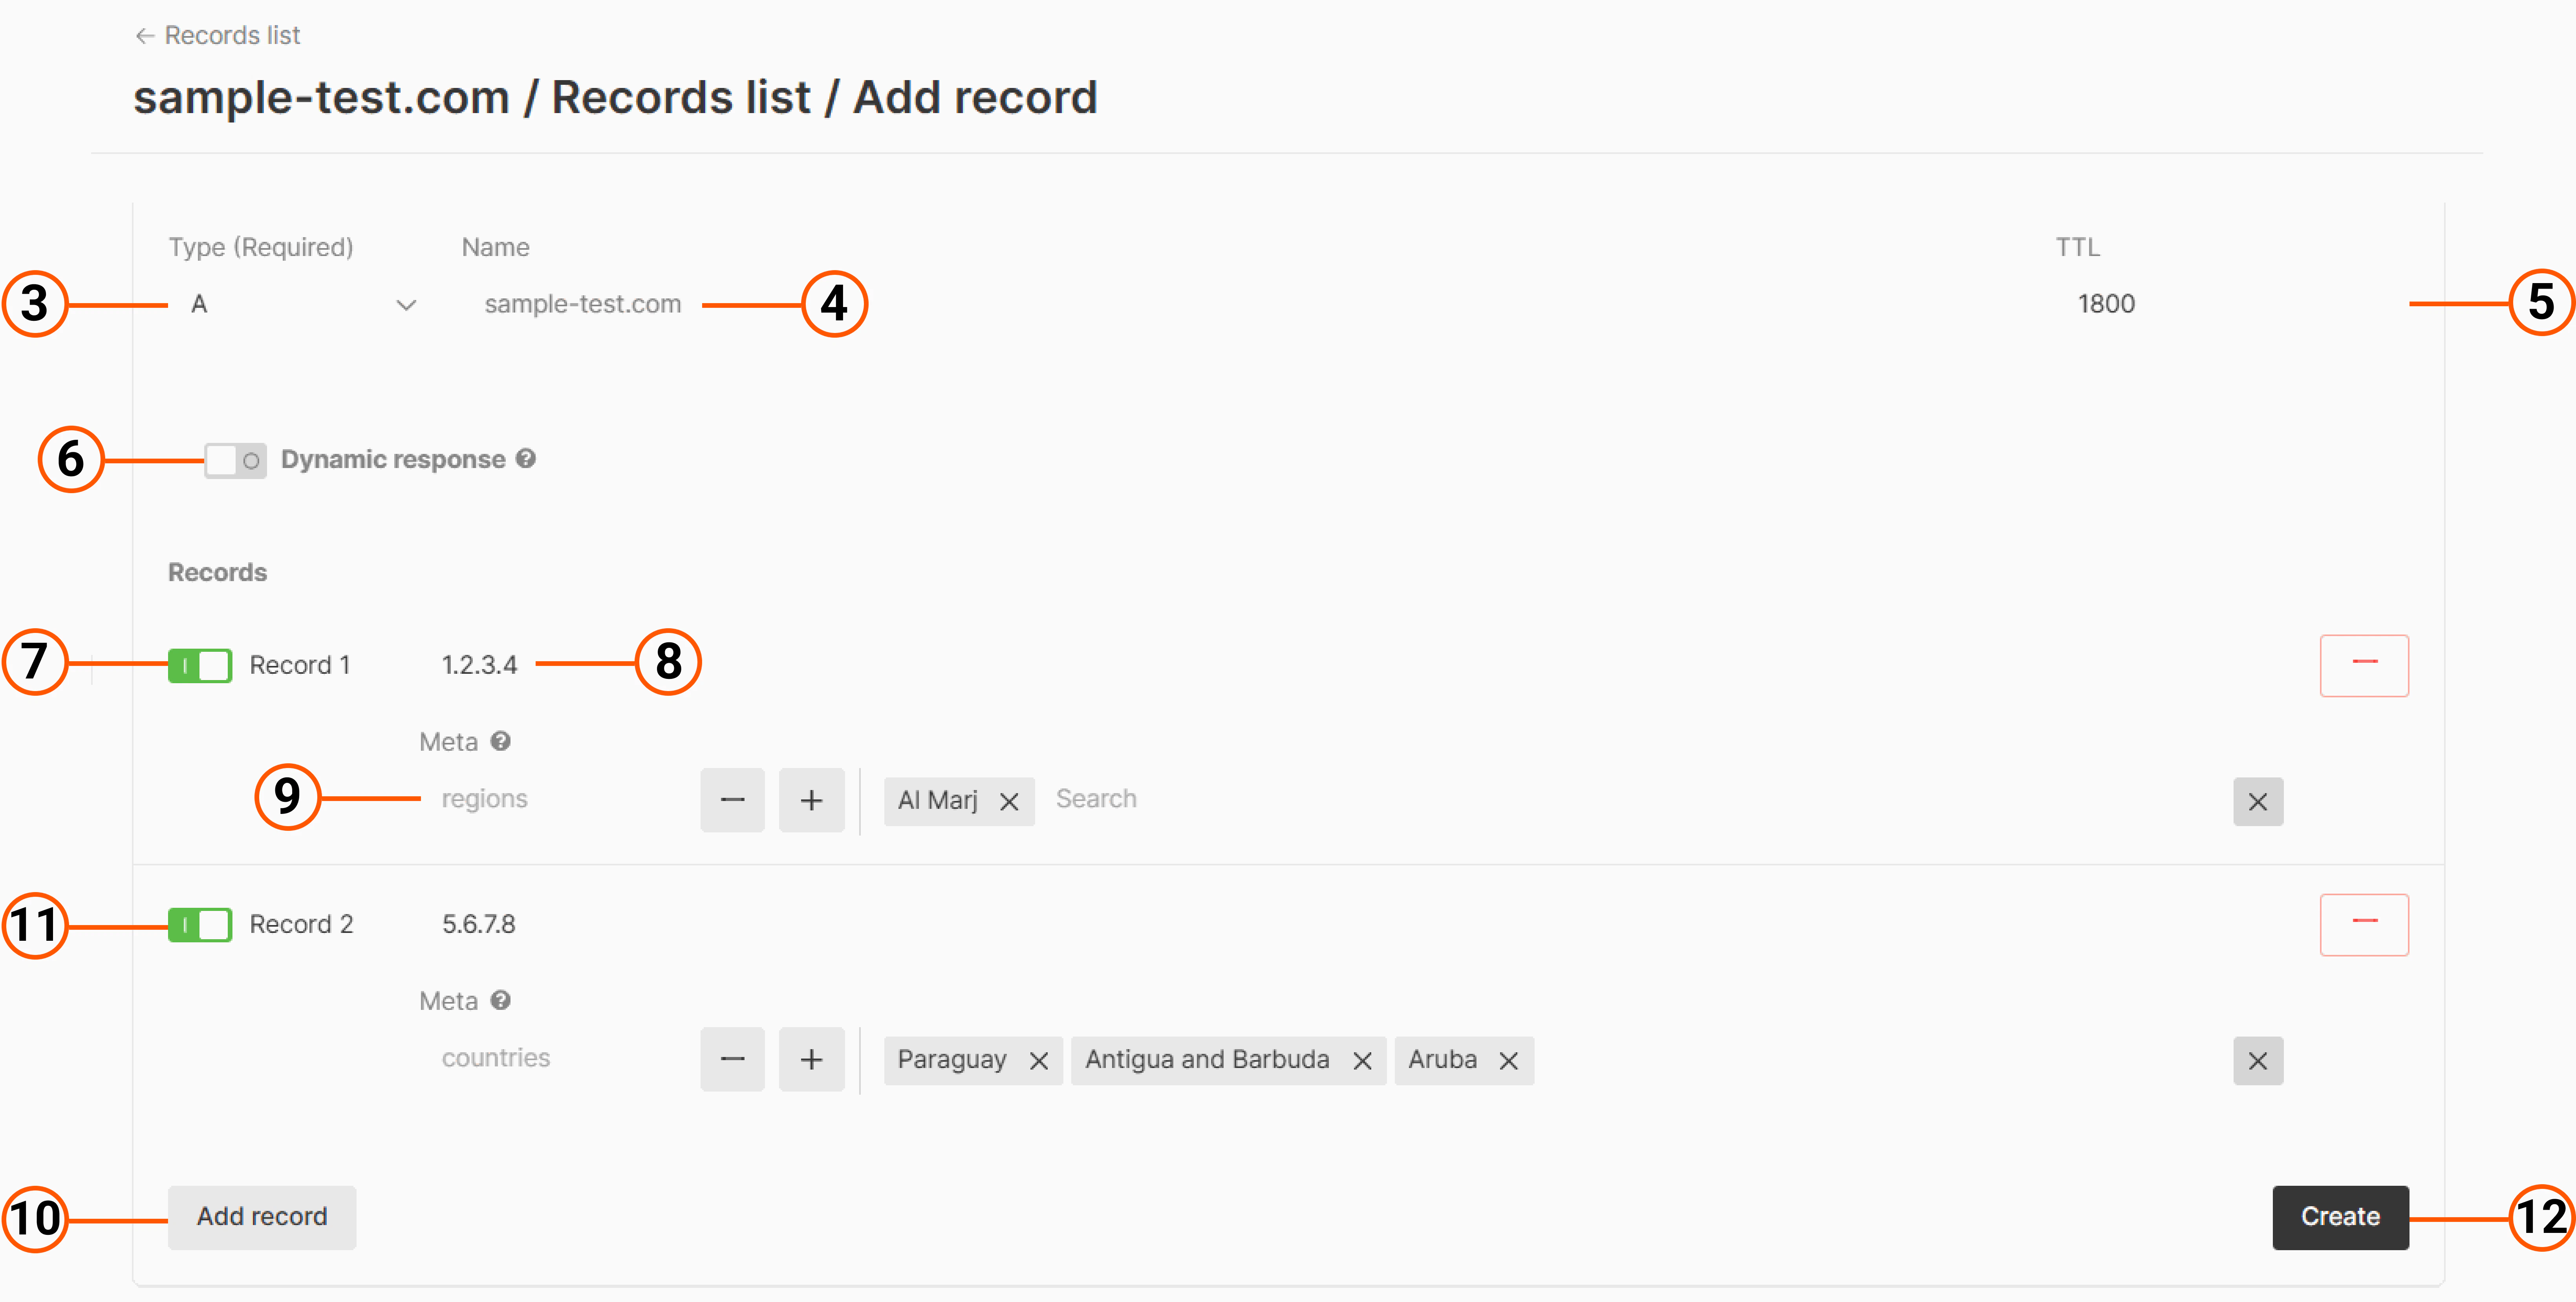 3\. In the "Type" section, select the type of DNS record you want to create: A, AAAA, NS, CNAME, MX, SRV, HTTPS, TXT, or CAA. Learn more about them in our article about [supported DNS record types](/dns/dns-records).
4\. In the "Name" field, specify the subdomain the record belongs to. There are several options:
* Leave the field blank to add a record for the main domain (apex/naked domain; in the picture above it is `sample-test.com`).
* Enter the name of this subdomain to add a record for a specific subdomain (for example, if you enter `one`, the record will be created for `one.sample-test.com`).
* Enter an asterisk (\*) to add a record for all subdomains at once (wildcard record).
5\. In the "TTL" field, specify the TTL (time to live) in seconds.
Let's take an example of an A record with a TTL of 300 seconds, equal to 5 minutes. Say you change the value of this record from `10.0.0.1` to `10.0.0.0`. For up to 5 minutes, users requesting your domain will get a server with IP `10.0.0.1` (this value will be stored in the cache of recursive DNS servers). However, within a maximum of 5 minutes, the DNS server will see the new value of the A record and refresh its cache. When your domain is requested, the DNS server will send users to the server with IP `10.0.0.0`.
The point within the 300-second interval at which you changed the record determines how long it will take for users to access the new record. If you change the record 240 seconds into the TTL, users will wait only one minute; if you change it at 1 second, they will wait 4 minutes and 59 seconds. So, choose a TTL duration according to your maximum wait-time tolerance.
6\. (Optional) Configure dynamic response.
**Note**
The dynamic response feature is also available for the Free plan, but to create more than one dynamic RRset you'll need a paid plan.
Gcore's DNS servers can give different DNS records to different users. For example, you can opt to send users in Asia to an Asian server and users in Europe to a European one. This is called dynamic response. Learn how to configure it in detail in our [dedicated article](/dns/dns-records/configure-weight-balancing-and-geobalancing).
To enable dynamic response, enable the "Dynamic response" toggle. If you don't require balancing, leave it disabled and go to the next step.
You can also configure the dynamic response feature via API requests using dynamic RRsets. For more information about pickers and selectors, read the [API documentation](/api-reference/dns/rrsets/create-rrset).
7\. Enable the toggle to make the value of the record active.
8\. In the field, enter a value appropriate for your record type.
Record type | Value
\---|---
A | The IP address (IPv4) of the server of the web page that will open by your domain name.
Example: `128.128.128.128`
AAAA | The IP address (IPv6) of the server of the web page that will open by your domain name.
Example: `7625:0d18:1fa3:07d7:1f44:8a2e:07a0:678h`
NS | The name of the zone you want to delegate your domain to.
Example: `ns1.smth.com`
CNAME | The domain or domain zone name that your domain should refer to.
Example: `uuuuu8.cdn.co`
MX | The name of the mail server that receives mail for your domain. Example: `ASPMX.L.GOOGLE.COM`
If you are using multiple mail servers, fill in the "Priority" field for each server.
The lower the value in this field, the higher the priority.
SRV | The canonical name of the machine providing the service.
Example: `_sip._tcp.example.com. 3600 IN SRV 10 50 5060 sipserver.example.com`
HTTPS | HTTPS is a resource record that provides information and parameters for how to access a web service available via HTTTS.
Example: *example.com. 1800 IN HTTPS 1 . alpn=h3,h3-29,h2 ipv4hint=1.2.3.4,9.8.7.6 ipv6hint=2001:db8:3333:4444:5555:6666:7777:8888, 2001:db8:3333:4444:CCCC:DDDD:EEEE:FFFF*
TXT | Text information the record should contain.
Example: `logmein-verification-code=976afe6f-8039-40e4-95a5-261b462`
CAA | Defines the certificate authorities who are allowed to issue an SSL/TLS-certificate for the domain name.
The recording consists of three parts which are separated by a space.
`CAA [flags] [tag] "[value]"`
The "value" must be enclosed in double-quotes ("").
Example: 0 issue "comodo.com"
9\. (Optional) Specify associated metadata to be used for dynamic response configuration. Learn more in our [dedicated metadata guide](/dns/dns-records/configure-weight-balancing-and-geobalancing).
10\. (Optional) Click **Add record** if you want to specify several values for one record.
11\. A new module will appear. There, enter the content of the next record and associated metadata if needed. You can also delete any record by clicking the "—" button next to it or disable it via its toggle.
12\. Click **Create**.
That's it! The DNS records with the specified parameters will be created. You can check if the created record has been added correctly using the [Gcore DNS Lookup](https://gcore.com/dev-tools/dns-lookup) tool.
## Manage a DNS record
1\. Navigate to the [All zones](https://portal.gcore.com/dns/zones) tab and select the domain zone in which you want to manage (edit or delete) records. Or, click the three-dot icon on the right and then click **Go to records**.
The new page will open. Perform the remaining steps there.
3\. In the "Type" section, select the type of DNS record you want to create: A, AAAA, NS, CNAME, MX, SRV, HTTPS, TXT, or CAA. Learn more about them in our article about [supported DNS record types](/dns/dns-records).
4\. In the "Name" field, specify the subdomain the record belongs to. There are several options:
* Leave the field blank to add a record for the main domain (apex/naked domain; in the picture above it is `sample-test.com`).
* Enter the name of this subdomain to add a record for a specific subdomain (for example, if you enter `one`, the record will be created for `one.sample-test.com`).
* Enter an asterisk (\*) to add a record for all subdomains at once (wildcard record).
5\. In the "TTL" field, specify the TTL (time to live) in seconds.
Let's take an example of an A record with a TTL of 300 seconds, equal to 5 minutes. Say you change the value of this record from `10.0.0.1` to `10.0.0.0`. For up to 5 minutes, users requesting your domain will get a server with IP `10.0.0.1` (this value will be stored in the cache of recursive DNS servers). However, within a maximum of 5 minutes, the DNS server will see the new value of the A record and refresh its cache. When your domain is requested, the DNS server will send users to the server with IP `10.0.0.0`.
The point within the 300-second interval at which you changed the record determines how long it will take for users to access the new record. If you change the record 240 seconds into the TTL, users will wait only one minute; if you change it at 1 second, they will wait 4 minutes and 59 seconds. So, choose a TTL duration according to your maximum wait-time tolerance.
6\. (Optional) Configure dynamic response.
**Note**
The dynamic response feature is also available for the Free plan, but to create more than one dynamic RRset you'll need a paid plan.
Gcore's DNS servers can give different DNS records to different users. For example, you can opt to send users in Asia to an Asian server and users in Europe to a European one. This is called dynamic response. Learn how to configure it in detail in our [dedicated article](/dns/dns-records/configure-weight-balancing-and-geobalancing).
To enable dynamic response, enable the "Dynamic response" toggle. If you don't require balancing, leave it disabled and go to the next step.
You can also configure the dynamic response feature via API requests using dynamic RRsets. For more information about pickers and selectors, read the [API documentation](/api-reference/dns/rrsets/create-rrset).
7\. Enable the toggle to make the value of the record active.
8\. In the field, enter a value appropriate for your record type.
Record type | Value
\---|---
A | The IP address (IPv4) of the server of the web page that will open by your domain name.
Example: `128.128.128.128`
AAAA | The IP address (IPv6) of the server of the web page that will open by your domain name.
Example: `7625:0d18:1fa3:07d7:1f44:8a2e:07a0:678h`
NS | The name of the zone you want to delegate your domain to.
Example: `ns1.smth.com`
CNAME | The domain or domain zone name that your domain should refer to.
Example: `uuuuu8.cdn.co`
MX | The name of the mail server that receives mail for your domain. Example: `ASPMX.L.GOOGLE.COM`
If you are using multiple mail servers, fill in the "Priority" field for each server.
The lower the value in this field, the higher the priority.
SRV | The canonical name of the machine providing the service.
Example: `_sip._tcp.example.com. 3600 IN SRV 10 50 5060 sipserver.example.com`
HTTPS | HTTPS is a resource record that provides information and parameters for how to access a web service available via HTTTS.
Example: *example.com. 1800 IN HTTPS 1 . alpn=h3,h3-29,h2 ipv4hint=1.2.3.4,9.8.7.6 ipv6hint=2001:db8:3333:4444:5555:6666:7777:8888, 2001:db8:3333:4444:CCCC:DDDD:EEEE:FFFF*
TXT | Text information the record should contain.
Example: `logmein-verification-code=976afe6f-8039-40e4-95a5-261b462`
CAA | Defines the certificate authorities who are allowed to issue an SSL/TLS-certificate for the domain name.
The recording consists of three parts which are separated by a space.
`CAA [flags] [tag] "[value]"`
The "value" must be enclosed in double-quotes ("").
Example: 0 issue "comodo.com"
9\. (Optional) Specify associated metadata to be used for dynamic response configuration. Learn more in our [dedicated metadata guide](/dns/dns-records/configure-weight-balancing-and-geobalancing).
10\. (Optional) Click **Add record** if you want to specify several values for one record.
11\. A new module will appear. There, enter the content of the next record and associated metadata if needed. You can also delete any record by clicking the "—" button next to it or disable it via its toggle.
12\. Click **Create**.
That's it! The DNS records with the specified parameters will be created. You can check if the created record has been added correctly using the [Gcore DNS Lookup](https://gcore.com/dev-tools/dns-lookup) tool.
## Manage a DNS record
1\. Navigate to the [All zones](https://portal.gcore.com/dns/zones) tab and select the domain zone in which you want to manage (edit or delete) records. Or, click the three-dot icon on the right and then click **Go to records**.
The new page will open. Perform the remaining steps there.
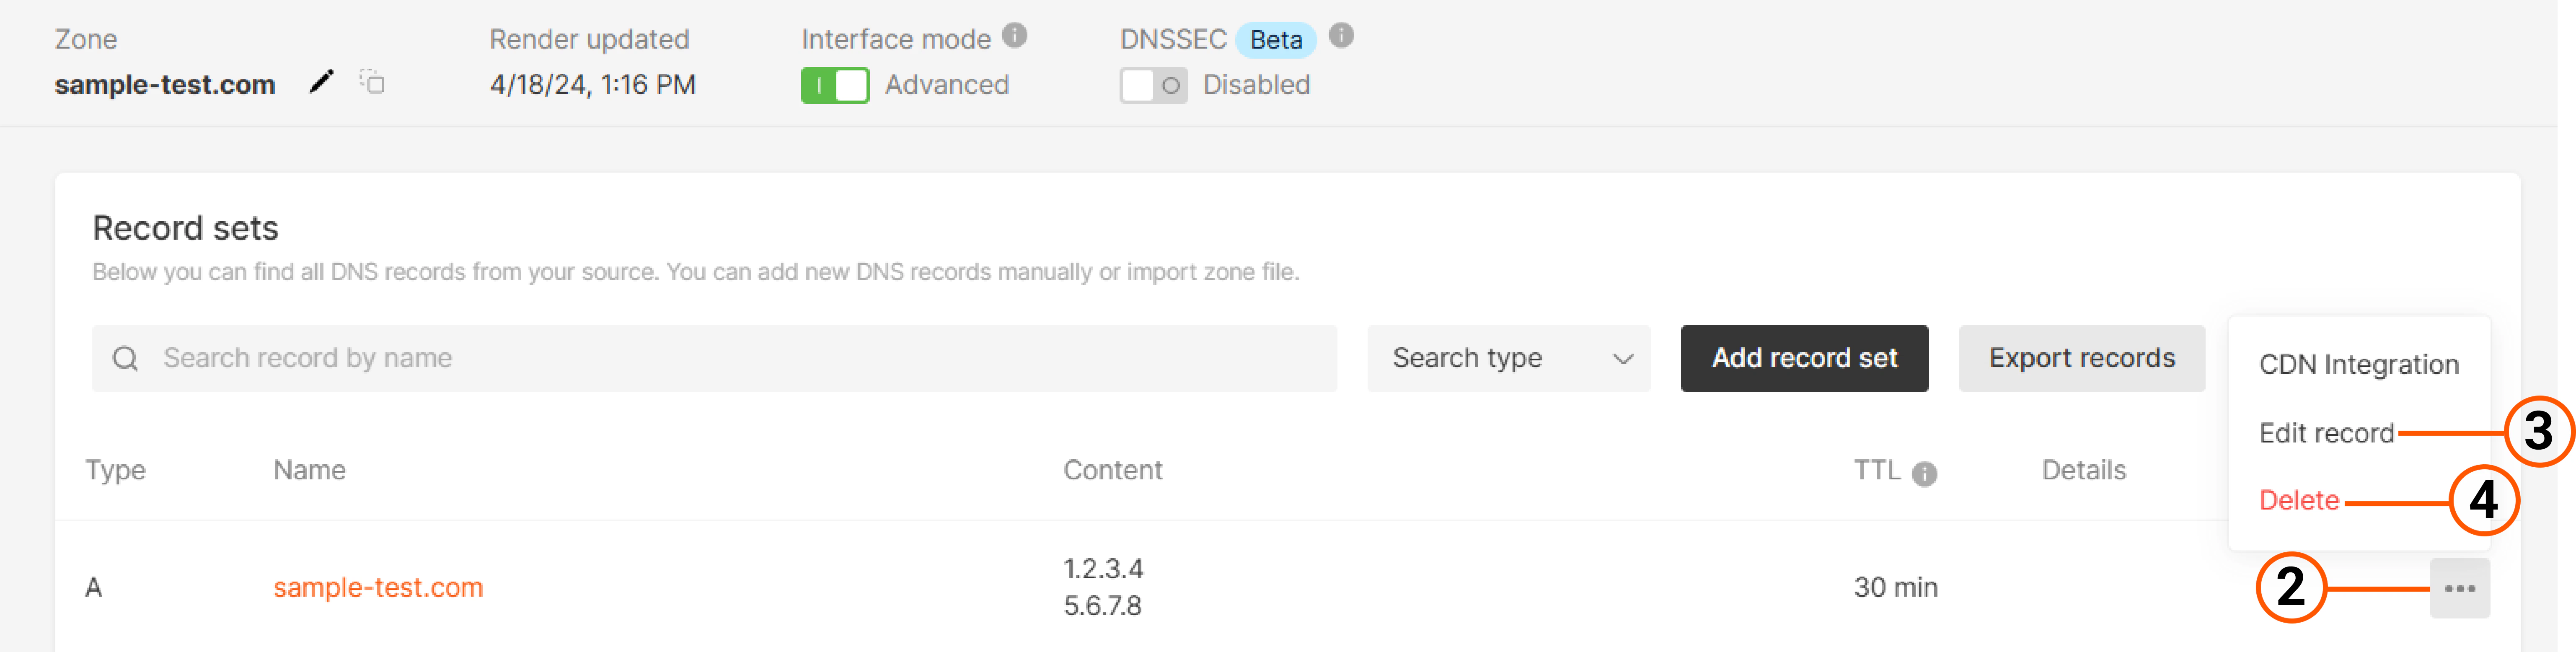 2\. Click on the three-dot icon next to the desired resource record, or click on its name.
3\. In the menu that appears, click **Edit record** if you want to edit the record.
4\. In the menu that appears, click **Delete** if you want to delete the record.
2\. Click on the three-dot icon next to the desired resource record, or click on its name.
3\. In the menu that appears, click **Edit record** if you want to edit the record.
4\. In the menu that appears, click **Delete** if you want to delete the record.