> ## Documentation Index
> Fetch the complete documentation index at: https://docs.gcore.com/llms.txt
> Use this file to discover all available pages before exploring further.
# Deploy a custom model
If the [Application Catalog](/edge-ai/everywhere-inference/application-catalog) does not include the model you need, you can deploy any Docker container image from a public or private registry.
The container image must meet Everywhere Inference requirements — [prepare it for deployment](/edge-ai/everywhere-inference/ai-models/prepare-a-custom-ai-model-for-deployment) before proceeding.
[Request a quota increase](/edge-ai/everywhere-inference/quotas/request-quota-increase) if the account quota is insufficient for the selected flavor.
## Deploy the model
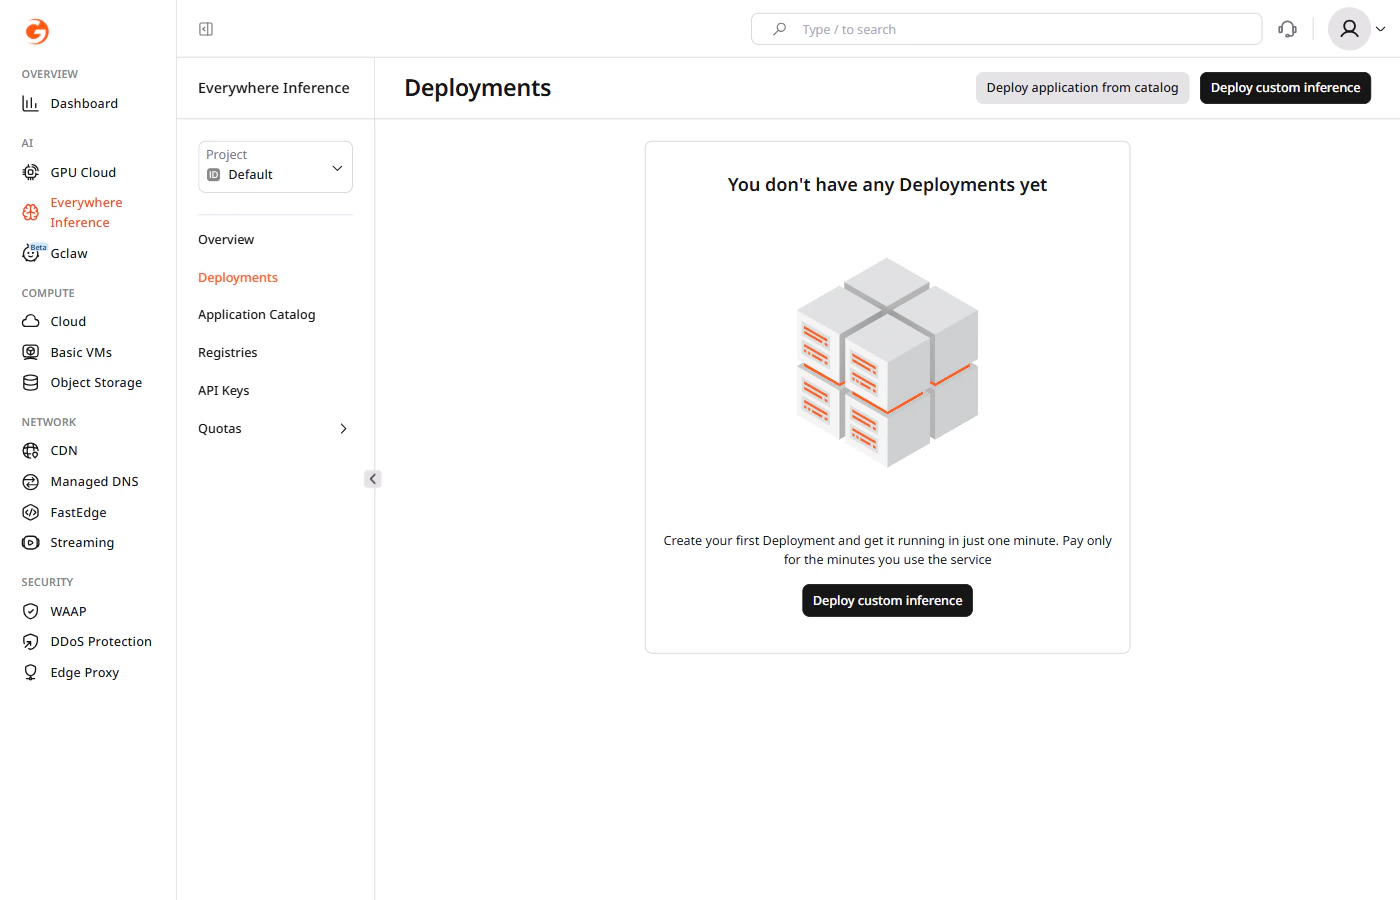
In the [Gcore Customer Portal](https://portal.gcore.com/), navigate to **Everywhere Inference** > **Deployments** and click **Deploy custom inference** in the top-right corner. The **Deploy custom model** form opens.
 ### Step 1. Configure the model image
Under **Model image**, configure the container image source.
**Public registry**: Select **Public**, then enter the **Model image URL (docker tag)** and the **Container port** where the model listens for requests.
### Step 1. Configure the model image
Under **Model image**, configure the container image source.
**Public registry**: Select **Public**, then enter the **Model image URL (docker tag)** and the **Container port** where the model listens for requests.
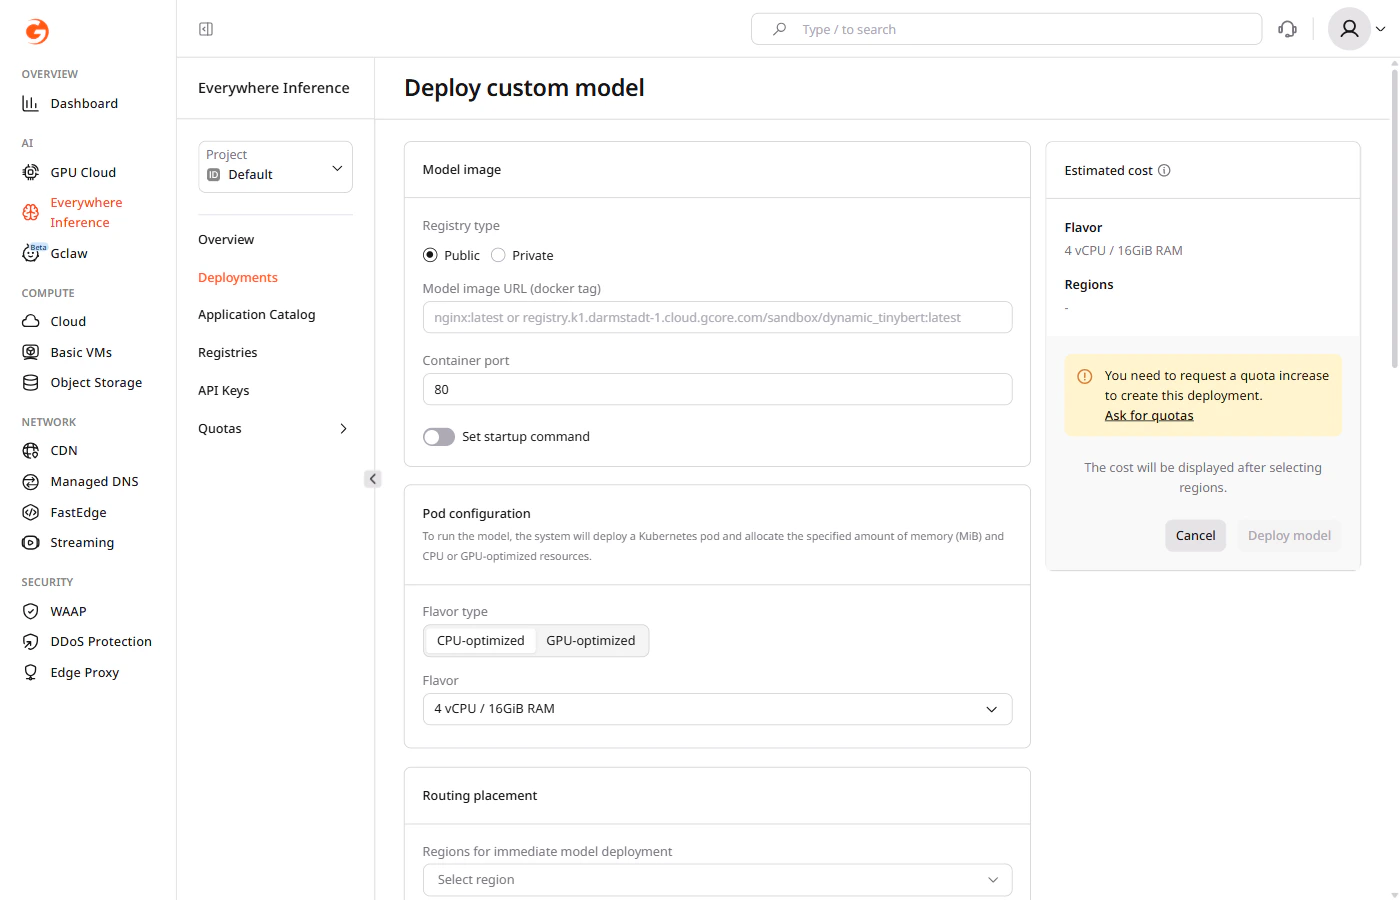 **Private registry**: Select **Private**, select the registry from the **Registry** dropdown, then enter the **Model image URL (docker tag)** and the **Container port**.
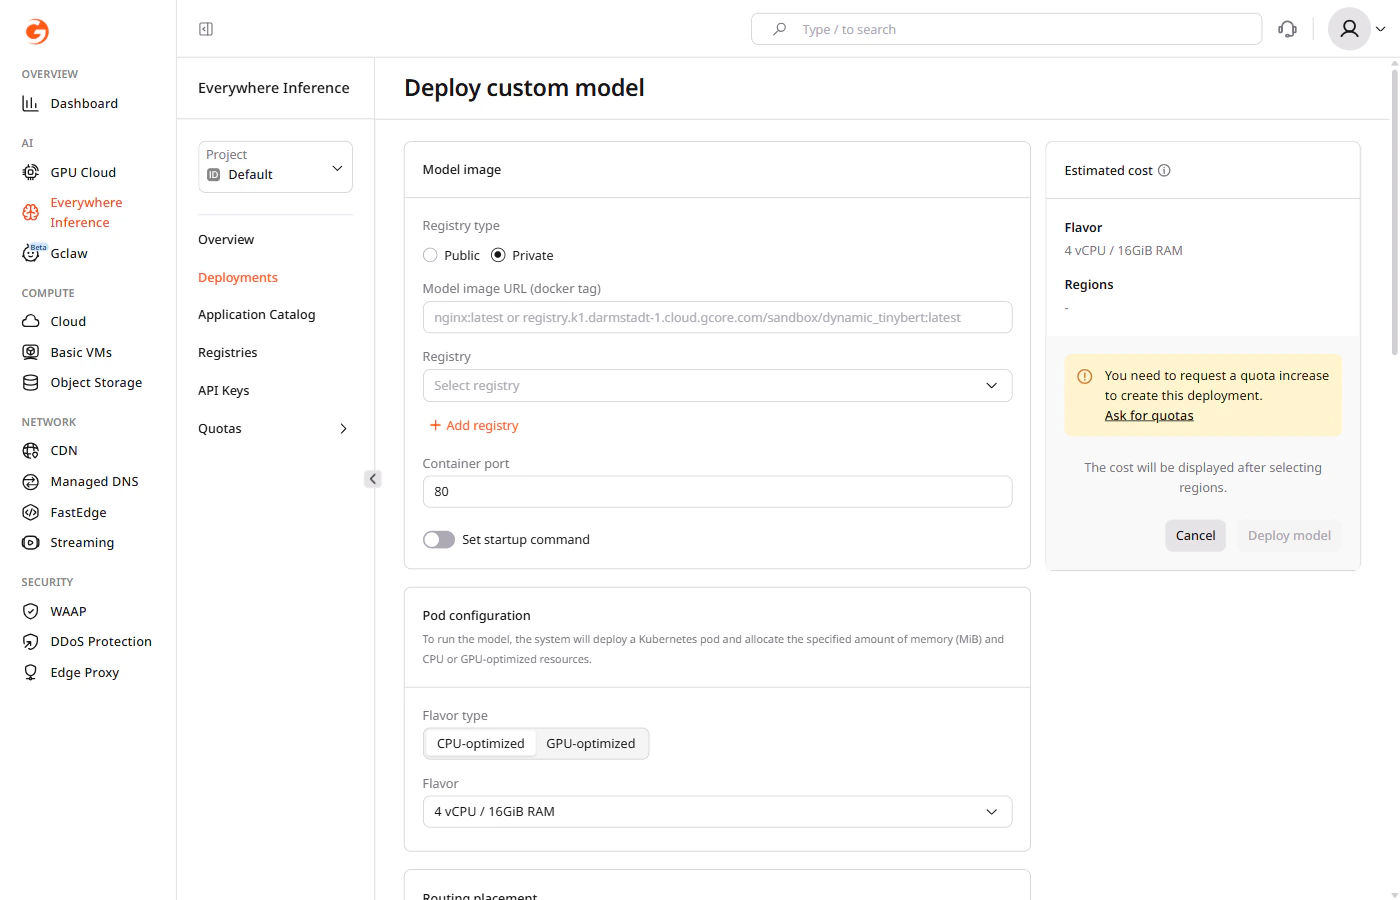 If no private registry is configured yet, click **+ Add registry** to [add one](/edge-ai/everywhere-inference/container-image-registries/add-a-registry).
(Optional) Enable the **Set startup command** toggle to specify a command that runs when the container starts.
### Step 2. Select pod configuration
Under **Pod configuration**, select the compute resources for the deployment:
* **Flavor type** — select **CPU-optimized** or **GPU-optimized**.
* **Flavor** — select the hardware configuration from the dropdown.
The following flavor parameters are recommended based on model size:
| **Billion parameters** | **Recommended flavor** |
| ---------------------- | ---------------------- |
| \< 21 | 1 x L40S 48 GB |
| 21–41 | 2 x L40S 48 GB |
| > 41 | 4 x L40S 48 GB |
### Step 3. Set up routing placement
Under **Routing placement**, select up to six regions where the model will run.
If no private registry is configured yet, click **+ Add registry** to [add one](/edge-ai/everywhere-inference/container-image-registries/add-a-registry).
(Optional) Enable the **Set startup command** toggle to specify a command that runs when the container starts.
### Step 2. Select pod configuration
Under **Pod configuration**, select the compute resources for the deployment:
* **Flavor type** — select **CPU-optimized** or **GPU-optimized**.
* **Flavor** — select the hardware configuration from the dropdown.
The following flavor parameters are recommended based on model size:
| **Billion parameters** | **Recommended flavor** |
| ---------------------- | ---------------------- |
| \< 21 | 1 x L40S 48 GB |
| 21–41 | 2 x L40S 48 GB |
| > 41 | 4 x L40S 48 GB |
### Step 3. Set up routing placement
Under **Routing placement**, select up to six regions where the model will run.
 ### Step 4. Configure autoscaling
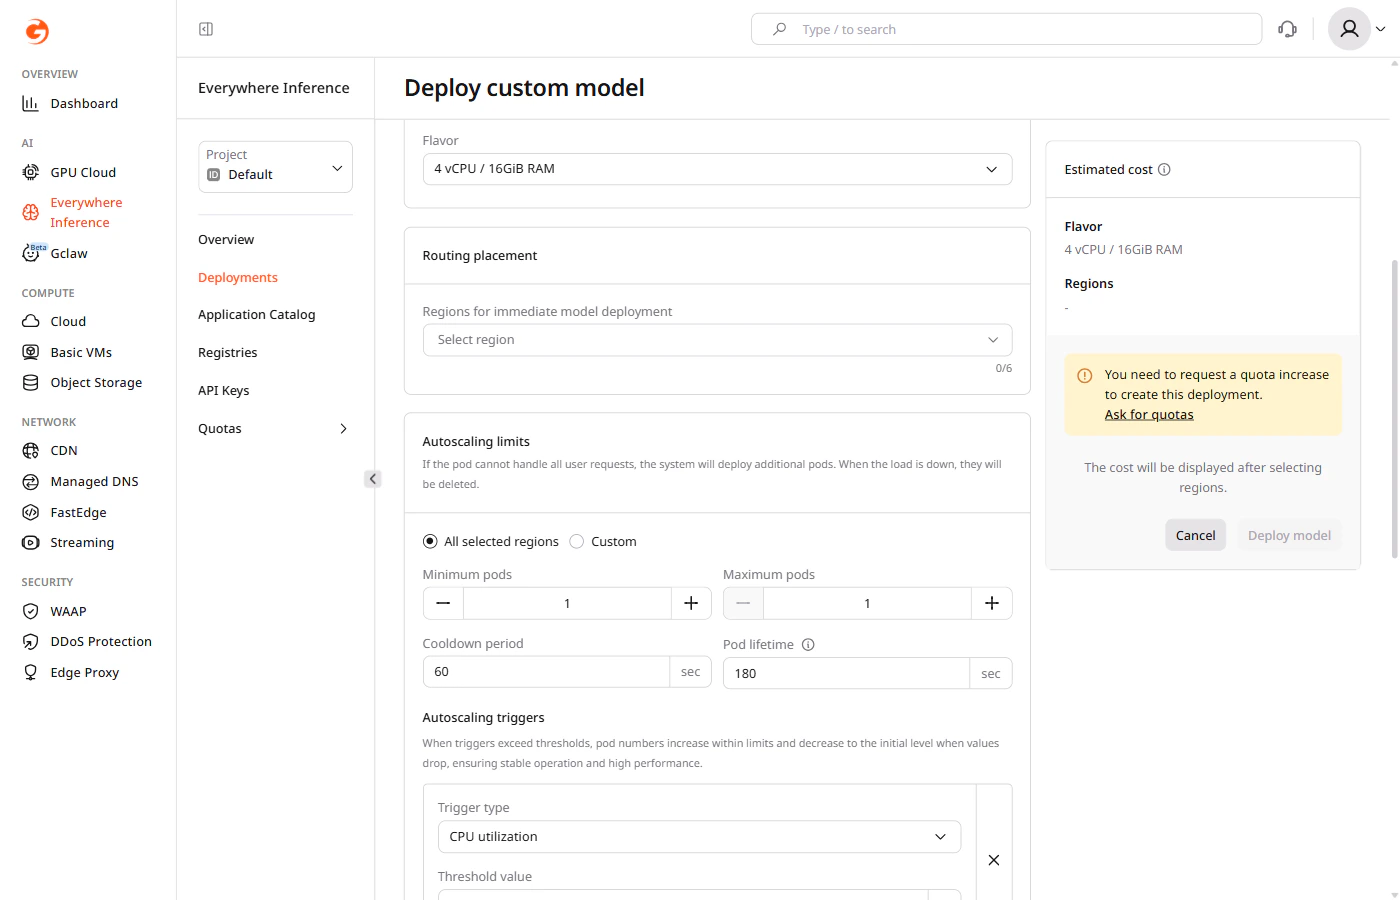
Under **Autoscaling limits**, configure pod scaling:
* **All selected regions** — applies the same autoscaling settings to all selected regions.
* **Custom** — applies different settings per region.
* **Minimum pods** — the minimum number of pods to maintain during low-traffic periods.
* **Maximum pods** — the maximum number of pods that can be provisioned during peak traffic.
* **Cooldown period** — the time (in seconds) the autoscaler waits after a scaling event before making another adjustment.
* **Pod lifetime** — the time (in seconds) before an idle pod is deleted after its last request.
A pod with a lifetime of zero seconds will take approximately one minute to scale down.
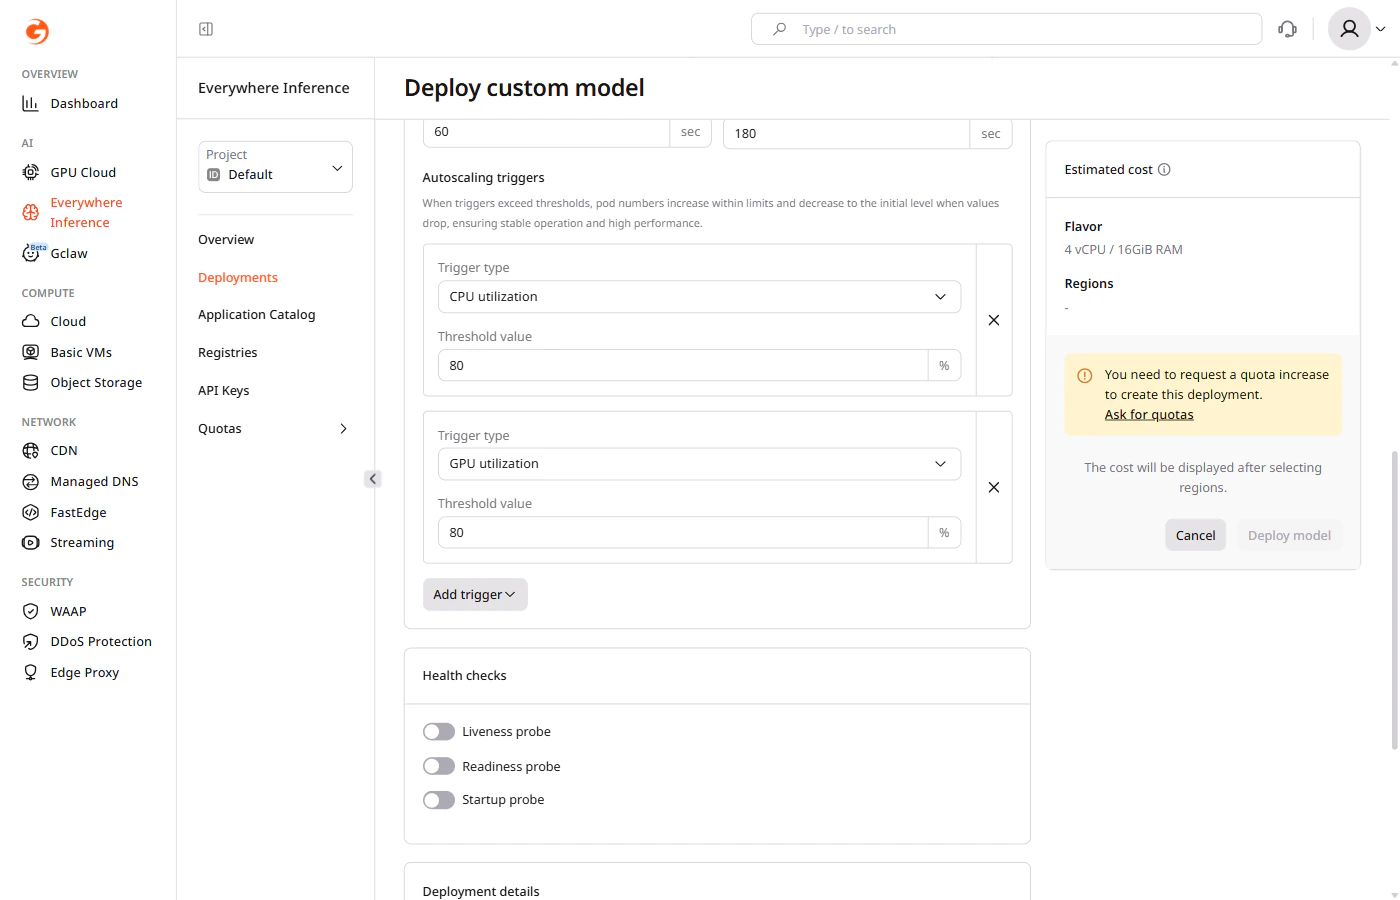
Under **Autoscaling triggers**, define the conditions that trigger pod provisioning. By default, CPU utilization and GPU utilization triggers are included with an 80% threshold. Click **Add trigger** to add more triggers.
### Step 4. Configure autoscaling
Under **Autoscaling limits**, configure pod scaling:
* **All selected regions** — applies the same autoscaling settings to all selected regions.
* **Custom** — applies different settings per region.
* **Minimum pods** — the minimum number of pods to maintain during low-traffic periods.
* **Maximum pods** — the maximum number of pods that can be provisioned during peak traffic.
* **Cooldown period** — the time (in seconds) the autoscaler waits after a scaling event before making another adjustment.
* **Pod lifetime** — the time (in seconds) before an idle pod is deleted after its last request.
A pod with a lifetime of zero seconds will take approximately one minute to scale down.
Under **Autoscaling triggers**, define the conditions that trigger pod provisioning. By default, CPU utilization and GPU utilization triggers are included with an 80% threshold. Click **Add trigger** to add more triggers.
 ### Step 5 (optional). Configure health checks
Under **Health checks**, enable probes to monitor container availability:
* **Liveness probe** — restarts the container if it becomes unresponsive.
* **Readiness probe** — removes the container from load balancing until it is ready to serve traffic.
* **Startup probe** — delays other probes until the container finishes starting up.
### Step 6. Set deployment details
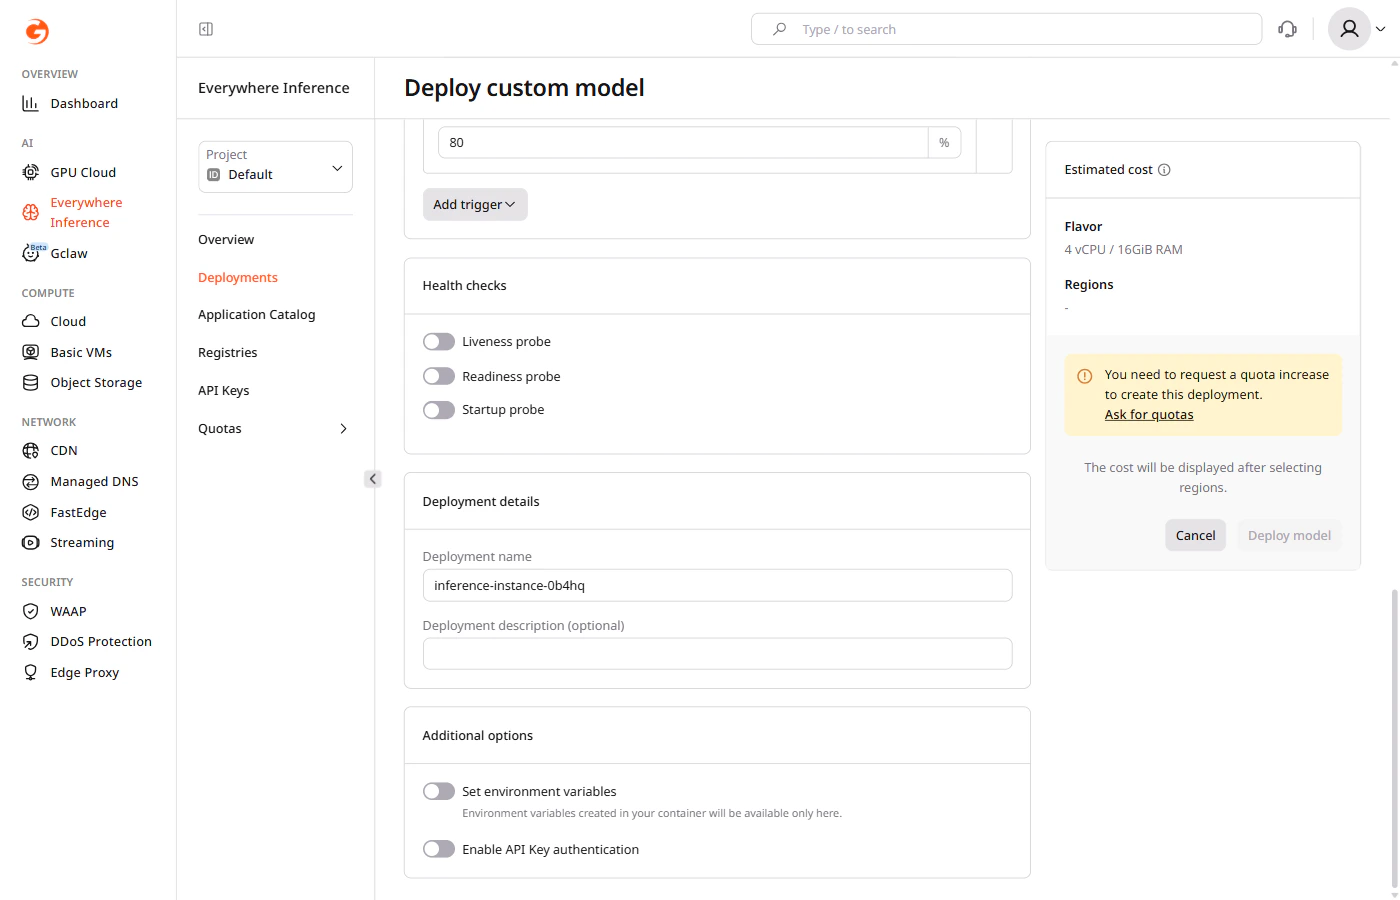
Under **Deployment details**, enter a deployment name. Use only letters and numbers — hyphens are not allowed in deployment names. An optional description can also be added.
### Step 5 (optional). Configure health checks
Under **Health checks**, enable probes to monitor container availability:
* **Liveness probe** — restarts the container if it becomes unresponsive.
* **Readiness probe** — removes the container from load balancing until it is ready to serve traffic.
* **Startup probe** — delays other probes until the container finishes starting up.
### Step 6. Set deployment details
Under **Deployment details**, enter a deployment name. Use only letters and numbers — hyphens are not allowed in deployment names. An optional description can also be added.
 ### Step 7 (optional). Set additional options
Under **Additional options**:
* Enable **Set environment variables** to pass key-value pairs to the container at runtime.
* Enable **Enable API Key authentication** to restrict access using [API keys](/edge-ai/everywhere-inference/api-keys/create-inference-deployment-with-auth).
Multiple API keys can be associated with a single deployment, and the same API key can be attached to multiple deployments.
### Step 8. Finalize the deployment
Review the estimated cost in the right panel, then click **Deploy model**.
Gcore creates the deployment and opens the **Deployments** page, where the deployment status is visible.
## Deployment status
The new deployment appears on the **Deployments** page with a **Deploying** status. Once all pods are running, the status changes to **Active**.
The endpoint URL becomes available on the deployment detail page. Use it to send inference requests as described in [Query a deployed model](/edge-ai/everywhere-inference/ai-models/query-deployed-model). Logs, compute settings, and other deployment options are available on the [deployment detail page](/edge-ai/everywhere-inference/ai-models/manage-ai-model-deployments).
### Step 7 (optional). Set additional options
Under **Additional options**:
* Enable **Set environment variables** to pass key-value pairs to the container at runtime.
* Enable **Enable API Key authentication** to restrict access using [API keys](/edge-ai/everywhere-inference/api-keys/create-inference-deployment-with-auth).
Multiple API keys can be associated with a single deployment, and the same API key can be attached to multiple deployments.
### Step 8. Finalize the deployment
Review the estimated cost in the right panel, then click **Deploy model**.
Gcore creates the deployment and opens the **Deployments** page, where the deployment status is visible.
## Deployment status
The new deployment appears on the **Deployments** page with a **Deploying** status. Once all pods are running, the status changes to **Active**.
The endpoint URL becomes available on the deployment detail page. Use it to send inference requests as described in [Query a deployed model](/edge-ai/everywhere-inference/ai-models/query-deployed-model). Logs, compute settings, and other deployment options are available on the [deployment detail page](/edge-ai/everywhere-inference/ai-models/manage-ai-model-deployments).