> ## Documentation Index
> Fetch the complete documentation index at: https://docs.gcore.com/llms.txt
> Use this file to discover all available pages before exploring further.
# Configure API access and protection with reserved tags
API protection tags are used to flag and categorize API requests based on different conditions and parameters, which allows you to manage API traffic more efficiently.
These tags are reserved, which means that you can't customize them. However, you can use the tags to create different custom rules for managing traffic to your endpoints.
Here's the list of reserved tags applicable only for the API protection:
* API Privileged Access
* API Admin Access
* Indicate API Privileged User
* Indicate API Admin User
* Ignore Email Address Detection
* Ignore Phone Number Detection
* Auth Endpoint
* Ignore CCN Detection
* Ignore SSN Detection
These tags can be added to your API endpoints either via the [API Discovery](/waap/api-discovery-and-protection/api-discovery) feature or by using [custom rules](/waap/waap-rules/custom-rules).
## Configure API protection
The following steps will guide you through the process of protecting your endpoints from unauthorized access.
After you complete the steps, it's important to enable the relevant policies within the [Advanced API protection](/waap/waap-policies/advanced-api-protection) policy group to make sure everything is set up correctly.
**Info**
To ensure that your APIs are fully protected, enable the [API Discovery](/waap/api-discovery-and-protection/api-discovery) feature or manually add your endpoints to the [API base path](/waap/api-discovery-and-protection/configure-api-base-path) so that WAAP correctly recognizes these endpoints as associated with your domain.
### Step 1. Group endpoints based on their access levels
The first step in API protection is to categorize your endpoints based on their authorization levels:
* **Admin** : Endpoints that can only be accessed by admin users.
* **Privileged** : Endpoints that can be accessed by privileged users and admins.
* **Non-privileged** : Endpoints accessible to users with no permissions.
You can control access to endpoints by creating custom rules that will automatically mark endpoints with tags, like **API Admin Access** or **API Privileged Access**.
When creating a rule, make sure that you specify secure conditions, such as client IP or specific HTTP response header. Avoid conditions that are easy to spoof, like the User-agent header.
For example, you can create a rule that restricts access to admin endpoints. Only users with a valid bearer token in the authorization header will be able to interact with admin APIs.
To create the rule:
1\. In the Gcore Customer Portal, navigate to **WAAP** > **Domains**.
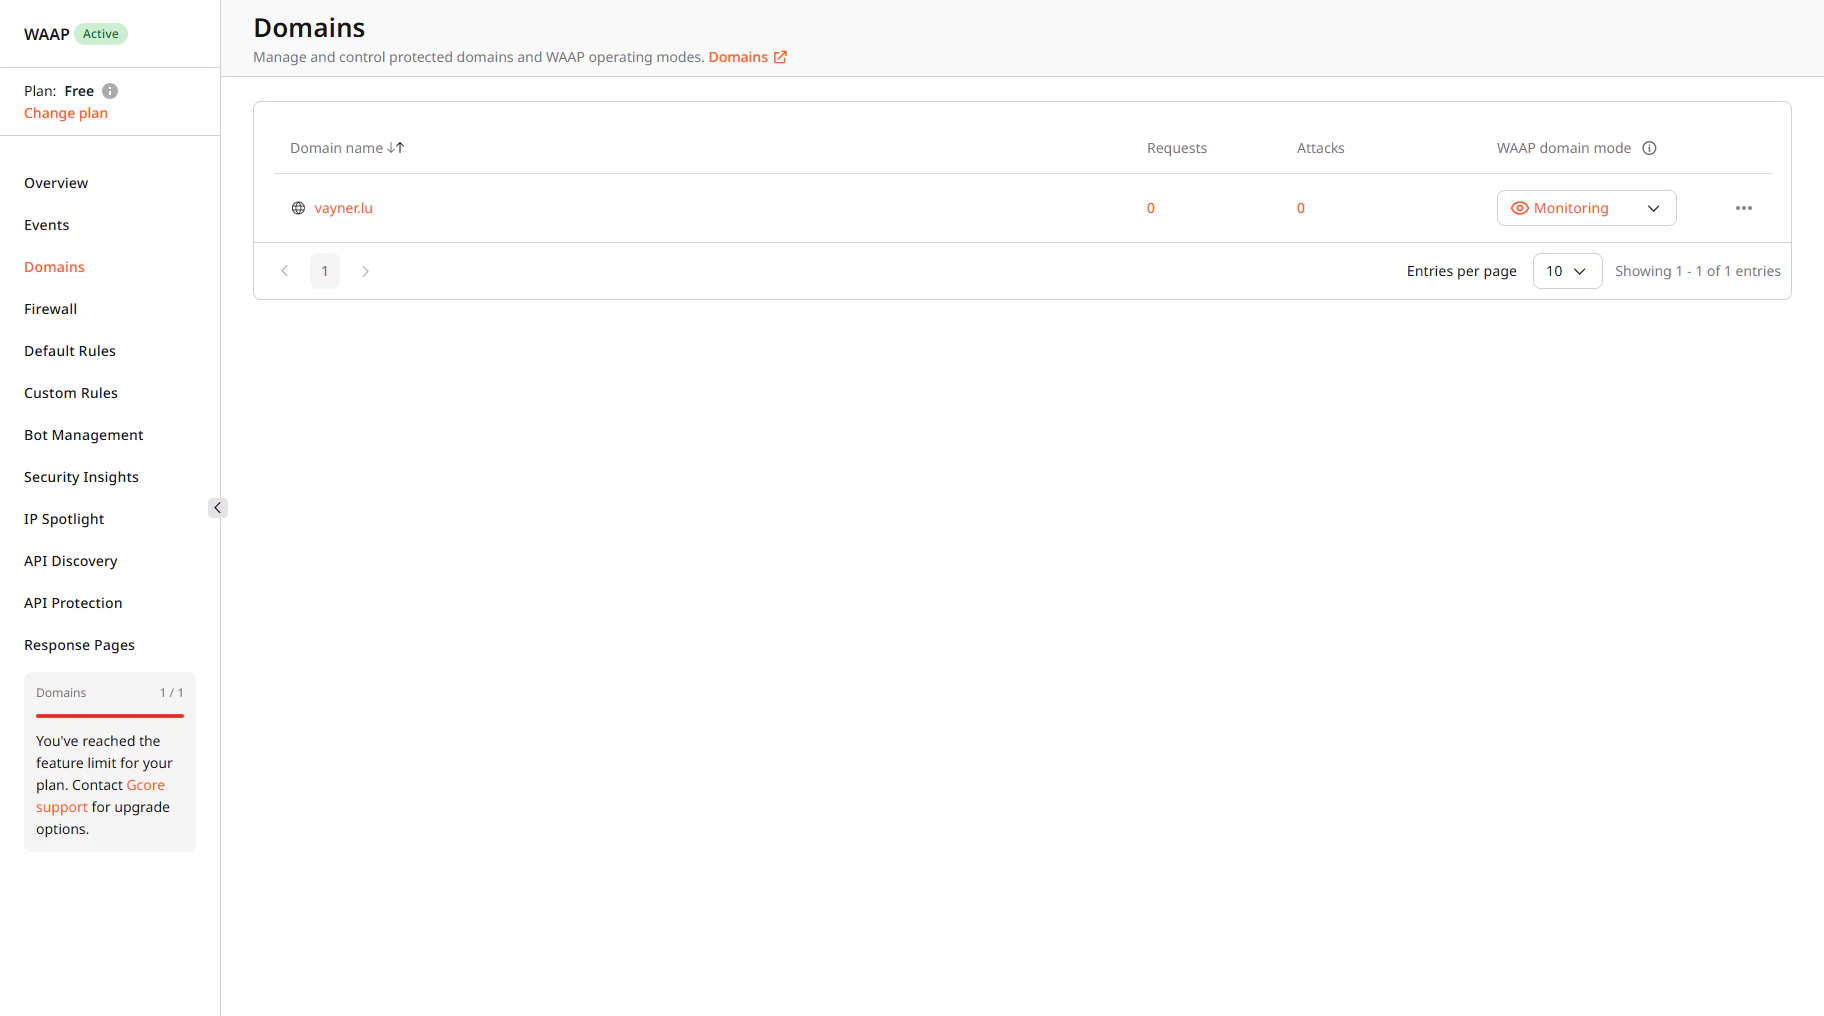 2\. Find the needed domain and click its name to open it. You'll be directed to the **Overview** page.
3\. In the sidebar, click **WAAP rules** > **Add a custom rule**.
4\. Give your rule a name.
5\. (Optional) Add a description to provide more context about the rule.
6\. In the **IF** section, select **Header**.
7\. In the **Header key** field, enter **Authorization**. This means that an admin user has to be authenticated to access the endpoint.
8\. In the next dropdown, select **-** to apply the rule only to the specified condition.
9\. Define match criteria. Select **Contains** to apply the rule even when a request header partly matches the specified one.
10\. Provide header value. Enter **Bearer** to require an authorization token on each request that attempts to access admin API endpoints.
11\. In the **THEN** section, select the **Tag** action to apply a relevant tag to each request that matches the specified criteria.
12\. In the next dropdown, select the relevant reserved tag:
* **API Privileged Access** : This tag grants permission to reach any privileged API endpoint.
* **API Admin Access** : This tag allows interaction with all API endpoints. In the current rule example, choose this tag.
2\. Find the needed domain and click its name to open it. You'll be directed to the **Overview** page.
3\. In the sidebar, click **WAAP rules** > **Add a custom rule**.
4\. Give your rule a name.
5\. (Optional) Add a description to provide more context about the rule.
6\. In the **IF** section, select **Header**.
7\. In the **Header key** field, enter **Authorization**. This means that an admin user has to be authenticated to access the endpoint.
8\. In the next dropdown, select **-** to apply the rule only to the specified condition.
9\. Define match criteria. Select **Contains** to apply the rule even when a request header partly matches the specified one.
10\. Provide header value. Enter **Bearer** to require an authorization token on each request that attempts to access admin API endpoints.
11\. In the **THEN** section, select the **Tag** action to apply a relevant tag to each request that matches the specified criteria.
12\. In the next dropdown, select the relevant reserved tag:
* **API Privileged Access** : This tag grants permission to reach any privileged API endpoint.
* **API Admin Access** : This tag allows interaction with all API endpoints. In the current rule example, choose this tag.
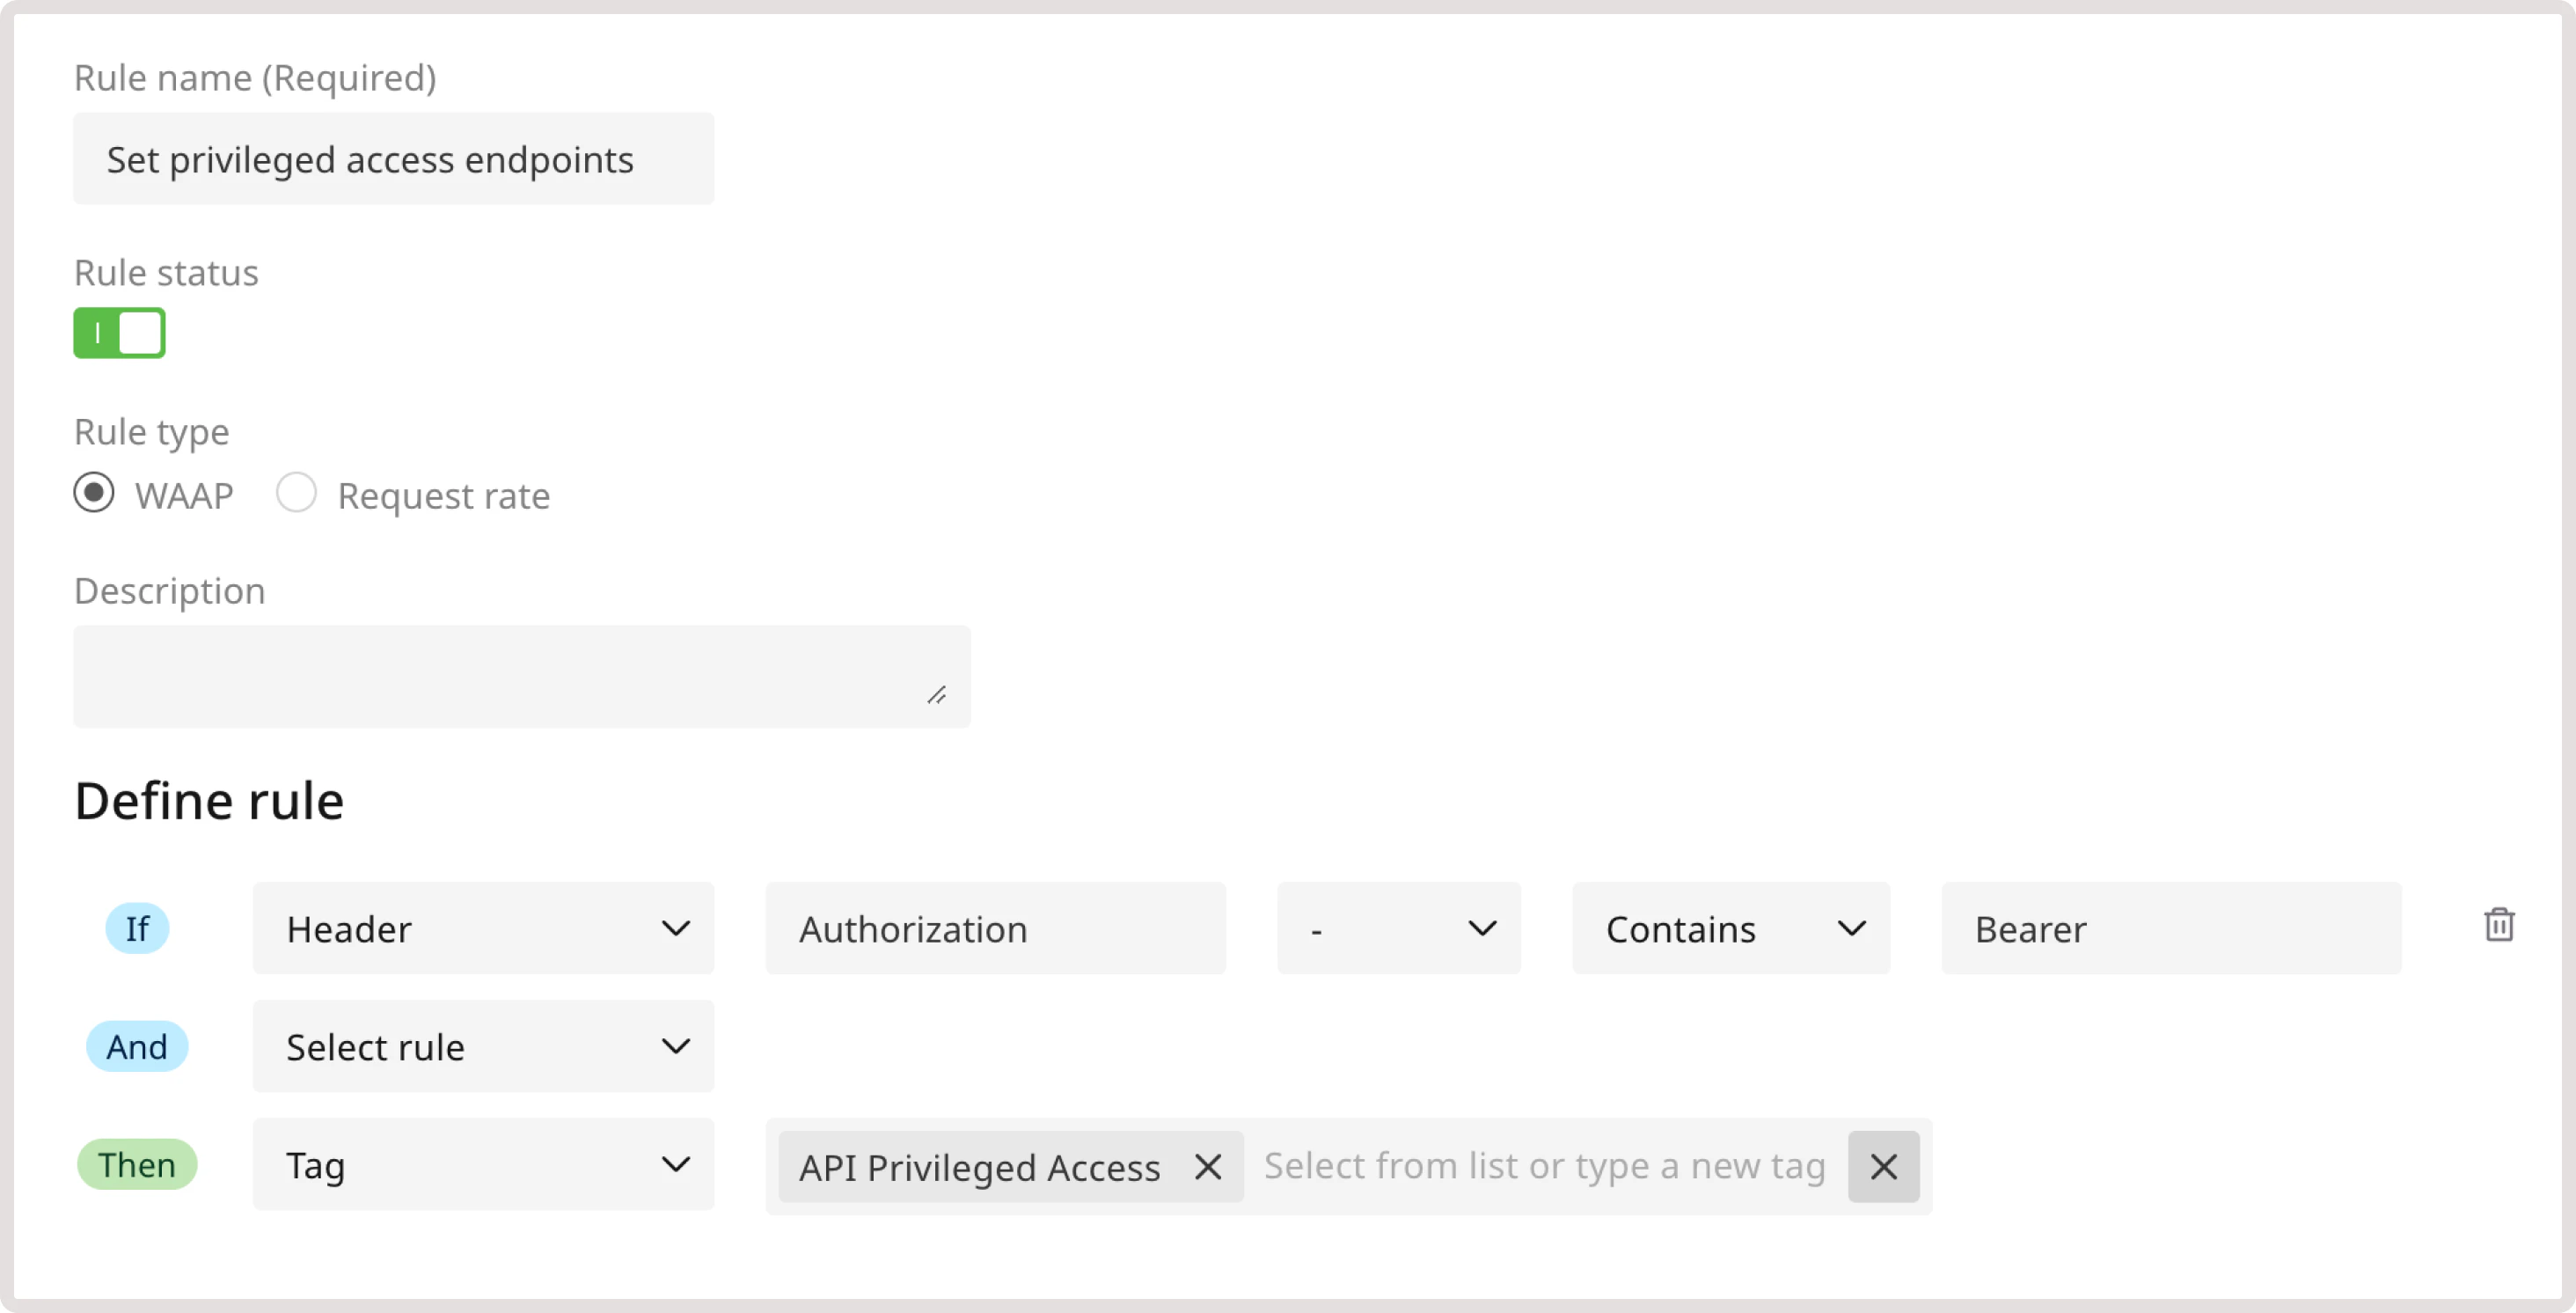 13\. Click **Save** to create the rule.
All requests from authorized users with relevant permissions can now reach the admin API endpoints.
### Step 2. Define user roles that can access endpoints
After you define access levels for API endpoints, you need to configure which users can interact with those endpoints. To do so, create a new custom rule for each user type.
For example, create a rule that identifies a request as coming from an admin user if the request contains a valid bearer token in the authorization header.
**Tip**
It's a good practice to add multiple conditions to custom rules. Complex rules are harder to bypass and more nuanced, which reduces the probability of false positives.
To create the rule:
1\. On the **WAAP Rules** page, click **Add a custom rule**.
2\. Give your rule a name.
3\. (Optional) Add a description to provide more context about the rule.
4\. In the **IF** section, select **Header**.
5\. In the **Header key** field, enter **Authorization**. This means that the user has to be authenticated to access the endpoint.
6\. In the next dropdown, select **-** to apply the rule only to the specified condition.
7\. Define match criteria. Select **Contains** to apply the rule even when a request header partly matches the specified one.
8\. Provide header value. Enter **Bearer** to require an authorization token on each request that attempts to access admin API endpoints.
9\. Select another condition in the **AND** section:
* In the **IF** section, select **Header**.
* In the **Header key** field, enter the relevant value: **X-Admin-User**
* Select **Contains** as a match criteria.
* Provide **Token** as a header value.
10\. In the **THEN** section, select the **Tag** action.
11\. In the next dropdown, select the relevant reserved tag:
* **Indicate API Admin User** : Requests from these users will reach any API endpoint. In the current rule example, choose this tag.
* **Indicate API Privileged User** : Requests from these users will reach privileged endpoints.
13\. Click **Save** to create the rule.
All requests from authorized users with relevant permissions can now reach the admin API endpoints.
### Step 2. Define user roles that can access endpoints
After you define access levels for API endpoints, you need to configure which users can interact with those endpoints. To do so, create a new custom rule for each user type.
For example, create a rule that identifies a request as coming from an admin user if the request contains a valid bearer token in the authorization header.
**Tip**
It's a good practice to add multiple conditions to custom rules. Complex rules are harder to bypass and more nuanced, which reduces the probability of false positives.
To create the rule:
1\. On the **WAAP Rules** page, click **Add a custom rule**.
2\. Give your rule a name.
3\. (Optional) Add a description to provide more context about the rule.
4\. In the **IF** section, select **Header**.
5\. In the **Header key** field, enter **Authorization**. This means that the user has to be authenticated to access the endpoint.
6\. In the next dropdown, select **-** to apply the rule only to the specified condition.
7\. Define match criteria. Select **Contains** to apply the rule even when a request header partly matches the specified one.
8\. Provide header value. Enter **Bearer** to require an authorization token on each request that attempts to access admin API endpoints.
9\. Select another condition in the **AND** section:
* In the **IF** section, select **Header**.
* In the **Header key** field, enter the relevant value: **X-Admin-User**
* Select **Contains** as a match criteria.
* Provide **Token** as a header value.
10\. In the **THEN** section, select the **Tag** action.
11\. In the next dropdown, select the relevant reserved tag:
* **Indicate API Admin User** : Requests from these users will reach any API endpoint. In the current rule example, choose this tag.
* **Indicate API Privileged User** : Requests from these users will reach privileged endpoints.
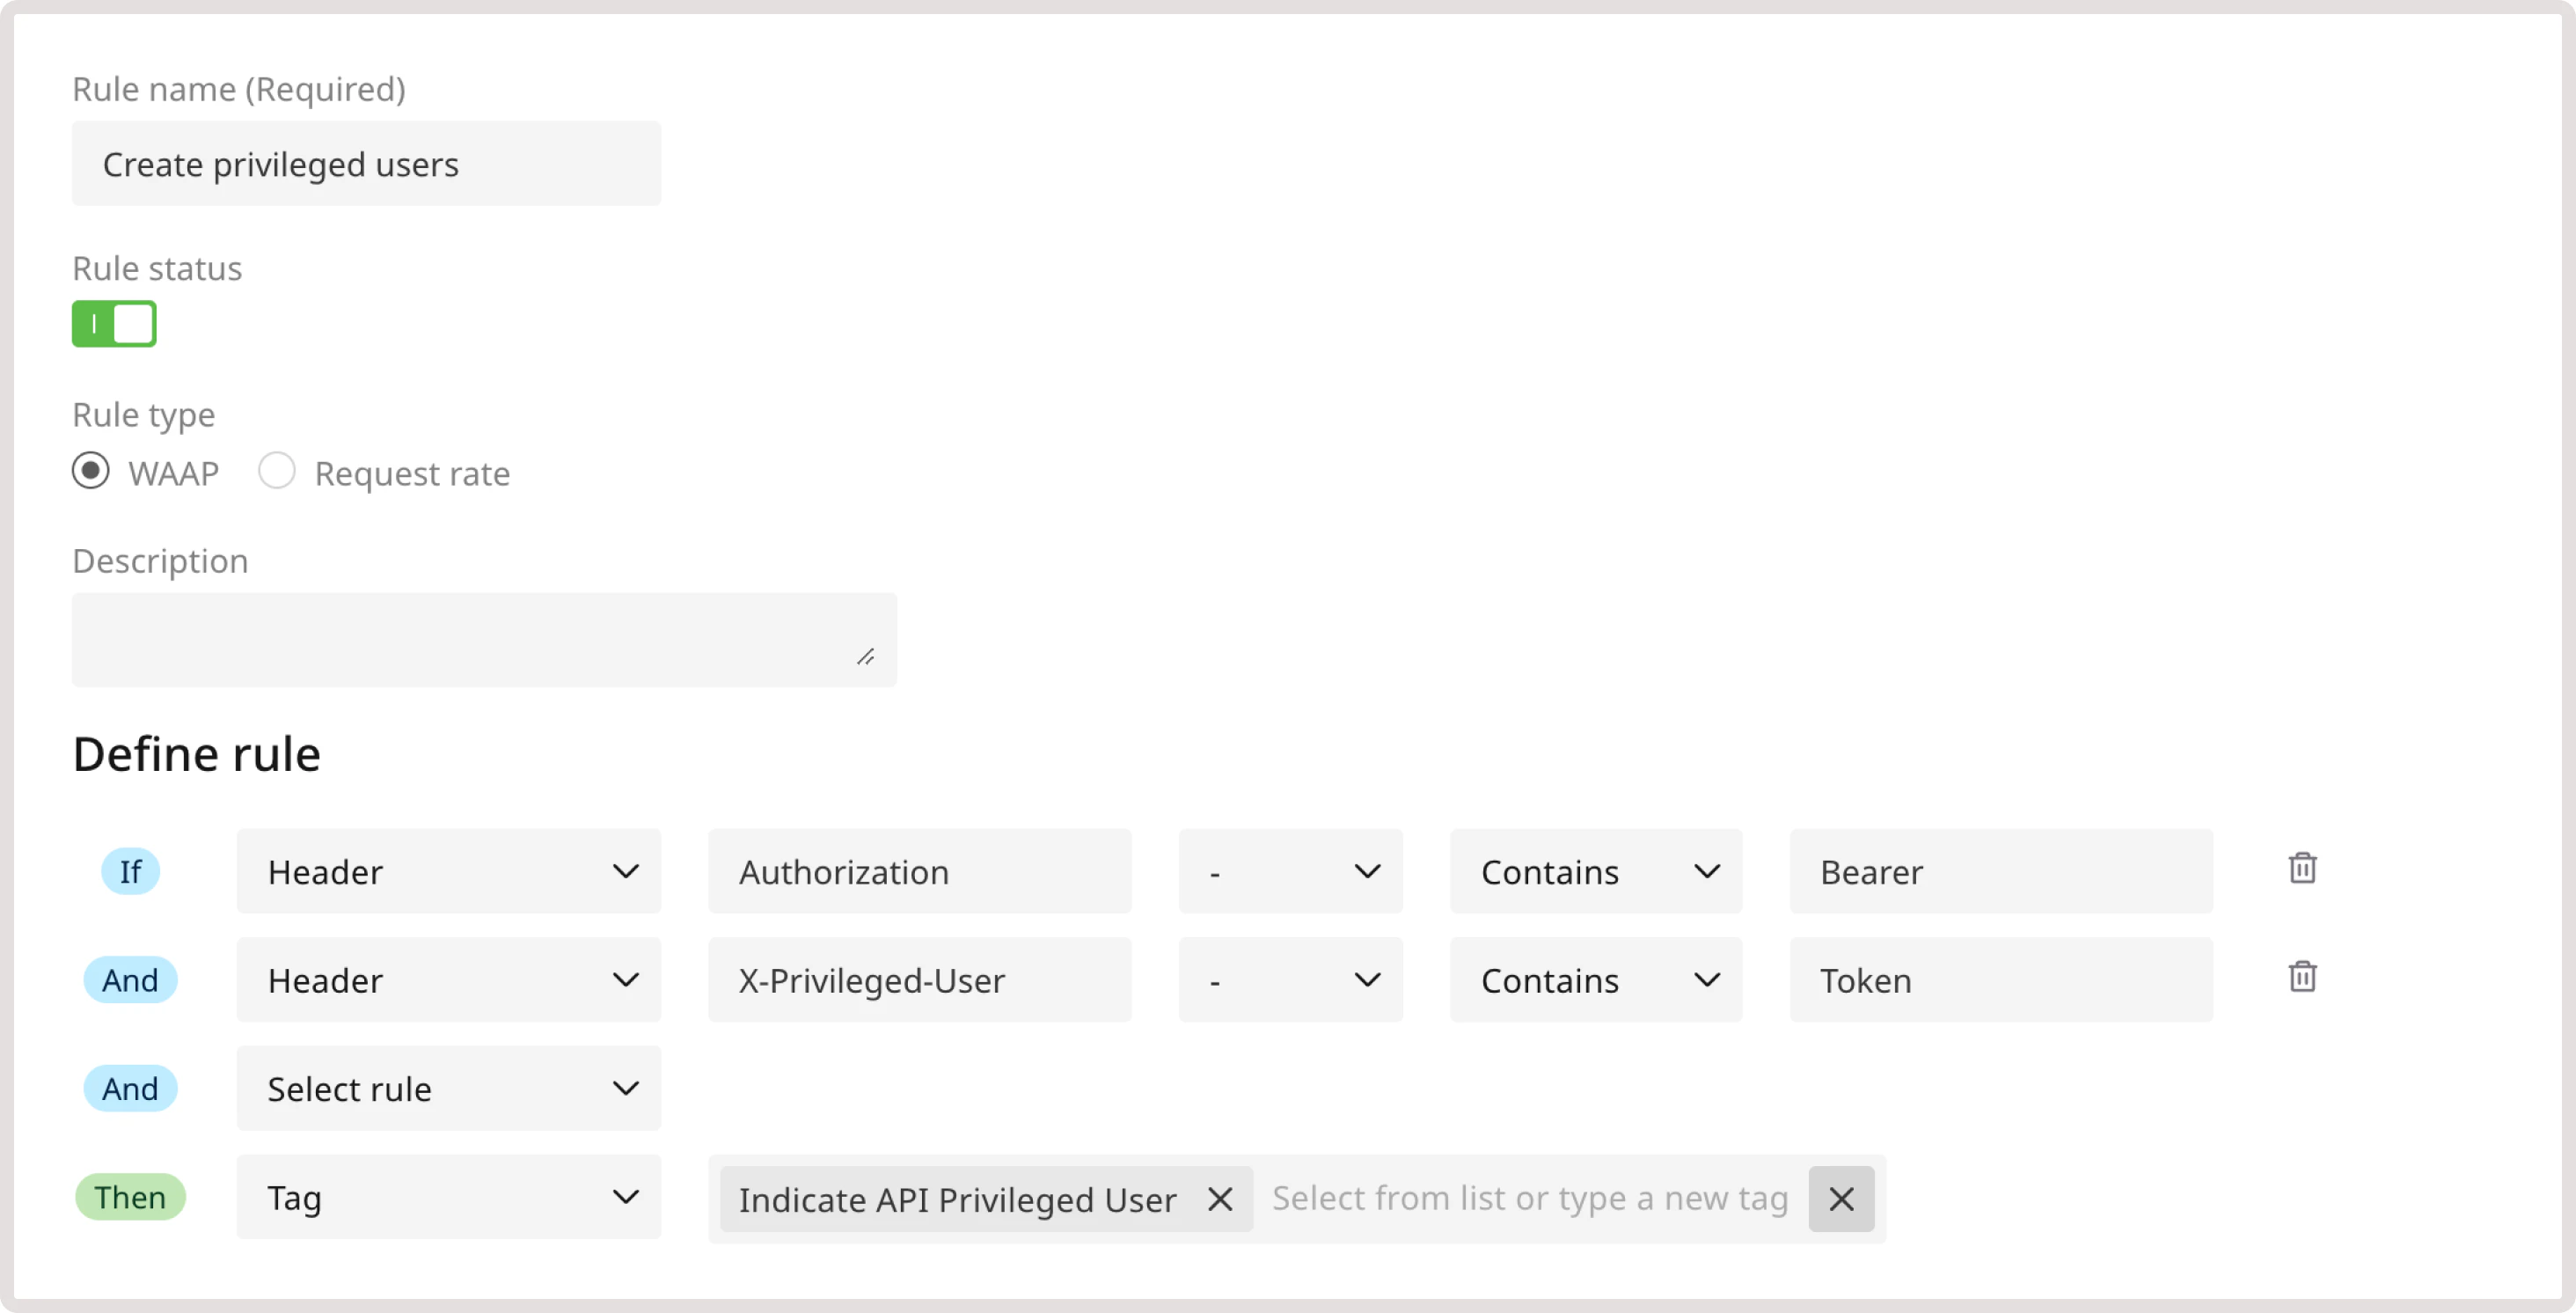 12\. Click **Save** to create the rule.
All authorized requests that contain the X-Admin-User token can now reach the admin API endpoints.
### Step 3 (optional). Configure additional API protection settings
Additionally, you can configure the following security settings for your APIs.
#### Auth token protection
As an additional API protection measure, you can tag the following OAuth endpoints: oauth/token, oauth2/token, and oauth2/v1/token. Protecting authentication token endpoints helps you secure APIs against unauthorized access, token theft, or brute force attacks.
Our heuristic mechanism automatically detects and protects Auth token endpoints. For additional customization, you can manually tag Auth endpoints via custom rules.
This will help our system apply more rigorous monitoring and protection in response to such events as multiple failed login attempts, requests with unauthorized tokens, and multiple requests to forbidden paths.
To tag the endpoints, create the following custom rule:
1\. Navigate to the **WAAP Rules** page and click **Add a custom rule**.
2\. Give your rule a name.
3\. (Optional) Add a description to provide more context about the rule.
4\. In the **IF** section, select **URL**.
5\. In the next dropdown, select **-** to apply the rule only to the specified condition.
6\. Define match criteria. Select **Equals** to apply the rule when the URL exactly matches the specified one.
7\. Enter the relevant endpoint.
8\. In the **THEN** section, select the **Tag** action to apply a relevant tag to each request that matches the specified criteria.
9\. In the next dropdown, select **Auth Endpoint** reserved tag.
12\. Click **Save** to create the rule.
All authorized requests that contain the X-Admin-User token can now reach the admin API endpoints.
### Step 3 (optional). Configure additional API protection settings
Additionally, you can configure the following security settings for your APIs.
#### Auth token protection
As an additional API protection measure, you can tag the following OAuth endpoints: oauth/token, oauth2/token, and oauth2/v1/token. Protecting authentication token endpoints helps you secure APIs against unauthorized access, token theft, or brute force attacks.
Our heuristic mechanism automatically detects and protects Auth token endpoints. For additional customization, you can manually tag Auth endpoints via custom rules.
This will help our system apply more rigorous monitoring and protection in response to such events as multiple failed login attempts, requests with unauthorized tokens, and multiple requests to forbidden paths.
To tag the endpoints, create the following custom rule:
1\. Navigate to the **WAAP Rules** page and click **Add a custom rule**.
2\. Give your rule a name.
3\. (Optional) Add a description to provide more context about the rule.
4\. In the **IF** section, select **URL**.
5\. In the next dropdown, select **-** to apply the rule only to the specified condition.
6\. Define match criteria. Select **Equals** to apply the rule when the URL exactly matches the specified one.
7\. Enter the relevant endpoint.
8\. In the **THEN** section, select the **Tag** action to apply a relevant tag to each request that matches the specified criteria.
9\. In the next dropdown, select **Auth Endpoint** reserved tag.
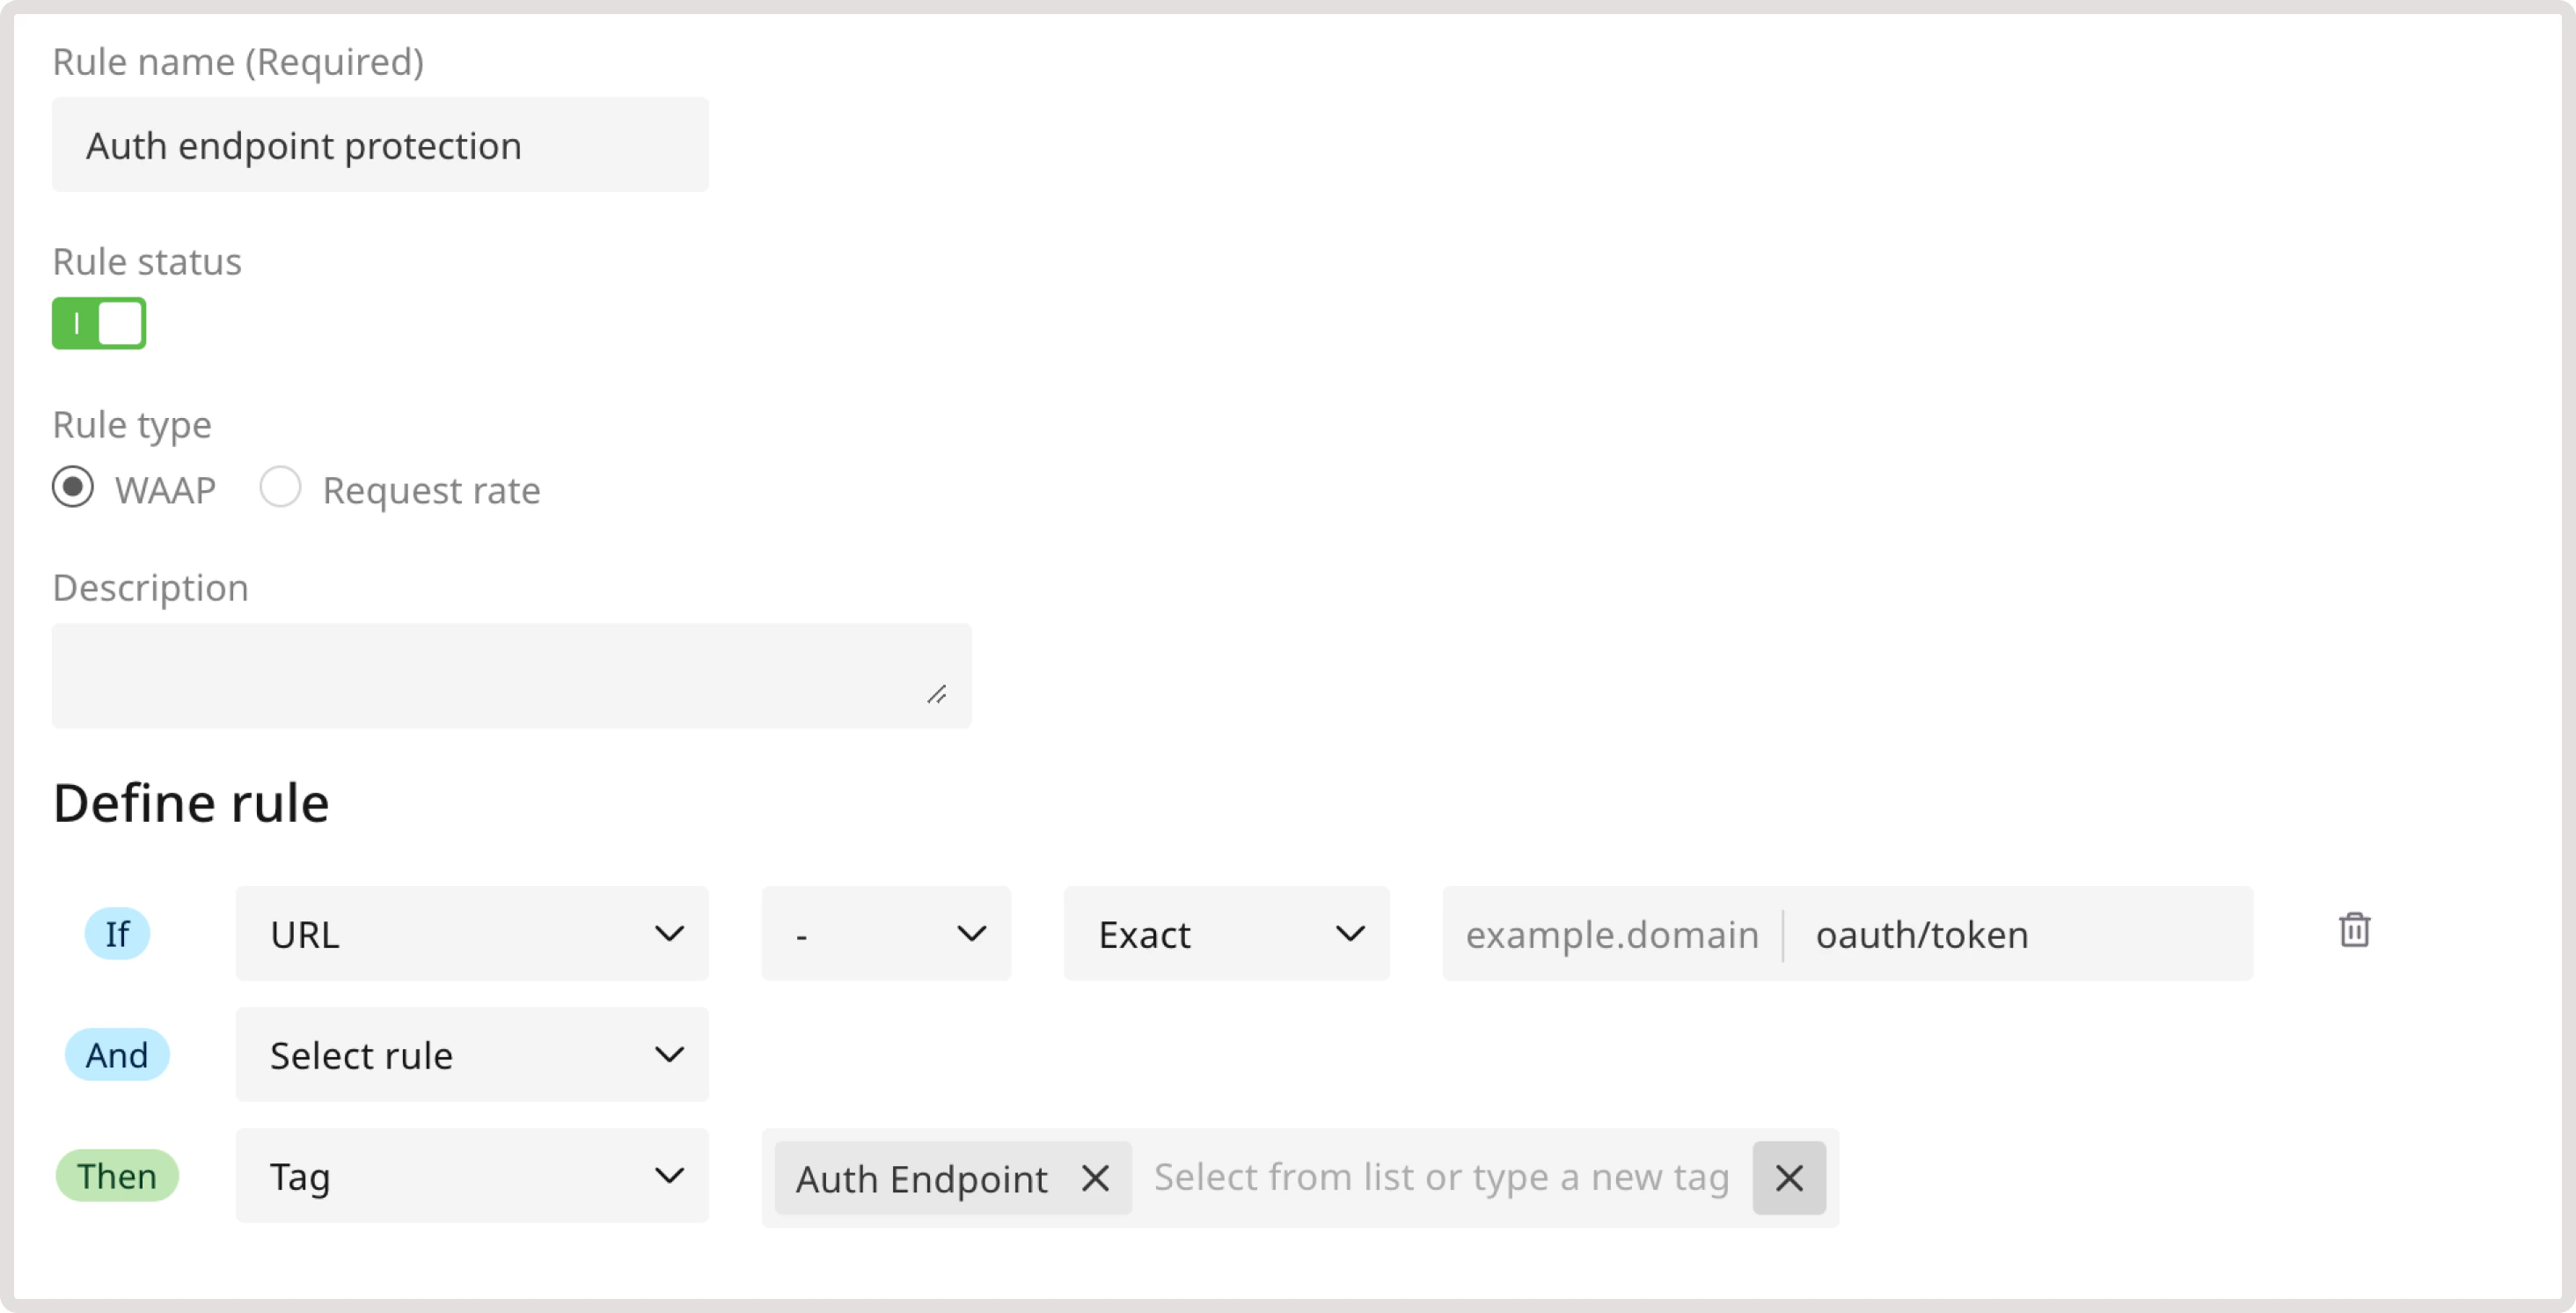 10\. Click **Save** to create the rule.
#### Ignore sensitive data exposure detection
You can notify the WAAP of any legitimate exposure of personally identifiable information (PII) in a request's response, such as social security numbers, credit card numbers, emails, and phone numbers. You can also exclude the request from being affected by the sensitive data exposure policy, which encompasses broader sensitive data exposures like confidential organizational data or code leaks.
Check our [WAF and OWASP top threats](/waap/waap-policies/waf-and-owasp-top-threats) policy group for details.
This means that you can still benefit from the protection of sensitive data leakage while allowing legitimate resources to collect user information without being interrupted by WAAP.
Setting up rules to ignore sensitive data can also prevent false positives and ensure that WAAP doesn't interrupt requests to certain endpoints.
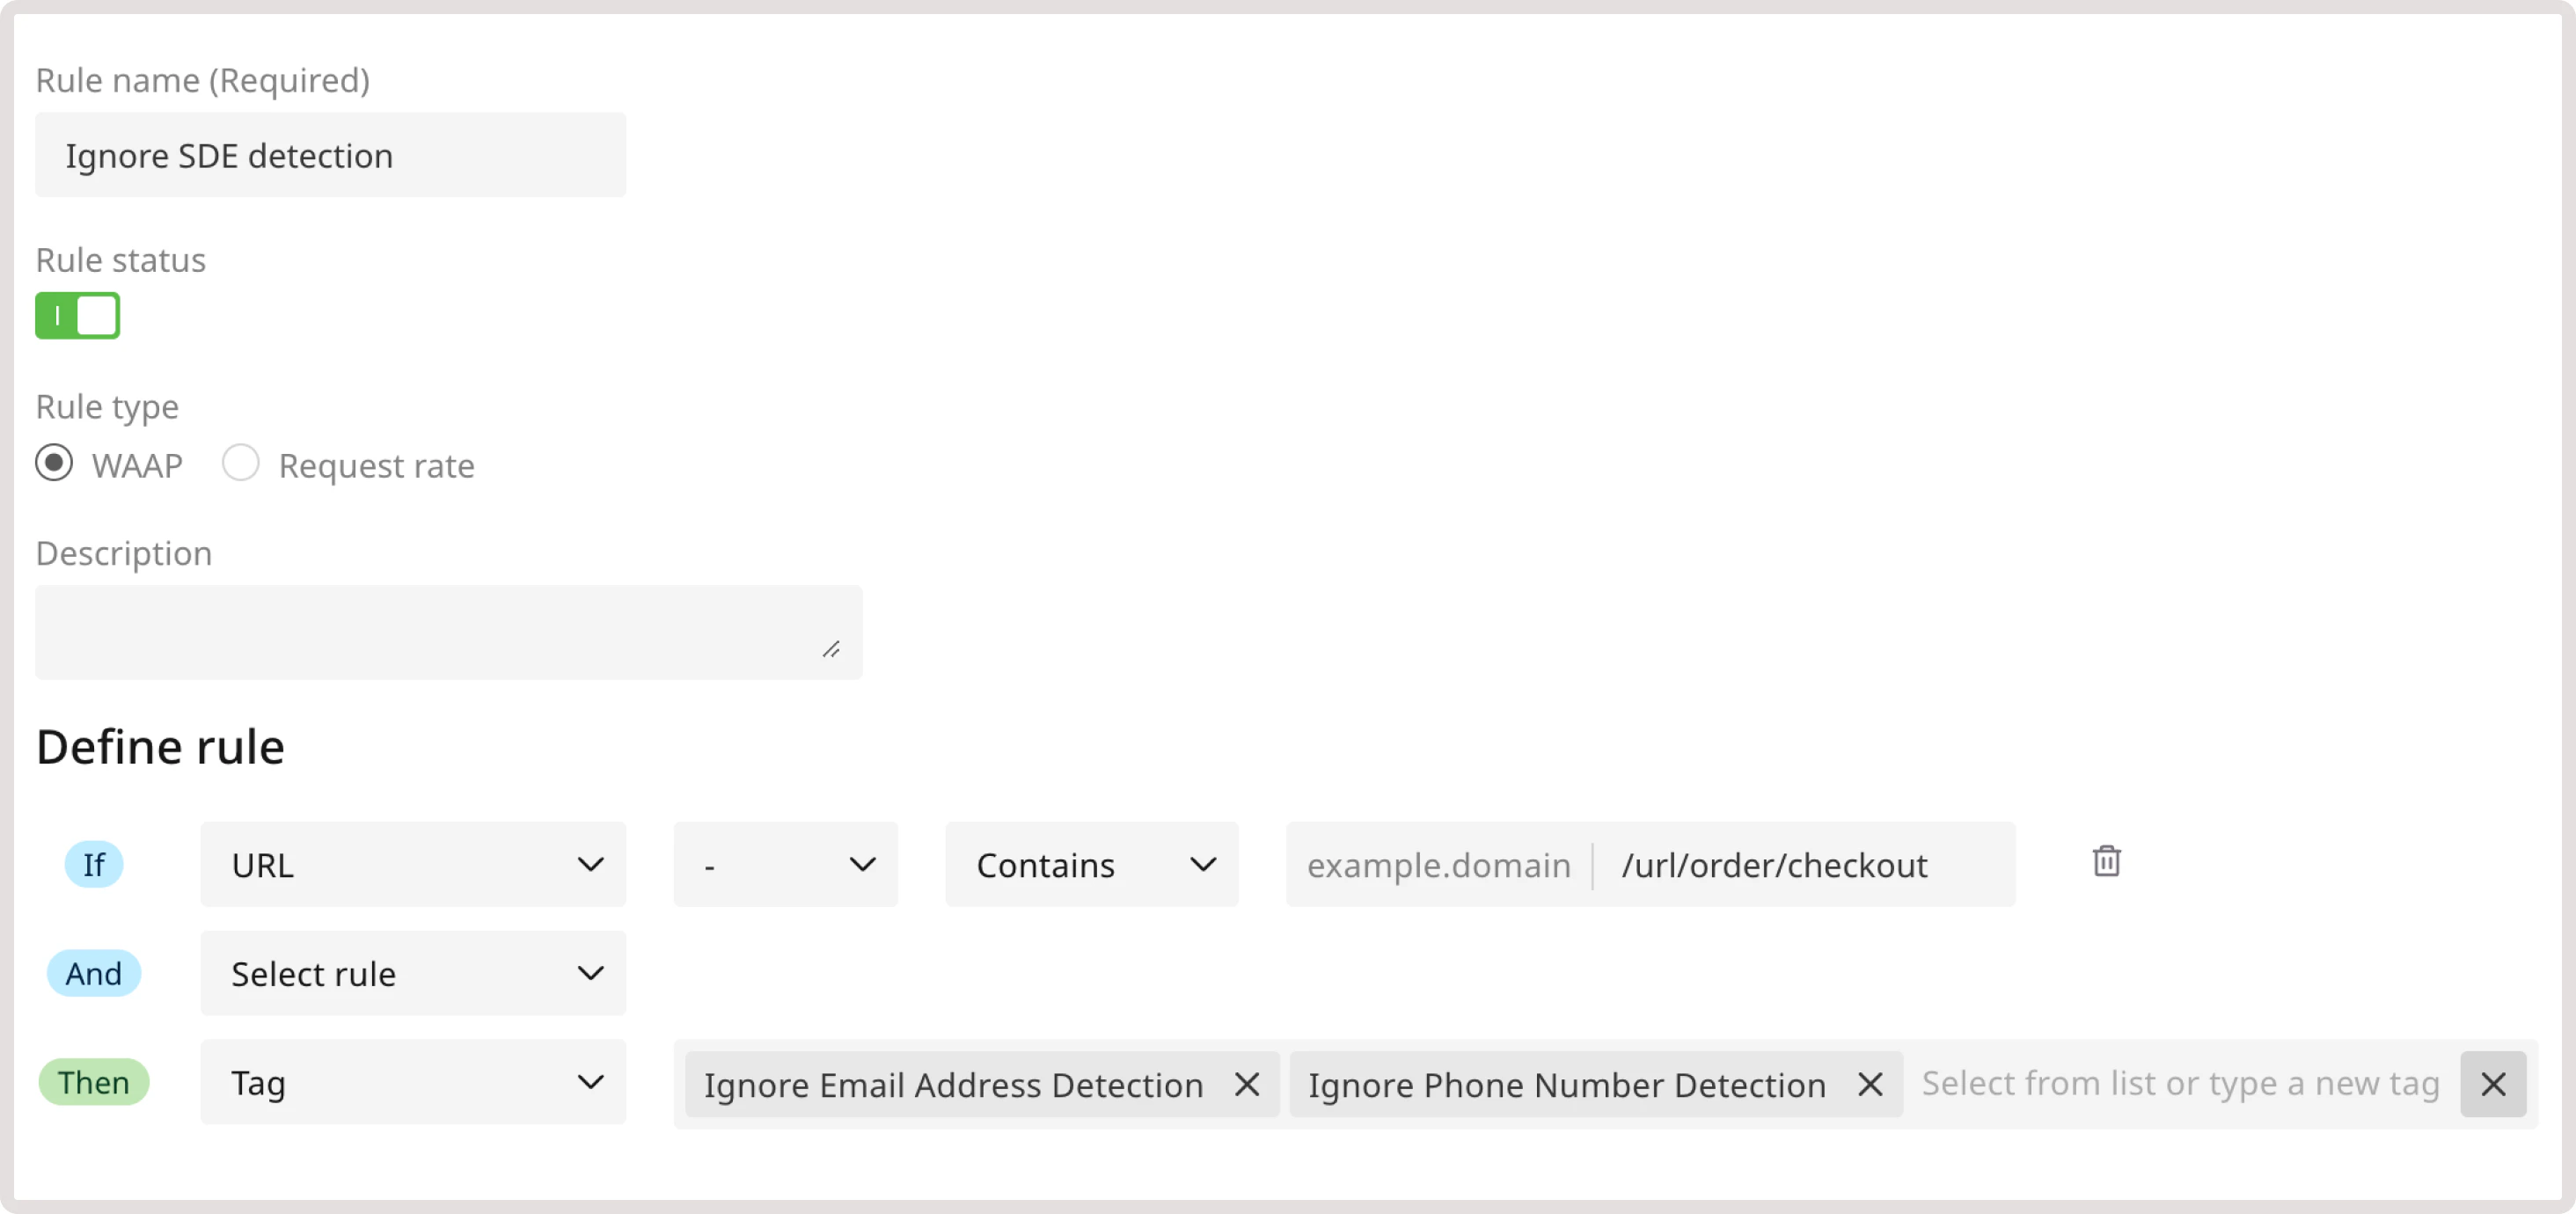
For instance, create the following rule to ignore data collection during the checkout process:
1\. Navigate to the **WAAP Rules** page and click **Add a custom rule**.
2\. Give your rule a name.
3\. (Optional) Add a description to provide more context about the rule.
4\. In the **IF** section, select **URL**.
5\. In the next dropdown, select **-** to apply the rule only to the specified condition.
6\. Define match criteria. Select **Contains** to apply the rule when the URL partially matches the specified one.
7\. Enter the relevant endpoint. In this example, /url/order/checkout.
8\. In the **THEN** section, select the **Tag** action to apply a relevant tag to each request that matches the specified criteria.
9\. In the next dropdown, select the **Ignore Phone Number Detection** and **Ignore Email Address Detection** tags.
10\. Click **Save** to create the rule.
#### Ignore sensitive data exposure detection
You can notify the WAAP of any legitimate exposure of personally identifiable information (PII) in a request's response, such as social security numbers, credit card numbers, emails, and phone numbers. You can also exclude the request from being affected by the sensitive data exposure policy, which encompasses broader sensitive data exposures like confidential organizational data or code leaks.
Check our [WAF and OWASP top threats](/waap/waap-policies/waf-and-owasp-top-threats) policy group for details.
This means that you can still benefit from the protection of sensitive data leakage while allowing legitimate resources to collect user information without being interrupted by WAAP.
Setting up rules to ignore sensitive data can also prevent false positives and ensure that WAAP doesn't interrupt requests to certain endpoints.
For instance, create the following rule to ignore data collection during the checkout process:
1\. Navigate to the **WAAP Rules** page and click **Add a custom rule**.
2\. Give your rule a name.
3\. (Optional) Add a description to provide more context about the rule.
4\. In the **IF** section, select **URL**.
5\. In the next dropdown, select **-** to apply the rule only to the specified condition.
6\. Define match criteria. Select **Contains** to apply the rule when the URL partially matches the specified one.
7\. Enter the relevant endpoint. In this example, /url/order/checkout.
8\. In the **THEN** section, select the **Tag** action to apply a relevant tag to each request that matches the specified criteria.
9\. In the next dropdown, select the **Ignore Phone Number Detection** and **Ignore Email Address Detection** tags.
 10\. Click **Save** to create the rule.
### Step 4. Enable advanced API protection
After you add access tags to restricted API endpoints and configure user roles, enable the relevant [Advanced API protection](/waap/waap-policies/advanced-api-protection) policies.
10\. Click **Save** to create the rule.
### Step 4. Enable advanced API protection
After you add access tags to restricted API endpoints and configure user roles, enable the relevant [Advanced API protection](/waap/waap-policies/advanced-api-protection) policies.
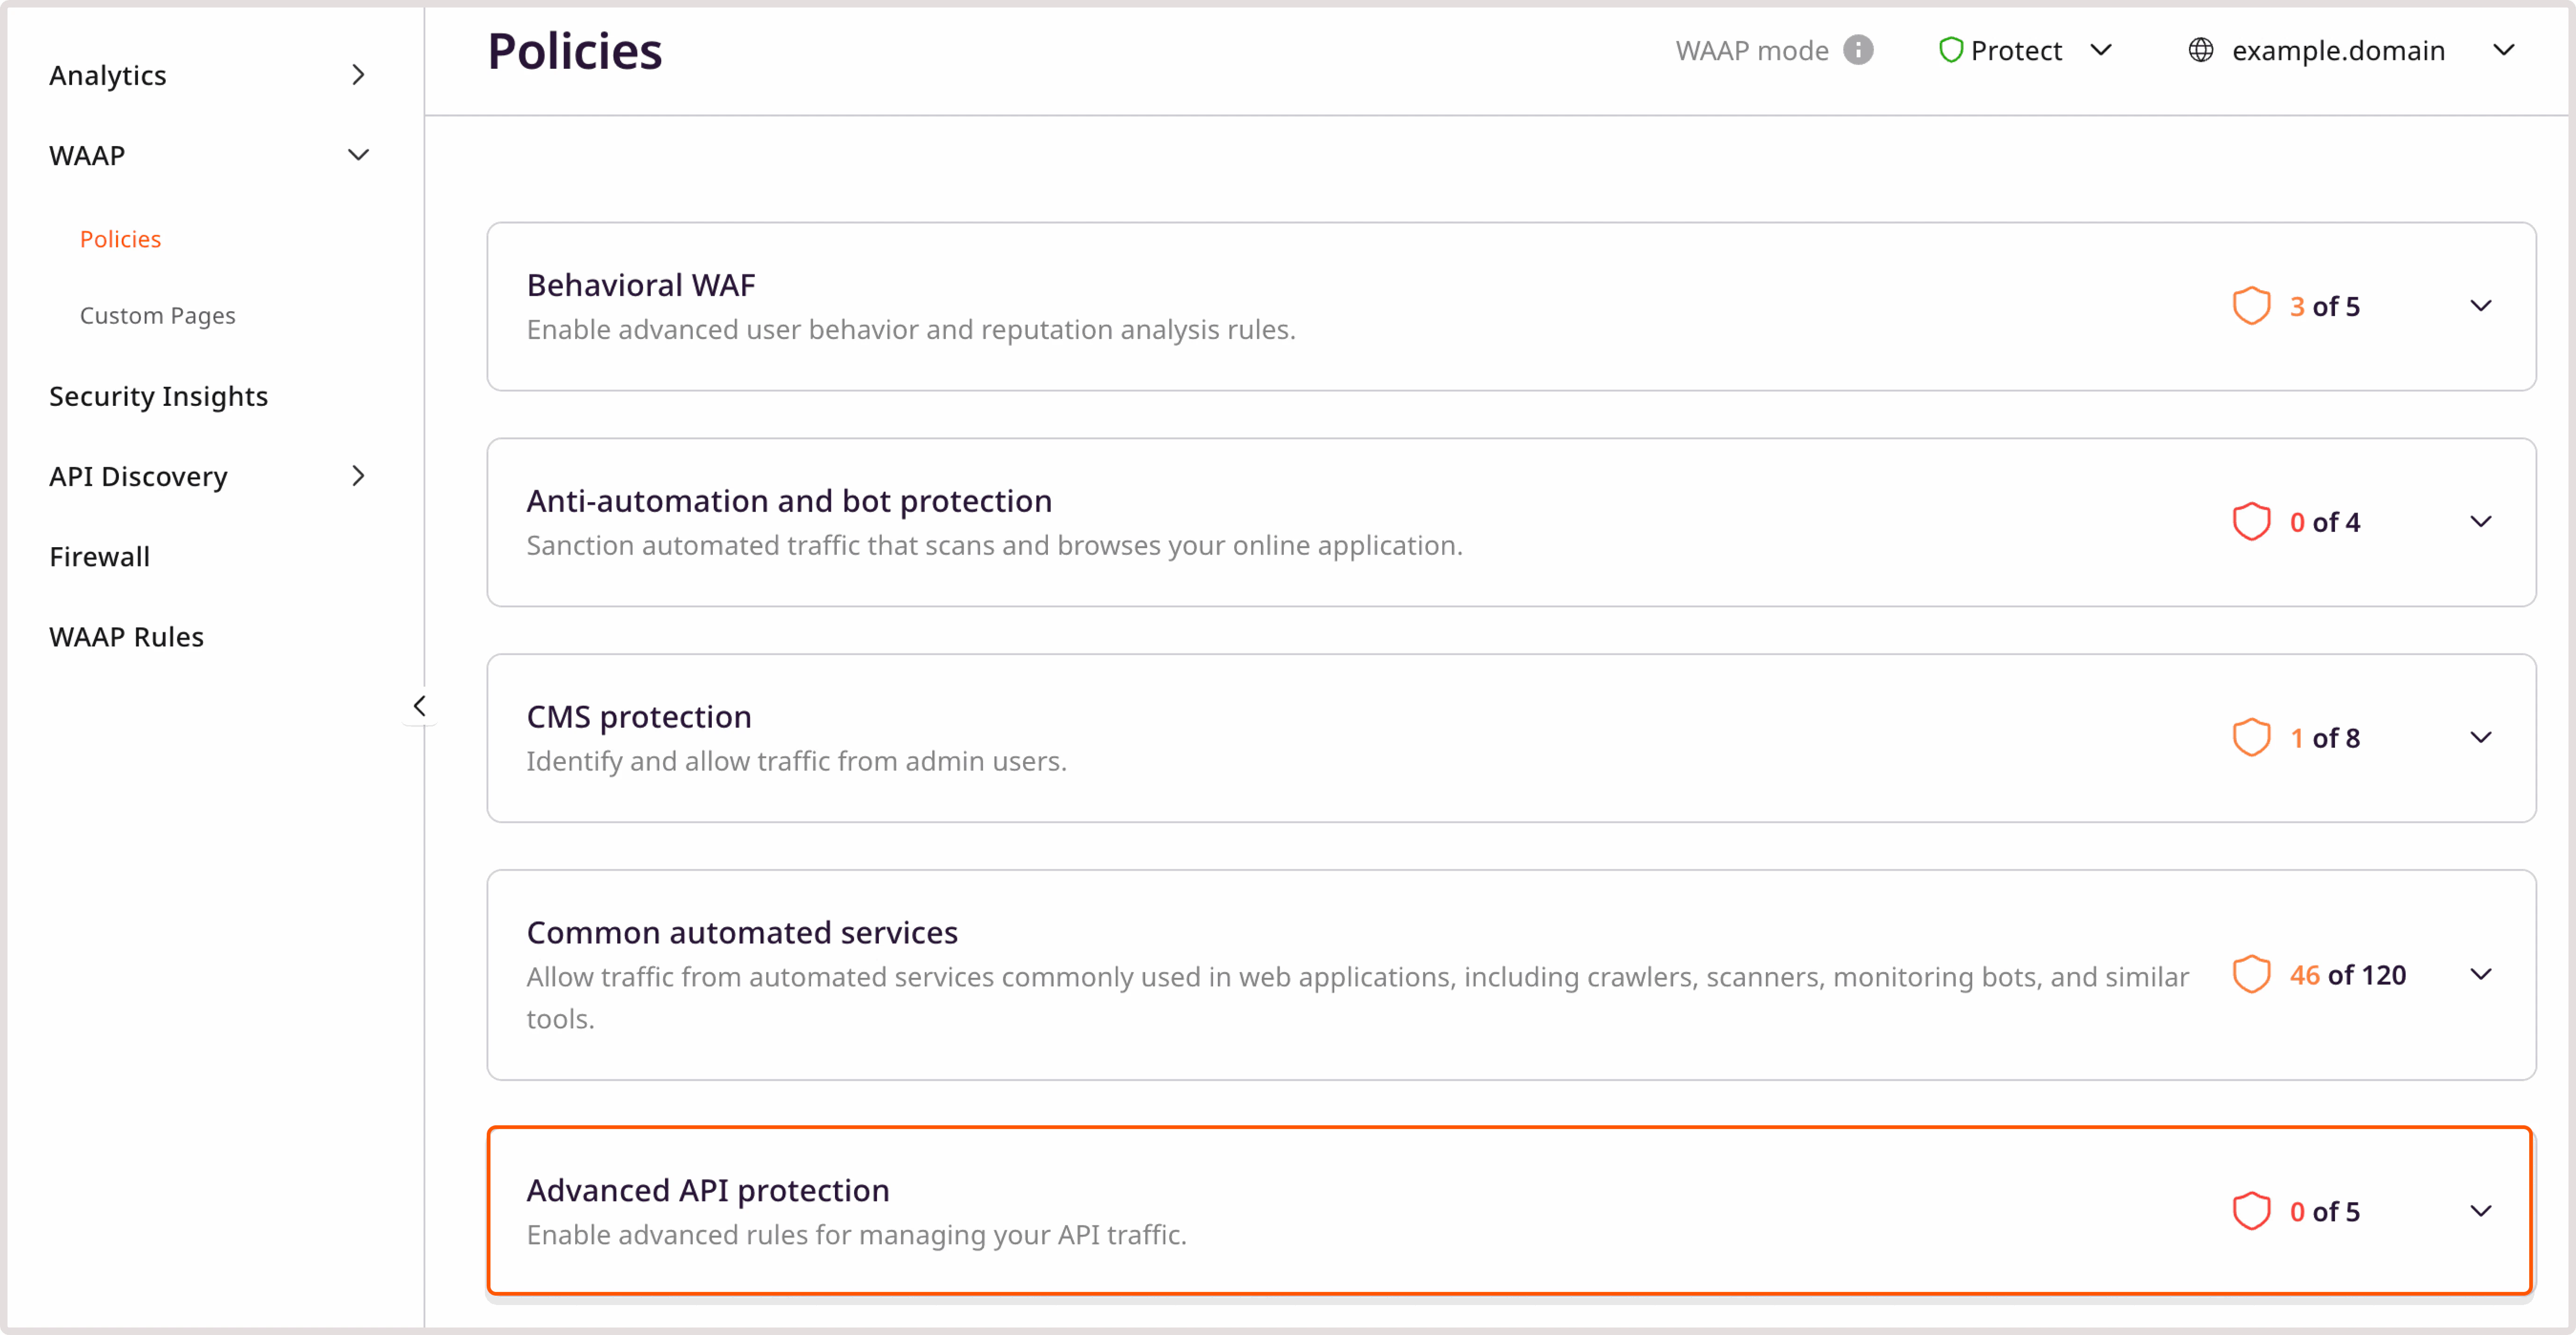 This is necessary to ensure that only users with admin and privileged roles will be able to interact with those API endpoints after logging in.
**Info**
Admin users can access any endpoint, so it's important to define users with admin roles.
After the policy is enabled, WAAP will block any requests that don't have the correct user tag.
This is necessary to ensure that only users with admin and privileged roles will be able to interact with those API endpoints after logging in.
**Info**
Admin users can access any endpoint, so it's important to define users with admin roles.
After the policy is enabled, WAAP will block any requests that don't have the correct user tag.